Pages

Showing posts with label microsoft. Show all posts

Friday, May 11, 2018

Office 365: Creating a Simple Flow (Workflow) in a SharePoint Online Document Library

I've not done a great deal of playing around with SharePoint Online in the past and so jumped at the chance during a recent rollout. One of the things I've always wanted to do is automatically group documents in a SharePoint document library based on the name of the file. To me this feature has always been one of the ones I've most wanted - the ability to name a word document (for example);

High-Level Design - Microsoft - Exchange - Andy Pellew - 20180510.doc

And have the SharePoint document library where I've saved it extract the Document Type, Vendor, Software, Author, and Date directly into the corresponding properties of the document in the SharePoint library (rather than getting the user to update it manually) would be fantastic. In SharePoint Online with the new "Flow" functionality, it looks like this was possible *without* having to resort to SharePoint designer (and the consequent "upgrade issues" use of that software always seems to raise).

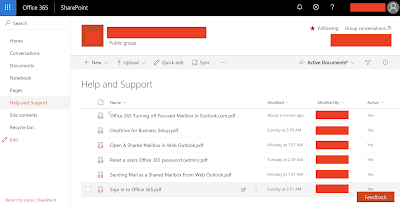
So to test this, I set up a new document library called "Help and Support". I added a column called "Active" as a simple Yes/No column (default "Yes"), and then created an "Active Documents" view to only show documents with "Active" set to "yes", and left the "All Documents" view to show everything. I created a new flow (clicking on "Flow" and then "Create a flow").

Once I was happy it was working I  uploaded a few documents;

SharePoint Online document library
You'll notice that all the documents in the view are PDF's. While it would be great to jump straight in and create all the columns I listed above it would be a little complicated for this post, so I'm going to make it simple; if it's a PDF active is "yes", if it's not then active is "no". Clear?

Let's see how it works. Clicking on "Flow" and then "See your flows" takes you to a new page;

My Flows
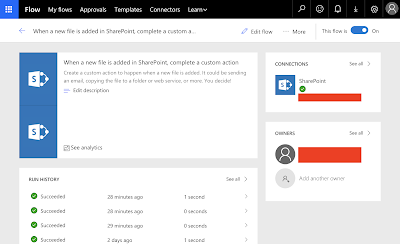
Clicking on the name of the flow "When a new file is added in SharePoint, complete a custom action", this then takes you to the details page;

My Flows > Flow Details
As you can see I haven't changed the description from the default (terrible practice, if it were staying then I would update it!).

Clicking "Edit flow" at the top shows the flow;

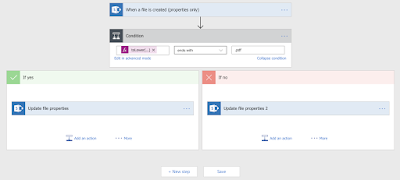
Flow details
As you can see this is an effortless flow. Basically, it's just a simple condition (does it end in pdf), followed by setting the property depending on the result (yes or no)*.

Starting at the top; the flow fires every time a file is created.

The condition was a relatively simple "end with .pdf" however I wanted to add a small amount of complexity here by converting the name of the file into lowercase so that PDF, Pdf, pdf, etc. are all treated the same. This made things a bit more complicated as there didn't seem to be a way to use the simple editor to do this and I was forced to click "Edit in advanced mode". The code I added was this;

@endswith(toLower(triggerBody()?['{FilenameWithExtension}']), '.pdf')

From the simple dialogue I started with this;

@endswith(triggerBody()?['{FilenameWithExtension}'], '.pdf')

The help showed that toLower was a function so when I dropped that in it worked the first time - I was actually very impressed!

Next was updating the file's properties based on the result. Here everything was very much "select from a list"; picking SharePoint, picking "Update file properties", then the SharePoint site, and document library.

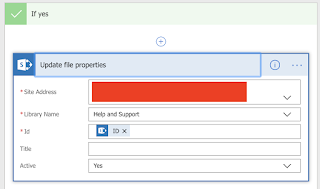
The one little bump in what was looking like a very intuitive process (the Active field had already appeared once I picked the library name) was the mandatory field Id;

Update file properties dialogue
As you can see it's currently set to the ID of the SharePoint item. It became clear that it should be this on entering the field and help popped up with ID as the only option, but until I'd actually entered and the help had appeared I literally had no idea what this was going to require!

I repeated the process with "if no", setting Active to "no".

Testing was quick and relatively easy - I clicked the "Test" icon and then uploaded a file.

And that was it.

*- Yes, I know, you could just do this in a simple step by doing everything in one go (setting the property based on the filename), but that's not really in the spirit of either or this example or how to do workflows in general!

Thursday, March 27, 2014

Creating Embedded Email Links Within Office Documents (Word, Powerpoint, Excel, etc)

We have a new requirement from our users. Basically what they want to do is send a document out to a number of people, have them read it, and then (on the final page) click on a link that will automatically generate an email to a set email address within the company basically saying "I have read and understood this document".

It's actually a pretty simple requirement but something I think is worth documenting just in case it comes up again.

In order to go through this step-by-step I'm going to use Microsoft Word, although you could (in theory) use any Office application.

Let's start with something simple. Open Word;

Microsoft Word: Blank Canvas!
This is basically just a blank word document into which we're going to add the following text;

Here's a simple link;
www.google.co.uk 
Here's a few email tests; 
apellew@gmail.com (blank)
apellew@gmail.com (with a subject)
apellew@gmail.com (with a subject and a body)
As you can see nothing complicated. Paste this into Word (as plain text, just so you don't get any web formatting) and press Ctrl-K and the "Insert hyperlink" dialog box will appear;

Building A Simple URL Link In Word
As you can see the entry box at the top is displaying the text that will appear in the document, while at the bottom you can see the address the link will take you to.

NOTE: If you have any %20 strings (or similar) in the "Address" field then this is because you selected a white space either before or after the URL address. Just click cancel, change the highlighting to not include the spaces, and then try again.

When you return to the document you'll now see the Google address highlighted in blue;
Highlighted Links In Word
Next select the "apellew@gmail.com (blank)" line and again press Ctrl-K. Now when the "Insert Hyperlink" dialog appears click on the "Email address" button at the bottom left;

Inserting an Email Address as a Hyperlink
Here you can enter the details of what you want to display and where you want the email address to go. Just enter "apellew@gmail.com (blank)" in the box at the top, and the email address "apellew@gmail.com" in the email address field. Then click "OK".

Repeat the above process for the second link (with a subject) and enter the subject "THIS IS A TEST".

The final option, an email link with a subject AND a body, is a little more complicated. Word doesn't seem to offer a way of doing this through the "Email address" interface so you'll need to craft the link in direct HTML. The easiest way to do this is to use the same "Existing file or web page" we used to create the first link to Google;

Building a Custom Address To Trigger an Email
Here's the text you need to enter into the "Address" field;

mailto:apellew@gmail.com?subject=TEST WITH A BODY&body=BODY TEXT

This, when clicked on, will create a email with the subject "TEST WITH A BODY" and the email body text of "BODY TEXT". Like this in Outlook;

Email With Subject & Body in Outlook
When you return to your document this will now have all the links highlighted and ready to click. If you export the document to a PDF the links will be maintained.

Tuesday, March 20, 2012

SQL Server: Installing Microsoft SQL Server 2012 On a Development Windows 2008r2 (SP1) System

This is a simple step-by-step guide to installing Microsoft's newest version of SQL Server with Reporting Services in stand-alone mode (the alternative is SharePoint Integrated, I'll deal with all the steps necessary to do that installation separately in a few days/weeks time).

I'm using the developer edition as downloaded from Microsoft MSDN, the ISO name is;

en_sql_server_2012_developer_edition_x86_x64_dvd_813280.iso

I've highlighted the build version. If past experience is anything to go by later releases will follow pretty-much the same installation pattern.

The first step is to install your Windows 2008R2 box and get it fully upgraded to the latest patch levels (SP1). Then you can run the setup.exe on the installation DVD;
SQL Server 2012: Installation Centre

Select "Installation" from the list of options on the left;
SQL Server 2012: Installation Options

Select "New SQL Server stand-alone installation ..." which is the top option on the right. After a few seconds wait (but I guess that probably depends on the speed and power of your system!) the following dialog appears;
SQL Server 2012: Setup Support Rules
The installation program has checked your system and, on the system I'm using, found nothing that prevents the installation from proceeding. If you are interested in seeing the "Detailed Report" I've updated it to Google Docs here (with a slight bit of editing to remove machine names).

Once you've got a good set of passes click "OK". A "please wait" dialog will appear and after a few seconds the next dialog;
SQL Server 2012: Product Key
You now need to enter your Product Key. If you are using the MSDN edition then it will be pre-populated, if you don't have one when you can just select one of the "Free" editions. Once you've entered the details click "Next";
SQL Server 2012: License Terms
No installation process would be complete without a 20-page Licensing Agreement and this one is no different. After you've read the entire document (you do do that right? *cough*) click on the "I accept the license terms". I also select the "Send feature usage data to Microsoft" and if you don't you'll only have yourself to blame when the features I use and tell them about are prioritised for improvement and the features you use but keep secret about aren't ... ;-)

Click "Next";
SQL Server: Install Setup Files
This dialog will only appear for a few seconds, as soon as the installation files have been successfully installed you are presented with the next dialog;
SQL Server: Setup Support Rules
Again I've made the Detailed Report for this check available via Google Docs here. As you'll see there is one Warning related to the "Windows Firewall", I'm going to ignore this and just move on.

Click "Next";
SQL Server: Setup Role
The default option, "SQL Server Feature Installation" is the one I'm after so I'll just click "Next";
SQL Server: Feature Selection
And this is the part where things start to get complicated. What exactly do you want your SQL Server to be doing? I'm going to install pretty much everything except the SharePoint integrated features (the first two shared features; Reporting Services - SharePoint, and Reporting Services Add-in for SharePoint Products). Clearly I'm building a development box so it's usually better to have too much rather than too little so I can use it for many different purposes.

Clearly if you're building a test (or production) machine you need to be a lot more careful about what you select on this page. As you select features configuration pages appear on the left to allow you to configure them during the installation.

Once you're done click "Next";
SQL Server: Installation Rules
So we now have another check, the third, to make sure the system is capable of running the options I've selected. And now it "Failed" as "Microsoft .NET Framework 3.5 Service Pack 1 is required". The instructions for enabling this feature I have also blogged about, click here. When I did this no-reboot was required.

After you've enabled the feature click on "Re-run" in the dialog;
SQL Server: Installation Rules (Attempt 2)
As you can see the check that had previously failed has now passed. The Detailed log is available (via Google Docs) here.

Click "Next";
SQL Server: Instance Configuration
There isn't anything here I need to change so just click "Next". There will be a brief pause while the installation program checks to see if sufficient disk space exists to install the options you have selected. After a few seconds a report will be displayed;
SQL Server: Disk Space Requirements
Click "Next";
SQL Server: Server Configuration
It's pretty unlikely that you'll want to change anything here (all these are services you can always change later). The one thing you might want to check if you are deploying to non-English customers is that the correct options are selected under the "Collation" tab - this is especially true if your system will be used to store multi-byte data such as Chinese, Japanese, Korean, etc. characters.

Click "Next" when you're done;
SQL Server: Database Engine Configuration
I always use "Windows authentication" and (as it's a development machine which will spend 90% of it's time off!) I usually add in a few AD groups representing the entire company (we are an IT Service company) on the basis that I never know who I might want to share it with. This is your chance to secure the system either as tightly or loosely as you wish.

Click "Next";
SQL Server: Analysis Services Configuration
And the same again really. You need to enter the users who will have access to the Analysis Services. Once you're happy with this click "Next";
SQL Server: Reporting Services Configuration
The default option, "Install and Configure", is the option I'm interested in so just click "Next";
SQL Server: Distributed Replay Controller
Whilst appearing to be exactly the same as other "Pick the users" dialog box this one is subtly (invisibly!) different; you cannot select groups. If you try when you click "Next" you get an error;

The specified account 'XX\YYYY' for setting 'CTLRUSERS' is a group account. You can only use a user account.

Add in the users for this feature and click "Next";
SQL Server: Distributed Replay Chat
Enter the name of your controller (or leave blank) and then click "Next";
SQL Server: Error Reporting
I always check this check box (to send error reports to Microsoft) so that errors I encountered will hopefully be dealt with in future releases! Click "Next" when you're done and another round of checks will be executed and after a few seconds you will be presented with a report;
SQL Server: Installation Configuration Rules
Again I have uploaded the detailed report to Google Docs here. Click "Next";
SQL Server: Ready To Install
Click "Install" to begin the install process. The installation itself on the development system I was using took around 25/30 minutes. After the install is complete you will see the following dialog;
SQL Server: Computer Restart Required
Click "OK" and under this is the final installation report;
SQL Server: Complete (Install Report)
I've attached the (edited) log file generated by the installation here.

A restart is required, after the restart running Internet Explorer and pointing to the the SQL Server Reporting Services URL will (after logging in) take you to the standard webpage.

Windows 2008R2: Installing .NET Framework (Enabling the Feature)

2008R2 includes the .NET Framework as a feature that needs to be turned on when required. Numerous installation programs (for example SQL Server 2012) require it and will mostly just error and tell you to turn the feature on.

The blog post is intended as a step-by-step guide to switching the feature on.

Go to the start menu and type "Feature" into the search box, choose the option "Turn Windows Features on or off". The Server Manager will then be displayed;
Windows 2008r2: Server Manager
Click on "Features" in the tree-view on the left;
Windows 2008r2: Features
If you already have any features installed they will be listed here. Click on "Add Features" on the right;
Windows 2008r2: Select Features Dialog
Expand the top node in the list (.NEW Framework 3.5.1 Features) and select the first item ".NET Framework 3.5.1). Click "Next";
Windows 2008r2: Confirm Installation Selections
Click "Install", the next dialog actually shows the installation process which should take about 30 seconds (depending on how powerful your system is!) then you will see the following;
Windows 2008r2: Installation Results
Presuming you have "Installation succeeded" in the dialog click on "Close" to complete the process.

Tuesday, March 6, 2012

Sharing your Microsoft Outlook 2007 Calendar Within Your Organisation

This is something quite a few people want to do every now and then, it tends to make booking meeting for a large number of people a lot easier if you can see the couple of people who can't make it have, for example, just block-booked the time to work at their desks and could be persuaded to move it!

Open Microsoft Outlook and click on "Calendar";

Calendars in Microsoft Outlook 2007
Now right-click your Calendar under "My Calendars" on the left and select "Share Calendar" from the list which appears;
Microsoft Outlook 2007 "Sharing Invitation" Dialog
Now you just need to enter the individuals (or distribution list) that you want to Share your Calendar with in the "To" box and click "Send".

They will then receive an email along the lines of;
Microsoft Outlook "Sharing Invitation" Email Notification
The user receiving the email just had to click "Open" and your Calendar will be visible.

Friday, February 3, 2012

Configuring GMail Access (with Push Notification) on an iPhone/iPad/iPod

The first thing you're probably thinking is "why not just use the standard Gmail account type?" and it's a perfectly valid question. I recommend using exchange because it gives you Push Email - this means when you get email it "instantly" appears on your device rather than your device checking for email at regular intervals (called Polling Email). Depending on your volume of emails having Push Email could save you considerable amounts of battery power (and time).

To enable Gmail with Push Email on an iPhone follow these steps.

Open the "Settings" application go to "Mail, Contacts, Calendars" and click "Add account...";
iPad: "Add Account" Under Settings
As you can see you have a list of options of which the one you're probably using the most at the moment is Gmail. Click on the top one, "Microsoft Exchange";
iPad: Add An Exchange Account
Enter your details here;
iPad: Add An Exchange Account (completed)
Click on the blue "Next" button at the top right of the entry dialog. The will now be a few seconds pause which an attempt is made to automatically identify the server you're trying to connect to. Unfortunately this doesn't seem to work so after a few seconds you are presented with the same information again this time with a "Server" entry box;
iPad: Add an Exchange Account With Server
Enter the server "m.google.com" and then click "Next" again.

Your account will now be verified by Google and providing you have entered everything correctly you will then be presented with the option what to sync with your device;
iPad: Select Items To Sync
You can select any/all of the options (or even none).

When you're done click "Save" at the top right and you'll now have Push Email on your device.

Wednesday, November 23, 2011

Refreshing AppV Application List


Sometimes new/ updated software is deployed during a business day and you want to have access immediately without rebooting. This purpose of this blog post is to show end-users the simple steps needed to refresh their applications.

The instructions given in this blog post are aimed at end-users.

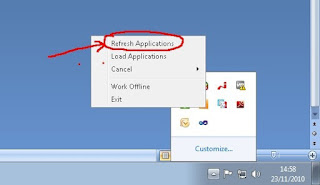
Locate the "Show Hidden Icons" button at the bottom right of your task bar;

Left-click the icon to show all the "hidden" icons.

Next locate the "Microsoft Application Virtualization Desktop Client" icon, this is typically box-like and yellow;


Right-click this icon;


Select "Refresh Applications".

The refresh will typically take a few seconds but any new or updated applications will then appear under your start menu.