Pages

Showing posts with label active directory. Show all posts

Friday, April 12, 2013

MobileIron: Problems Deploying iPad Applications To Active Directory Groups

Background: We have multiple AD domains but we configure and deploy the iPad from a single domain. Let's call it DM001. In Domain DM001 we don't have any end-users, they are in other domains each specific to the country of their users - for example UK001 for UK users, US001 for US users, etc.

Mobile iron is connected to the DM001 domain into which we have created a Group in Active Directory called "MobileIron_SW_Easypush". This group has a scope of "Domain local" and a Group type of "Security".

Into this group we have placed a group from each of the other domains, for example UK001\MobileIron_UK001_SW_EasyPush from UK users, US001\MobileIron_US001_SW_EasyPush for US users, etc.

This allows local IT groups in each Country to manage a local group in their AD Domain to add/remove their users rather than everything having to be done centrally (or with other people able to change AD groups in the admin domain).

The Problem: Users in all-but-one Country were picking up the software - no problem - while users in Switzerland weren't seeing this specific application in the Apps@Work folder but were able to download other applications they had been assigned permission to in other groups.

The problem is a little complicated by replication delays between the AD servers - but after waiting a few hours this could be ruled out.

The problem was eventually traced to this;

Active Directory: Problem Group Properties
AD groups which had a group scope of "Universal" were working, those with a scope of anything else were not.

Once the correct Group Scope was selected (and following an appropriate wait for replication) the problem was fixed.

This took a few hours of effort to work out, hopefully it will same someone else some time!

Wednesday, January 23, 2013

Installing Remote Server Administration (Active Directory) Tools in Windows 8

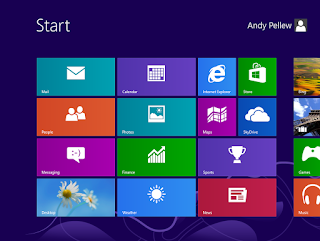
Windows 8: Start Screen
Following this process will install the "Active Directory Users and Computers" utility on your start menu (amongst other things).

The download link to the Microsoft page for the software you require is;

http://www.microsoft.com/en-us/download/details.aspx?id=28972 (the download is about 100MB)

Once you've opened the page you need to determine whether you're running 32-bit or 64-bit windows - I've written a separate post on this here.

Once you've downloaded the software install it;

Windows 8: Windows Update Dialog
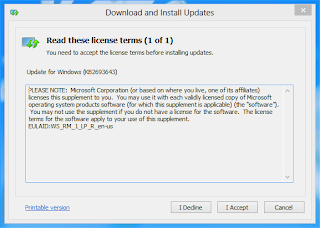
You'll then be presented with the standard EULA;

Windows 8: EULA Details
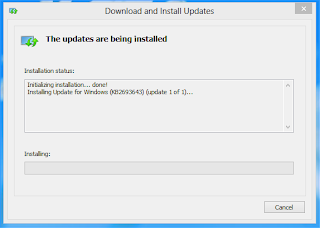
Click "I Accept" and the software will install;

Windows 8: Installation Progress
It's a 100MB installation so will take a bit of time, when it's done you'll see;

Windows 8: RSAT Installation Complete
Now one thing that is a definite improvement over the previous version is that now that you've installed the software it's immediately available - under Vista and Windows 7 you used to have to "turn it on" after you've installed it.

To find the installed applications return to the Start Page and scroll to the right;

Windows 8: RSAT Installation Blocks
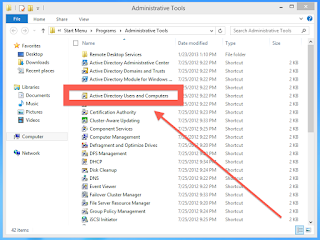
You'll see two new blocks, "Administrative Tools" and "Server Manager". The new Active Directory tools are under the "Administrative Tools" icon. Click on it, you'll be taken to the desktop;

Windows 8: Active Directory Users and Computers
And you're done.

Tuesday, August 21, 2012

Installing Active Directory Tools Under Windows 8

UPDATE: Full instructions for the installation can be found HERE (below was written for the Release Candidate).

-- -- -- -- -- -- -- -- -- -- -- -- -- -- -- -- -- --

With Windows 8 now released (via MSDN anyway) I thought it was time to update my blog post on installing Active Directory Tools (primarily "Users and Computers") on the new operating system.

I have to admit I gave this a bit of a go when Windows 8 Release Preview was released but beyond my personal interest didn't see any point in sharing it.

Sadly while Windows 8 Enterprise is now available (see here) Microsoft has yet to update it's version of the Remote Server Tools for the final release of the OS - the existing version of the tools (Remote Server Administration Tools for Windows 8 Release Preview) available via the URL below;

http://www.microsoft.com/en-us/download/details.aspx?id=28972

Does not install on Windows 8 Enterprise (I've tested the 64-bit version only). It just crashes a few seconds in - which makes sense if it is tailored to only work on the Release Preview.

Hopefully over the next few days searching for "Remote Server Administration Tools for Windows 8" will yield something other than the following results;


As soon as it does I'll update this post.

Thursday, February 2, 2012

Oracle PL/SQL: Using DBMS_LDAP To Query Active Directory

It's always useful to be able to retrieve details from Active Directory when working within an Oracle Database (I'll do a separate post later on how we use LDAP records to update our employee email addresses stored in Oracle).

Oracle have created a package called DBMS_LDAP, I have to say when I first found it I thought it was new but it has apparently existed in one form or another since Oracle 9i. It is fairly self explanatory to use, the main (useful) function is SEARCH_S which does the querying. The function takes the following parameters;
SYS.DBMS_LDAP.SEARCH_S Parameter List
As you can see calling this isn't going to be simple based on the complexity of the parameters (RAW, TABLE OF ...) but actually the DBMS_LDAP package has a number of helpful definitions that mean it's not quite so daunting as it may initially appear so here is a simple example;

DECLARE
  v_SearchUsername         VARCHAR2(40) := '@@';
  v_LDAPSession            DBMS_LDAP.SESSION;
  v_LDAPAttributeQueryList DBMS_LDAP.STRING_COLLECTION;
  v_LDAPQueryResults       DBMS_LDAP.MESSAGE;
  v_BerElement             DBMS_LDAP.BER_ELEMENT;
 
  v_FunctionReturnValue    PLS_INTEGER;
BEGIN
  :Result := '';
  v_LDAPSession := DBMS_LDAP.INIT('@LDAP server@', '@port@');
  v_FunctionReturnValue := DBMS_LDAP.SIMPLE_BIND_S(v_LDAPSession,
                                                   '@domain@\@user@',
                                                   '@password@');
  v_LDAPAttributeQueryList(1) := 'mail';
  v_FunctionReturnValue := DBMS_LDAP.SEARCH_S(

    ld       => v_LDAPSession,
    base     => '@base location@', -- "DC=xx,DC=yy=DC=zz"
    scope    => DBMS_LDAP.SCOPE_SUBTREE,
    filter   => 'samaccountname=' || v_SearchUsername,
    attrs    => v_LDAPAttributeQueryList,
    attronly => 0,
    res      => v_LDAPQueryResults);
  v_FunctionReturnValue := DBMS_LDAP.COUNT_ENTRIES(v_LDAPSession,
                                                   v_LDAPQueryResults);
  IF DBMS_LDAP.FIRST_ENTRY(v_LDAPSession, v_LDAPQueryResults) IS NOT NULL THEN
    :Result := DBMS_LDAP.GET_VALUES(

                 v_LDAPSession,
                 DBMS_LDAP.FIRST_ENTRY(v_LDAPSession, v_LDAPQueryResults),
                 DBMS_LDAP.FIRST_ATTRIBUTE(

                   v_LDAPSession,
                   DBMS_LDAP.FIRST_ENTRY(

                     v_LDAPSession,
                     v_LDAPQueryResults),
                   v_BerElement)) (0);
  END IF;
  v_FunctionReturnValue := DBMS_LDAP.UNBIND_S(v_LDAPSession);
END;


You need to do a little updating in order to make this work for your configuration (entering the server, a active directory user account with permission to do the query, your base location, etc) but on our system this runs in a tiny fraction of a second.

NOTE: This patch of code is only returning the first record returned. You will encounter problems if the user name exists in different domains, but that issue hasn't arisen for us and I guess most companies will probably be ok.

The v_berElement is required by the FIRST_ENTRY call in order to allow you to iterate through the results but as we're just interested in the first record returned it is declared, used, but never referenced again in the code above.

Final comment, if you are running 11g you are likely to get;

"ORA-24247: network access denied by access control list (ACL)"

When you attempt to run the command (unless your user has already been granted LDAP access). You need to update the access control list granting access to the connected user. The solution is readily available on Google (but I might create a post over the next few days as I need to do it myself!).

Monday, July 11, 2011

Installing Active Directory Tools Under Windows Vista (SP2)

This blog post is a step-by-step guide to installing the Active Directory Tools (i.e. Active Directory Users and Computers) on a Windows Vista machine. It has been tested on Windows Vista Enterprise (32-bit, Service Pack 2) but will probably work with all non-home versions.

First of all you need to download the software from Microsoft. If you type "windows vista remote server administration tools" into Google one of the results it returns will be titled "Microsoft Remote Server Administration Tools for Windows Vista", click on this link. Alternatively a direct link is available here;


You will need to have validated your version of window in order to download/ install it.

NOTE: If you are running the 64-bit version of Windows Vista then this is not the right link for you. You can either go to the directly link;


Or type "Microsoft Remote Server Administration Tools for Windows Vista for x64-based Systems" into Google for the correct link.

If you're unsure of which version you're running then go to the start button, right-click "Computer" and then select "Properties". You'll see something like this;
 
Look at the "System type:" value and you'll see what version of Windows you're running.

Once you've got the file install it (it's a standard KB update file, you will need Administrator rights on the machine you are using).
 
After it's been successfully installed go to the Start Menu > Control Panel and select "Programs and Features", then select the "Turn Windowsfeatures on and off" under Tasks on the left;

The "Windows Features" dialog box will be displayed, scroll down to "Role Administration Tools" (under "Remote Server Administration Tools") and select the the following items;

Click "OK" to make the changes.
 
In order to make finding these under the Start Menu a little easier right-click the Start Button and select "Properties";

Select "Customize ..." and then scroll down the list until you see "System administrative tools" and choose where you want the tools to display;

Under the Start Menu you will now see an "Administrative Tools" option, under this you'll see the new AD Tools you've just installed.
 
NOTE: Sometimes a reboot is required to pick up these changes!

Tuesday, January 11, 2011

Installing Active Directory Tools Under Windows 7

This blog post is a step-by-step guide to installing the Active Directory Tools (i.e. Active Directory Users and Computers) on a Windows 7 machine. It has been tested on Windows 7 Enterprise but will probably work with Professional or Ultimate as well - Home users it will not work (but then why are you wanting to administer AD from a home machine??!!)

First of all you need to download the software from Microsoft. In the Microsoft Download Centre these are called "Remote Server Administration Tools for Windows 7" a direct link to the download page is given below;

http://www.microsoft.com/downloads/details.aspx?displaylang=en&FamilyID=7d2f6ad7-656b-4313-a005-4e344e43997d

If you scroll down to the "Files in This Download" section of the page you'll see two files. Depending on whether or not you're running 32-bit or 64-bit Windows 7 you need to pick the correct file. If you're unsure of which version you're running then go to the start button, right-click "Computer" and then select "Properties". You'll see something like this;
System Information (64-bit/32-bit)
Look at the "System type:" value and you'll see what version of Windows you're running.

If you're running 32-bit then you need to download the file which starts "x86..." (currently this is "x86fre_GRMRSAT_MSU.msu" but it might change). For 64-bit users you need to download the file which begins "amd64..." (currently this is "amd64fre_GRMRSATX_MSU.msu") - this is true even if you're running a non-AMD 64-bit processor. The reason for this I'll leave Microsoft to explain ...

Once you've got the file install it (it's a standard KB update file).

After it's been successfully installed go to the Start Menu > Control Panel and select "Programs";
"Turn Windows Features on or off" under "Programs and Features"
The "Windows Features" dialog box will be displayed, scroll down to "Role Administration Tools" (under "Remote Server Administration Tools") and select the the following items;
"Windows Features" dialog
Click "OK" to make the changes.

In order to make finding these under the Start Menu a little easier right-click the Start Button and select "Properties";
Taskbar and Start Menu Properties
Select "Customize ..." and then scroll down the list until you see "System administrative tools" and choose where you want the tools to display;
Customize Start Menu
Under the Start Menu you will now see an "Administrative Tools" option, under this you'll see the new AD Tools;
Active Directory Start Menu Items
NOTE: Sometimes a reboot is required to pick up these changes!

Wednesday, November 26, 2008

Building an MSI to Deploy Fonts using wItem Installer (formerly Installer2Go)

This blog post gives you detailed instructions on how to build a simple MSI installer that will deploy fonts to Windows users. It is envisaged that this will be used in conjunction with Active Directory (Group Policy) to control the deployment.

Why Use an MSI?

The first thing to understand is that there are many ways of doing the deployment of fonts in Windows. Each machine you are seeking to deploy to has a "Fonts" directory under it's Windows installation folder. In a default Windows installation (XP, Vista, 7, or even 2003 Server) this installation folder is called C:\WINDOWS and the directory used for Fonts is C:\WINDOWS\Fonts.

It would be possible to write a script to copy the files into this directory, you could even run that script from a GPO, but using an MSI is much neater, creates a nice error trail if things go wrong (and they will in any large environment), and is much more controllable using Active Directory and Group Policy Objects (GPOs) for deployment. Unfortunately every company will have a few machines where the installation hasbeen done into a different directory (C:\WINNT for instance!), maybe even a couple where the installation is actually on the D: drive. Putting scripts in place to test all of this is a pain. Not just the writing of the script; it's the testing and proving that it works that consumes all the time.

In short; use an MSI. It really will save you time in the long run. And if you're going to use an MSI why not use one that's free? Hence my recommendation for wItem Installer (which was formerly called Installer2Go).

Getting The Software
Of course the obvious prerequisite is going to be obtaining the MSI-building software. Fairly simple; just visit this URL;

http://www.witemsoft.com/togo/ (wItem Software)

The software is also available from other sources such as CNET if that link doesn't work.

Make sure you read the software licensing information when prompted by the installation!

The software is provided by wItem Software as "Freeware".

Using The Software
Once you've got the software installed start it up;

Installer2Go Version 4.2 (Freeware Version)
For size reasons I've colour-compressed the images, but hopefully they will still be good enough to give you some idea of the process.

As you can see I'm using version 4.2.5 of the software, as the MSI standard has changed very little (especially when all you need to do is install fonts!) I would expect future versions to be pretty much the same.

Step 1: Click on the "New" icon at the top left. You'll now see a whole heap of tabs;
New Project Multi-Tabbed Dialog
You should now fill in all the fields on the General Info tab. You don't have to, but it's tidy and in IT we like tidy. Just show anyone in IT your windows desktop with it's gazillion icons and watch them flinch ... As the installer is going to be for internal use only you don't have to spend quite as much time on this bit ... Oh. You didn't. You've already scrolled past this bit to;

Step 2: Click on the "Files" tab and expand the "Windows" folder;
"File" Tab
Select "Fonts" and then drag-and-drop the fonts you wish to install into this Window (they will usually have the extension .TTF). Once you've done that you're ready for the next step.

Step 3: Click the "Create Setup" (right-most) tab enter an Output Folder and a Filename and make sure that "Create Self-Extracting Executable that will contain your MSI file" is not checked.

Next click "Build" and your MSI will magically appear in your installation directory.

NOTE: At the end of an attended installation a dialog will be displayed promoting SDS Software. When you're doing an unattended installation no dialog is displayed and if you're deploying via Group Policy then it's the unattended installation that you'll be interested in!