Pages

Showing posts with label textfile-search-and-replace. Show all posts

Thursday, October 6, 2011

SSRS: Using TS&R To Fix Report Builder 3 Issue with SharePoint Integrated Mode

This blog post describes a remedy for the issue which prevents Report Builder 3 from working with a Report in SharePoint integrated mode that has been migrated to SharePoint from a different server.

At the moment Microsoft has no solution for this issue (other that "don't use Report Builder 3).

NOTE: The exact problem that this blog post is showing you how to fix is detailed in another post here.

Background/ Setup
The first step in fixing this problem is gathering all the information. Each of your Reports will have embedded into it both the previous server URL and the location it was using on that server for it's Data Set. In this example we will assume the following;

The original server used the structure;
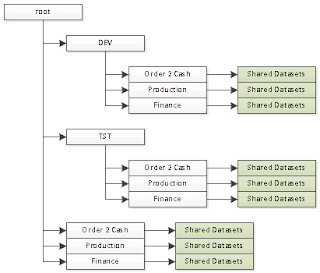
SSRS: Non-Sharepoint Integrated Mode Folder Structure
With the root folder being treated as "live" and the DEV and TST folders being hidden. The only location for data sets is in the "Shared Datasets" folders (highlighted in green).

This gives us the following list of "possible" sources for Data sets;
  • /DEV/Order 2 Cash/Shared Datasets
  • /DEV/Production/Shared Datasets
  • /DEV/Finance/Shared Datasets
  • /TST/Order 2 Cash/Shared Datasets
  • /TST/Production/Shared Datasets
  • /TST/Finance/Shared Datasets
  • /Order 2 Cash/Shared Datasets
  • /Production/Shared Datasets
  • /Finance/Shared Datasets
Each of these will need to be mapped to the "new" folder on the SharePoint integrated mode server. For the purposes of this example (and to assume maximum change) I'm going to assume the structure of the new server is;

SharePoint Integrated Mode Structure


Assuming you're following Microsoft "guidance" (using properties rather than folders) it's quite possible you could end up with something like this.

One other difference between non-integrated mode and integrated mode is that the Data Sets now have .rsd as a suffix (which makes sense - but is annoying).

An the final difference is in the server name itself (well assuming you did a migration rather than an upgrade to the server!). In our example I'm going to assume the SharePoint server is called "ssrsintegrated" and the other server is called "ssrs".

And that's it - a complete list of all the changes we need to make.

Configuring The Application
The first step is to download and open the application (it's open-source and you can find the details of how to get hold of it on another blog post TS&R: Replacing Text in Multiple Files).

The Search Folder needs to be set to point to the SharePoint servers' published folder for the "Reports "document library;

\\ssrsintegrated\DavWWWRoot\Reports\

The File Extensions we are interested in need to be restricted to SSRS Reports;

|*.rdl|

The vertical lines either side will be added when you enter "*.rdl" into the entry box;

Next is the Replace Strings entry box. Copy/Paste the following lines;

/DEV/Finance/Shared Datasets/|/Data Sets/
/DEV/Production/Shared Datasets/|/Data Sets/
/DEV/Order 2 Cash/Shared Datasets/|/Data Sets/
/TST/Finance/Shared Datasets/|/Data Sets/
/TST/Production/Shared Datasets/|/Data Sets/
/TST/Order 2 Cash/Shared Datasets/|/Data Sets/
/Finance/Shared Datasets/|/Data Sets/
/Production/Shared Datasets/|/Data Sets/
/Order 2 Cash/Shared Datasets/|/Data Sets/
http://ssrs/ReportServer|http://ssrsintegrated
http://ssrs/reportserver|http://ssrsintegrated
|.rsd
.rsd.rsd|.rsd

NOTE: The first 9 lines are just mapping old data set directories to the new one, the next two lines map the old URL's to the new one (you'll need to add additional lines if your developers capitalisation is not consistent - thankfully ours just settled on two versions!), the next line adds the .rsd to the Data Set reference and the final line removes duplicates if it was already there!

Finally an Output Folder needs to be selected (i.e. C:\TEMP\Report Output\).

Click "Execute" and the changes will be made and updated files will be placed in the C:\TEMP\Report Output\ directory - reports which are not changed will not be included in the new directory (so you could repeatedly run this process as you migrate new reports and only change the new reports).

Summary
Not the easiest method I know but at least it works and if you have 2/300 files it's a lot quicker than manual updates. It's completely ludicrous that Microsoft haven't patched this problem - it does make "Report Builder 3" a completely useless product in some specific circumstances and "just use BIDS" is not really acceptable unless they're going to scrap Report Builder 3!

TS&R: Replacing Text in Multiple Files

This blog post (copied across from the original Knol) describes the "textfile-search-and-replace" windows application I've developed. It's far from complete but it is open-source so you download the source and change it yourselves if you want or just work with changes other people have made.

Please feel free to report any bugs or feature requests via the "code.google.com" link below.

NOTE: Check out other "textfile-search-and-replace" posts (clicking on the tag associated with this post) I've created (or will create) for worked examples.

Pre-requisites
There are only two requirements to run this application; a Windows OS and Microsoft .NET Framework Version 4. The .Net framework is a free download available from Microsoft which you can download from this URL;

http://www.microsoft.com/download/en/details.aspx?id=17851

Where do I get the program?
The project home page is below, it is hosted on Google Code;

http://code.google.com/p/textfile-search-and-replace/

The software is written using Visual Studio.Net (2010). It is a fairly simple windows application.

Click "Downloads" (second tab from the left, or just click here) and select the Download at the top of the list, this will always be the most recent version. This Knol was produced using "Version 0.01" of the software. Later versions may vary, but probably not by much.

A direct link to this download is available here.

You need to copy the file to somewhere on your local machine. It is not signed so the first time you run it you will see a dialog similar to;

Open File - Security Warning Dialog
Click "Run" (you might want to un-check the "Always ask before opening this file" check-box, otherwise it will keep asking you the same question every time you start the application).

NOTE: You should *always* be a little suspicious of applications downloaded from the Internet. The source is available so you can always check the code and build it yourself if in doubt.

Using The Application
When you first start the application you are presented with the following screen;

Text File Search and Replace V0.01 - Main Dialog
Wen you next start the application it will remember your saved settings so there are some settings you only need to enter once.

How It WorksIn order to use the application you need to specify four things;
  • Search Folder: This is the folder the application will look for files in. Search of sub-folders is not supported so you will need to make sure all the files you want to search are in a single folder OR you will need to do the search multiple times.
  • File Extensions: You need to enter the file extensions (.txt, .rtf, docx, etc) that you would like the application to read the contents of. You need to use the "|" character as a separator between multiple file extensions - for example if you want to search all .txt and .docx files you would need to enter .txt|.docx. File extensions are not case sensitive so .txt will give you .TXT, .txt, .Txt, etc.
  • Replace Strings: This large entry box needs to contain the strings you want to replace in the format Old|New (using the same separator as file extensions). The strings are processed from top to bottom so, for example if you had two lines the first with Old|New and the second with Oldish|Notsooldish then the second string would *never* be used as by the time the application checks for it any instances of "Oldish" would already have been replaced and become "Newish"
  • Output Folder: Rather than modifying your files in the search folder this application creates a copy of the file and works on that. These copies are stored in the "Output Folder" directory. Only files that have been modified by the search will be held there. Once the process has completed it's then up to you to make sure the changes are what you intended(!) and copy the new files back over the originals
Once you're ready click "Execute" the process will begin.