Pages

Showing posts with label sharepoint integrated-mode. Show all posts

Monday, February 20, 2012

SSRS: Changing US-format Date/Time Pickers (SharePoint Integrated Mode)

If you have, like us, configured your servers and clients for a non-US locale and then been surprised to see that when running SQL Server Reporting Services (SSRS) all the date/time pickers seem still, somehow, to be stuck in US Date/Time format the fix is actually incredibly easy.

Basically the issue is that SharePoint uses neither the Locale of the Server or the Locale of the User but instead uses the SharePoint culture to determine the format that the Date/Time pickers will use.

In order to fix the issue you need to be able to administer the site in order to update the Regional Settings.

Go to your SharePoint website;
"Site Actions" on a SharePoint site
Using the "Site Actions" drop down select "Site Settings";
Site Settings in SharePoint
Under the "Site Administration" section select "Regional settings";
Site Settings > Regional Settings in SharePoint
Change the locale (which should be saying "English (United States)") to the correct locale.

Date/Time pickers will now be in UK-format (or whatever format you have selected);
SSRS Date/Time Pickers Showing UK-format
NOTE: It's worth noting that if you set your users settings to a different region the settings on the Site seem to take precedence to your personal settings.

Wednesday, February 15, 2012

SSRS: Scheduling/Subscribing To An Existing Report

This is a fairly simple blog post with details of how to schedule an existing report so that it will run automatically and send you the report. The process below describes using Reporting Services 2008R2 running in Sharepoint Integrated mode - standalone more is similar but not identical.

It's worth noting that in order to schedule a report to run it's vitally important that the critical parameters for the report (i.e. reporting period) have default values which automatically roll forward as the months pass; this way you only need to schedule the report to run one rather than having the schedule the report to run in each period (if you get the distinction). Your Report Writer/ System Administrator will be able to help you if you need parameter default values changing.

The first step is to go to the report URL;
SSRS "Specify Parameter Values"-default Report Web page

At the top-left is an "Actions" menu, from this drop down select "Subscribe";
Subscription Properties Web Page
On this page you can select how the subscription should be delivered (i.e. email, windows file share, Sharepoint document library) and the frequency that the report should run on and the delivery preferences (i.e. Excel file, web archive, etc).

Generally most of these you will want to leave as default except the "Delivery Event";
Subscription Options: Delivery Event

As you can see you have in essence three options;
  • When a report snapshot is created: This option is only relevant if you are using reporting snapshots. If you aren't sure (or don't know what one is) then this isn't the option to pick. Usually snapshots will be managed by your system administrator
  • On a shared schedule: Your administrator can set-up "shared schedules" on the server which allow multiple reports to be scheduled within a window and, in the event of scheduled downtime for instance, that window to be moved around. By attaching your report to a shared schedule it puts the execution of your report in the hands of the system administrator - this makes it a log easier for the System Administrator but if your report *must* run at a set time then this is not the option to pick
  • On a custom schedule: You are most likely to choose this option, this gives you complete free reign on when your report executes and how often it executes
If you select "On a custom schedule" and then click "Configure" you will be presented with the following screen;
Subscription Options: Defining a Custom Schedule
Changing the frequency at the top allows you to adjust the schedule. If you need a more complex schedule (for example run every Tuesday and on the First of the month) then you will need to configure multiple subscriptions in order to handle your request - there is no limit to the number of subscriptions you can create so this shouldn't be a problem.

Once you've defined your schedule you now need to pick the parameters for your report;
Report Subscription Parameters
As a general rule unless there is a specific reason to not use "Use Report Default Value" then I'd recommend you stick with that.

When all your parameters have a value click "OK" at the bottom of the web page, you will then be presented with the "Manage Subscriptions" page for this report showing your new subscription;
Manage Subscriptions Page for Report
If you with to add other subscriptions (i.e. you have a complex schedule which needs them) then you can click "Add Subscription" otherwise click "Close".

NOTE: If you ever want to un-subscribe from a report find the report in the document library, hover over it for a few seconds until the drop down menu appears, and then select "Manage Subscriptions".


Friday, September 2, 2011

SSRS: Problems Linking To SharePoint Lists When Running in Sharepoint-Integrated Mode

This blog post documents a problem linking to List Items in SharePoint from a SSRS Report Running on a SharePoint integrated-mode server.

NOTE: There is currently no solution to this problem. However there is a quick and relatively painless work-around (see below)

Prerequisites;
  • SQL Server Reporting Services 2008R2 with SP1 server running in Integrated Mode (with SharePoint 2007)
  • A SharePoint website containing at least one list to use as a source for reporting
  • Report Builder 3.0 for creating/ testing the report
Duplicating The Issue
Create a new report (using the "Blank report" option in the Wizard);
Report Builder 3: New Report (using Wizard)

Click on the "Click to add title" box and enter the text TEST. Right-click the text box and select "Text Box Properties" and then go down to "Action" in the list on the left;
Report Builder 3: Text Box Properties
Select "Go to URL" and then click on the Expression (fx) elipse;
Report Builder 3: Expression Dialog
Enter the URL to directly link to an item in the list adding in the current value of ID from the report as the parameter. For the example list I'm using this is;

="http://xxx/Reports%20List/DispForm.aspx?ID=4"

This will mean when you click on the link it will take you directly to the corresponding item. Click "OK" twice to get back to the main report and then click "Run" on the ribbon;
Report Builder 3: Report Preview
Click on "TEST" and it will open the URL in Internet Explorer (for example My Tasks);
Internet Explorer: Working Link
The important point to note is the URL which is;
Internet Explorer URL Bar
http://xxx/Reports%20List/DispForm.aspx?ID=4

The "4" is the ID for the "My Tasks" item (shown above).

This shows the report is working correctly when run from within Report Builder.

Save the Report to the Integrated-Mode Reporting Services server and re-run it;
Test Reporting Running from SharePoint Server
I've highlighted the same item we clicked on previously, click on it again;
Incorrect Data Displayed
Different data. Incorrect data. If you check the URL it has become;
http://xxx/Reports%20List/DispForm.aspx?ID=4&ID=4[1]

You'll notice that the ID variable on the end of the URL has been duplicated. This is no-where in the code that causes the link not to work. If you add the URL we are building as a displayed field you will find that it is displayed correctly (with a single ID) - something in SSRS seems to be causing this duplication to be introduced in the renderer/viewer rather than in the code of the report.

Workaround
If, rather than building the URL as described above, you use the expression;

="javascript:void(window.open('http://xxx/Reports%20LIVE/Forms/EditForm.aspx?ID=" & CStr(Fields!ID.Value) & "', '_self'))"

This solves the problem by "hiding" the URL in the expression so it doesn't get incorrectly updated.

(Thanks to Klaus Sobel from Microsoft Support for providing me with this work-around!)

References
  1. The error seems very specific to SharePoint URL's. For example if you change the URL to "http://www.google.co.uk/?ID=" then the problem (duplication of parameters) does not appear. Equally if you were to remove the ?ID= then you don't get the problem. If you then add in the “?ID=” a bit at a time you get; Adding "?" gives http://xxx/Reports%20LIVE/Forms/EditForm.aspx?4. Adding "?ID" gives http://xxx/Reports%20LIVE/Forms/EditForm.aspx?ID4. Adding "?ID=" gives http://xxx/Reports%20LIVE/Forms/EditForm.aspx?ID=83&ID=4. This suggests some amount of parsing is going on somewhere, and the parsing is incorrect.

Thursday, September 1, 2011

SSRS: Using &ReportName In SharePoint Mode vs Native Mode

This blog highlights the different values (for the same report) returned in the two modes in which SSRS can be run; Integrated into a SharePoint Farm, and in Native (or stand-alone) Mode.

For the purposes of testing I am running Report Builder 3 against 2008R2 SP1 reporting servers. The version of SharePoint I'm using to integrate with is 2007 (with SP2). To browse the website I'm using Internet Explorer 9.

UPDATE (from Microsoft): The lowercasing behaviour (documented below) is a "known bug" (108596) which will be resolved in a "future release". Appending the ".rdl" extension is a feature of SharePoint and as such is "as intended" behaviour. Bugs are fixed based on the number of users affected so if you want it fixed you need to raise it with Microsoft.

Writing The Test Report
Let's start with a fairly simple report;
Report Builder 3: New Report (Using Wizard)
This report is basically the "Blank Report" as created by the wizard when you first start Report Builder 3 (without specifying a starting report).

Right-click on the "Click to add title" at the top of the screen;
Report Builder 3: Expression Dialog (using Globals!ReportName)
Choose "Globals!ReportName" as your expression (under the "Built-in Fields" category on the left). Click OK;
Report Builder 3: Showing &ReportName as Report Title
You'll see that the title of the report is now set to the Report Name. Click on "Run" (left on the ribbon);
Report Builder 3: Showing Report GUID

This is your reports GUID. As you haven't saved the report yet it doesn't have a formal name so the expression evaluates to the GUID.

Saving The Report To Reporting ServersSave the Report to a native (stand-alone) server using the name "ReportName Test Report" and click refresh;
Report Builder 3: Native-Mode Report Title
Save the Report to SharePoint-Integrated server using the same name and click refresh;
Report Builder 3: SharePoint Integrated-Mode Report Title
You notice that ".rdl" (the file extension) has been appended in SharePoint integrated mode.

Both of these tests were running the report in "Report Builder" - this is usually a pretty good indicator of how the report will look in live but it's important to test the report in a web browser as well.

Looking at the native mode report in Internet Explorer (I'm using IE9) gives you;
Native-Mode Report in IE9
Looking at the same report in SharePoint integrated mode;
SharePoint Integrated-Mode Report in IE9
Exactly what you'd expect. Now close Report Builder, open the native-mode report and then save it to the SharePoint server (adding a 1 suffix so we can tell it's different). Close down Report Builder (so we can be sure we're not carrying across any settings) and re-edit the "ReportName Test Report 1" file.

Preview the report in Report Builder;
Report Builder 3: Migrated Report
Exactly what we'd expect. Now view the report in IE;
Migrated Report in IE
The ReportName has now been converted to lowercase.

Result Summary for ReportName "ReportName Test Report";
Non-Integrated Mode

  • &ReportName remains "ReportName Test Report" in all circumstances
Integrated (SharePoint) Mode
  • &ReportName has ".rdl" added as a suffix in all circumstances
  • If the report has been migrated from Non-Integrated Mode @ReportName is converted to lowercase when viewing in a browser only (Report Builder is unaffected)

Friday, August 19, 2011

SSRS: Migrating Reports from One SharePoint Server To Another

Sounds easy? Problem free? Think again ...

This blog post is a step-by-step guide to copying a Report (consisting of a Report, one (or more) Shared Datasets, and a Data Source) from an existing Microsoft SharePoint 2007 document library into another document library on a different server (such as you might want to do when taking a production report into development for enhancement).

You can probably thing of at least three ways to do it off the top of your head;

1. Save each item into a file on your local disk and then upload them to the new server using the standard "Upload" button on the document library
2. Highlight each item in turn and under the menu choose "Send to" and then "Other Location" and specify the location of the document library on the new server
3. As 1, except "hack" the report file so that it works.

Way 3 works so you might want to jump straight to that bit if you're in a rush. I'll go through 1) and 2) and let you know why they don't work and explain some of the errors you'll encountered if you try them (and what probably got you to google for a solution anyway!)

0. Just Create the Data Source
It's much easier than trying to copy it - just create a new one.

1. Save and Upload
Locate your dataset on the existing server;

The dataset I'm going to be working with is called "Parameter Default Values" and is highlighted in the image above.

Bring up the menu for the affected dataset and then choose "Send To" and then "Download a Copy". Then you should be prompted to save the downloaded file to local storage.

Next locate the dataset library on your new server;

Choose the "Upload" button (as highlighted above) and then "Upload Document";

Select the file you just saved the data set to and click "OK".

Click "OK".

The report file has now loaded, apparently correctly, into the Document Library. Unfortunately it's not actually worked and is in an unusable state. To show this highlight the new data set and choose "Manage Datasource" from the popup menu;


The text of the error is;

The item XXX cannot be found ---> Microsoft.ReportingServices.Diagnostics.Utilities.ItemNotFoundException: The Item XXX cannot be found

You'll notice that the URL's for the error message feature the OLD server. The file has been migrated with hard-coded links and unfortunately the new server does not allow you to update these links so what you're left with is a problem that you can't fix (well, within SharePoint anyway).

You have to question whether the "Upload" button should actually be enabled for importing SSRS items as it doesn't work.

2. Send To > Other Location
Locate the dataset on the original server;

Hover over the data set and choose "Send To" and then "Other Location";

Enter the URL for the new document library (click to test).

Click "OK"

And this is as far as it gets ...

And now you need to try and stop it "copying". The only way I've found to do this is to kill the process in Task Manager. 

It's possible that there could be some strange permissions problem but, to be frank, I've clicked "Test" and that worked so why wouldn't the copy??!! Very poor process design Microsoft ...

3. Export/ Edit/ Upload
And here is the "working" method for migrating items between two servers.

Migrating Data Sets
Locate the data set on the original server;

Bring up the menu for the affected dataset and then choose "Send To" and then "Download a Copy". Then you should be prompted to save the downloaded file to local storage.

Open the locally downloaded file using a text editor (I prefer Notepad++ but practically anything will do);

There are TWO places in the downloaded data set where the URL of the Datasource and the Reporting Server are stored. Thankfully they are located at the top and bottom of the file so don't require much searching!

Locate the two entries (search for DataSourceReference, and ReportServerUrl) and update the URL's to point to the new server. Save the edited file.

Next locate the dataset library on your new server;

Choose the "Upload" button (as highlighted above) and then "Upload Document";

Select the file you just edited and saved and click "OK".

Click "OK" (we don't want to change anything).


The report file has now loaded, apparently correctly, into the Document Library. To verify this select the data set and choose "Manage Data Sources";

Seems to be working (well if it's not you can at least change it!).

Migrating Reports
Ironically this works in exactly the same way as migrating a report from a non-SharePoint server (that I have documented here).

Thursday, August 11, 2011

SSRS: Migrating Reports to SharePoint Integrated Mode

This blog post covers the process of migrating a report from Microsoft SQL Server Reporting Services 2008R2 running in non-integrated (i.e. non-SharePoint) mode to a different server also running 2008R2 but running in SharePoint integrated mode.


A Little Background
This is important as it will affect the steps you need to take!

In our environment we split the various parts of the report (Data Source, Data Set, and Report) into separate files. This allows multiple datasets to share a data source, and multiple reports to share a data set. It's a fairly useful design.

If you don't do this and just bundle everything into the Report - your maintenance must be a nightmare if you have a large number of reports! - then all you need to do is the single "Migrating the Main Report File" step below.

I suspect (hope!) that most large companies will do it our way.

Finding Items To Migrate
There are three parts to a report; Data Source, Dataset, and Report.

Steps to identify the bits to move are given below.

Identifying The Report
Find the existing report you wish to migrate on the non-integrated server. In this example I'll be migrating the "AP Separation Monitor" report;


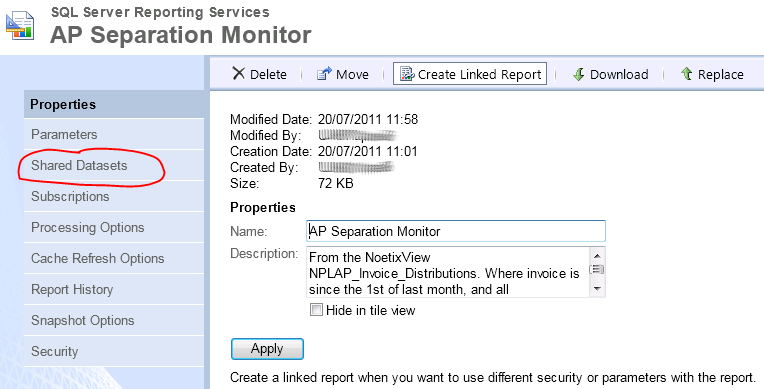
Identifying Any Datasets
Hover over the report name until it's menu appears and then select "Manage";


Click on "Shared Datasets" in the list on the left side;

Make a note of these "Datasets".

Identifying Required Data Sources
Find each of the datasets identified above and "Manage" them;

Click on "Data Source" in the panel on the left;

Make a note of this data source.

Migrating The Main Report File
Hover over the report name until it's menu pops up and then select "Edit in Report Builder";

Choose "Save as" from the Ribbon menu;

Click on "Recent Sites and Servers" at the top left on the pane on the right;

This displays a list of all the recent sites and servers you have used. If your new SharePoint server is not in the list then you'll need to create a new instance of Report Builder and create a new report on your new server (which you can then delete) in order to get the Site/Server to appear in this list.

Select the new (Integrated mode) server you wish to use.

You are now presented with a list of all the document libraries in SharePoint and you need to pick the one in which you want to save the report. I'm going to use "Reports LIVE".

This is a list of existing reports in the document library. I'm not planning on changing the name so just click "Save" (you will get an error);

The key part of the error is "The report definition was saved ...". The errors are due to the data sources not being exactly identical on the new server with what they were on the old server. Clicking on "Details" for my report I can see the error text is;

The report 'http://xxx/Reports LIVE/AP Separation Monitor.rdl' contains a reference to a dataset that is not valid. Verify that the shared datasets that are required for this report are deployed to the report server.

As we haven't moved across the datasets yet this problem is expected.

Close down report builder.

Migrating a Dataset
The process for migrating a dataset is almost identical to the process for migrating a report (so I'm not going to reproduce the image).

Hover over the data set until it's menu appears and choose "Edit in Report Builder", use "Recent Sites and Servers" to point to the new server, select the document library in which you want to save the dataset (I'd recommend a different one to the report!) and click "Save". You get an error, but it's different;

Note the key difference that you're not seeing a "The report definition was saved ...". It has been saved, but the message is much more worrying - still just as irrelevant - but it looks more worrying.

If you click on "Details" then the message gets truly bizarre;

"The path of the item '/Data Sources/NOETIX_R12TEST' is not valid. The full path must be less than 260 characters long; other restrictions apply. If the report server is in native mode, the path must start with slash. ---> Microsoft.ReportingServices.Diagnostics.Utilities.InvalidItemPathException: The path of the item '/Data Sources/NOETIX_R12TEST' is not valid. The full path must be less than 260 characters long; other restrictions apply. If the report server is in native mode, the path must start with slash."

This is a rubbish error message (Microsoft take note) but it doesn't matter as the dataset has been saved;

Close down Report Builder (you will be prompted to save again, just ignore that and click "No").

Migrating The Data Source
Don't. Just create a new one. It's genuinely not worth the hassle of migrating an existing data source - all your passwords will be cleared anyway so why bother?

On our new folder Data Sources live in the Data Sources document library;

You'll only need to do this once for each Data Source.

Connecting It all Together
Looking at the Report/ Dataset/ and Data Source information we have from the old server the structure we need to configure on the new server is;

Joining Dataset to Data Source
Go to each of the datasets on the new server hover over them until the menu appears and choose "Manage Data Sources";
This shows you (via the yellow triangle) that there is a problem with the Data Source. Click on the link (called DataSetDataSource) to get the properties;

As you can see from the error message (The linked data source could not be found) you need to specify the Data Source Link. Click on the elipse to locate it or just type the full name into the box. In the case of this example the Data Source we are after is;

http://xxx/Data Sources/NOETIX_R12TEST.rsds

(If I'm going to convert a lot of reports I tend to have strings like this in Notepad somewhere as, if you try the ellipse, you'll see that it's not exactly quick identifying the data source that way). Once you've found/ entered the Data Source click "OK and it will be verified.

Click on "Close"

Joining Report to Dataset(s)
Find the report, hover over it, and select "Managed Shared Datasets";

In this specific report we have two datasets that aren't configured correctly. Click on the link (we'll start with APSeparation Monitor);

Click on the ellipse;

As I have separated the datasets from the reports there are no datasets in the default directory (the reports directory) so click on "Up" and navigate into the datasets document library;

Select the "AP Separation Monitor" dataset (the one we recorded earlier);

The link is actually the URL of the Dataset;

http://xxx/Data Sets/AP Separation Monitor.rsd

Click on "OK" and the link will be verified.

The first dataset has now been fixed, repeat the process to fix the second dataset. You'll notice that the dataset links aren't obviously named so it's worth writing down the names from the old server (which you did earlier ... right?) rather than hoping to remember it when you get to this stage.

Click "Close" when you've completed the fix.

Test the report and you're done.

Tidying Up
Ah yes, now you've moved the report across you really should be getting rid of the old one. If it's a big migration job it really helps to not complicate things further by leaving items you've already migrated on the existing server. Equally though you don't want to break anything.

The easiest item to remove is the report - these can be deleted straight way as nothing can really be dependant on them (if you've separated everything correctly!). Find the report, hover over it, and select "Delete" from the menu.

As there is a possibility of a dataset being used in a different report you need to check. "Manage" the dataset;

Click on "Dependent Items" on the left;

As you can see the message;

"There are no items that use the "/R12/Finance/Shared Datasets/AP Separation Monitor" dataset."

Is being displayed meaning that there is nothing (now we've deleted the report) that used the dataset so we can safely delete it (go back to "Properties" on the left and click "Delete").

Now looking at the other dataset and doing the same check;

This shows that there are a large number of other reports that are using this dataset so it should be left alone rather than being deleted (why Microsoft doesn't do this check and give you a warning when you do a delete is beyond me!).

And that's it. We now have a report running on a different server. There is slightly more tidying up to do to ensure that the SharePoint details for the Report and Dataset are up to date (for example the Dataset description will not have been copied across).