Pages

Thursday, October 13, 2011

Oracle EBS: Initialising the APPS Environment in PL/SQL

How to set your user, responsibility, etc in PL/SQL to work with APPS functions

This blog post covers a fairly simple PL/SQL block that allows you to initialise your APPS environment from within PL/SQL allowing you to do things like run concurrent requests.

Language (NLS_LANGUAGE and NLS_TERRITORY)

The most important thing to start with is to make sure that your language and the current APPS configured languages and territory are the same in your session as they are on the server. You only need to do this step if you are looking onto a server configured with a different language. For example here in the UK our server is configured as AMERICAN.

To alter your session in PL/SQL you need to use EXECUTE IMMEDIATE;

execute immediate 'alter session set NLS_LANGUAGE = AMERICAN';
execute immediate 'alter session set NLS_TERRITORY = AMERICA';

If you want to see what your current settings are you can query FND_GLOBAL.NLS_LANGUAGE - in our case this turned out to either be GB or null.

Initialising Oracle EBS Environment

Clearly this issue has been around for a long time as Oracle provide a handy API in order to setup the environment. This API is part of the FND_GLOBAL package and is called APPS_INITIALIZE (note the US spelling). This API takes the following parameters;

USER_ID - The ID of the user (from FND_USER)
RESP_ID - The ID of the responsibility (from FND_RESPONSIBILITY)
RESP_APPL_ID - The ID of the application (also from FND_RESPONSIBILITY, APPLICATION_ID column)
SECURITY_GROUP_ID - This has a default value and in most cases you won't need to change it
SERVER_ID - Same with this

Once you have the correct values you can execute the call using the PL/SQL;

APPS.FND_GLOBAL.APPS_INITIALIZE(
  user_id      => v_UserId,
  resp_id      => v_RespId,
  resp_appl_id => v_RespAppId);

If successful you can then query values in FND_GLOBAL.

NOTE: It's worth probably saying that you just need to Initialize the environment - it's quite possible if you have an environment initialised as a lowly user you would still be able to pro grammatically run System Administrator Concurrent Requests with it.

Noetix: Manually Enabling Incremental Refresh in PL/SQL

Turning on Incremental Refreshing of Key Flex Field (KFF) data in Noetix.

This blog post covers turning on the Incremental Refresh "manually". Noetix provide a Concurrent Request that you can run what will work in almost all circumstances - unfortunately our site was one where it wouldn't run due to a independent value set that should have had some values in being empty.

NOTE: You *must* have initialised the APPS environment (calling APPS.FND_GLOBAL.APPS_INITIALIZE) in order for this to work. See Initialising the APPS Environment for my blog post giving instructions on how to do this in PL/SQL.

Executing the following SQL with turn on the incremental refresh;

declare
  v_error_buf   varchar2(2048);
  v_Return_code number;
begin
  noetix_sys.n_gseg_utility_pkg.enbl_incr(o_error_buf   => v_error_buf,
                                          o_return_code => v_return_code,
                                          i_flex_code   => 'ALL');
end;


This code needs to be run as the APPS user (after ensuring that this user is GRANTed permission to EXECUTE the n_gseq_utility_pkg package).

To check incremental refresh has been successfully enabled (there is absolutely no output from this call - very poor!) you need to query the triggers on the APPS tables that populate the KFF data and check to see if the triggers are enabled or not.

You can also log into Oracle e-Business Suite as the XXNAO user and check to see if the concurrent requests have run.

If the triggers have been enabled then you're in business - otherwise you'll need to, in the first instance, check the logs of the concurrent requests it schedules and if this doesn't work you'll then need to open the package in an editor and add DBMS_OUTPUT lines to echo the output to the screen so you can properly see what is going on.

Oracle PL/SQL: Storing Application Settings With Oracle

You're always being told not to hard-code values into your code (and they're right BTW). This blog post gives instructions on creating a table/ package combination in order to allow settings to be saved/ loaded from within PL/SQL.

The first step is to create a table to store the values;

create table XXC_SYSTEMSETTINGS
(
  setting_section VARCHAR2(80) not null,
  setting_name    VARCHAR2(80) not null,
  setting_value   VARCHAR2(240) not null,
  setting_type    VARCHAR2(8) not null
);
alter table XXC_SYSTEMSETTINGS
  add constraint XXC_SYSTEMSETTINGS_PK primary key (SETTING_SECTION, SETTING_NAME)
  using index;

Now we've created a table an a primary key index so we can quickly search and find values. Now the next step we need to do is think about what values we actually want to be able to store.

The settings will need to be placed into the table so that they can be picked up by the package below. This is intended to be a very simple package allowing developers to create their own settings in the table but, by not having a non-developer user interface, preventing anyone else from having a go.

From my experience most settings are either numbers or text (and of course with text you can store anything else) so based on that I'm going to create a package for retrieving numbers and text - it would be easy to add another (for example a date) or to add a customisation to refine text to be something specific like a Zip Code. The package body therefore is;

CREATE OR REPLACE PACKAGE XXC_SYSTEMSETTING IS
  function getNumber(p_Section in varchar2,
                     p_Name    in varchar2,
                     p_Default in number) return number;
  function getText(p_Section in varchar2,
                   p_Name    in varchar2,
                   p_Default in varchar2) return varchar2;
  function textSettingExists(p_Section in varchar2, p_Name in varchar2)
    return boolean;
  function numberSettingExists(p_Section in varchar2, p_Name in varchar2)
    return boolean;
end XXC_SYSTEMSETTING;


Nothing earth-shattering, I've added the two "Exists" functions as it's often useful to know if the value already exists. The package body will be;

CREATE OR REPLACE PACKAGE BODY XXC_SYSTEMSETTING is
  cursor c_Sys(p_Section varchar2, p_Name varchar2, p_Type varchar2) is
    select sp.setting_value
      from XXC_SYSTEMSETTINGS sp
     where upper(sp.setting_section) = upper(p_Section)
       and upper(sp.setting_name) = upper(p_Name)
       and upper(sp.setting_type) = upper(p_Type);

  function TextExists(p_Section in varchar2, p_Name in varchar2)
    return boolean as
  begin
    return(getText(p_Section, p_Name, '@@@@') <> '@@@@');
  end TextExists;

  function NumberExists(p_Section in varchar2, p_Name in varchar2)
    return boolean as
  begin
    return(getNumber(p_Section, p_Name, -905040) <> -905040);
  end NumberExists;

  function get(p_Section in varchar2,
               p_Name    in varchar2,
               p_Type    in varchar2,
               p_Default in varchar2) return varchar2 as
    pragma autonomous_transaction;
 
    v_Result varchar2(255);
  begin
    open c_Sys(p_Section, p_Name, p_Type);
    fetch c_Sys
      into v_Result;
    close c_Sys;
 
    if v_Result is null then
      v_Result := p_Default;
    end if;
 
    return v_Result;
  end get;

  function getNumber(p_Section in varchar2,
                     p_Name    in varchar2,
                     p_Default in number) return number as
 
    v_TextResult varchar2(255);
    v_Result     number;
  begin
    v_TextResult := get(p_Section, p_Name, 'NUMBER', to_char(p_Default));
    begin
      v_Result := to_number(v_TextResult);
    exception
      when others then
        v_Result := p_Default;
    end;
    return v_Result;
  end getNumber;

  function getText(p_Section in varchar2,
                   p_Name    in varchar2,
                   p_Default in varchar2) return varchar2 as
  begin
    return get(p_Section, p_Name, 'TEXT', p_Default);
  end getText;
end XXC_SYSTEMSETTING;


The getNumber function gives an example of how it works when we have specific formatting you want to apply to a setting.

Hopefully this will help you, it's actually saved me a lot of time over the years!

Thursday, October 6, 2011

SSRS: Using TS&R To Fix Report Builder 3 Issue with SharePoint Integrated Mode

This blog post describes a remedy for the issue which prevents Report Builder 3 from working with a Report in SharePoint integrated mode that has been migrated to SharePoint from a different server.

At the moment Microsoft has no solution for this issue (other that "don't use Report Builder 3).

NOTE: The exact problem that this blog post is showing you how to fix is detailed in another post here.

Background/ Setup
The first step in fixing this problem is gathering all the information. Each of your Reports will have embedded into it both the previous server URL and the location it was using on that server for it's Data Set. In this example we will assume the following;

The original server used the structure;
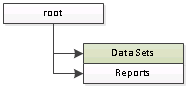
SSRS: Non-Sharepoint Integrated Mode Folder Structure
With the root folder being treated as "live" and the DEV and TST folders being hidden. The only location for data sets is in the "Shared Datasets" folders (highlighted in green).

This gives us the following list of "possible" sources for Data sets;
  • /DEV/Order 2 Cash/Shared Datasets
  • /DEV/Production/Shared Datasets
  • /DEV/Finance/Shared Datasets
  • /TST/Order 2 Cash/Shared Datasets
  • /TST/Production/Shared Datasets
  • /TST/Finance/Shared Datasets
  • /Order 2 Cash/Shared Datasets
  • /Production/Shared Datasets
  • /Finance/Shared Datasets
Each of these will need to be mapped to the "new" folder on the SharePoint integrated mode server. For the purposes of this example (and to assume maximum change) I'm going to assume the structure of the new server is;

SharePoint Integrated Mode Structure


Assuming you're following Microsoft "guidance" (using properties rather than folders) it's quite possible you could end up with something like this.

One other difference between non-integrated mode and integrated mode is that the Data Sets now have .rsd as a suffix (which makes sense - but is annoying).

An the final difference is in the server name itself (well assuming you did a migration rather than an upgrade to the server!). In our example I'm going to assume the SharePoint server is called "ssrsintegrated" and the other server is called "ssrs".

And that's it - a complete list of all the changes we need to make.

Configuring The Application
The first step is to download and open the application (it's open-source and you can find the details of how to get hold of it on another blog post TS&R: Replacing Text in Multiple Files).

The Search Folder needs to be set to point to the SharePoint servers' published folder for the "Reports "document library;

\\ssrsintegrated\DavWWWRoot\Reports\

The File Extensions we are interested in need to be restricted to SSRS Reports;

|*.rdl|

The vertical lines either side will be added when you enter "*.rdl" into the entry box;

Next is the Replace Strings entry box. Copy/Paste the following lines;

/DEV/Finance/Shared Datasets/|/Data Sets/
/DEV/Production/Shared Datasets/|/Data Sets/
/DEV/Order 2 Cash/Shared Datasets/|/Data Sets/
/TST/Finance/Shared Datasets/|/Data Sets/
/TST/Production/Shared Datasets/|/Data Sets/
/TST/Order 2 Cash/Shared Datasets/|/Data Sets/
/Finance/Shared Datasets/|/Data Sets/
/Production/Shared Datasets/|/Data Sets/
/Order 2 Cash/Shared Datasets/|/Data Sets/
http://ssrs/ReportServer|http://ssrsintegrated
http://ssrs/reportserver|http://ssrsintegrated
|.rsd
.rsd.rsd|.rsd

NOTE: The first 9 lines are just mapping old data set directories to the new one, the next two lines map the old URL's to the new one (you'll need to add additional lines if your developers capitalisation is not consistent - thankfully ours just settled on two versions!), the next line adds the .rsd to the Data Set reference and the final line removes duplicates if it was already there!

Finally an Output Folder needs to be selected (i.e. C:\TEMP\Report Output\).

Click "Execute" and the changes will be made and updated files will be placed in the C:\TEMP\Report Output\ directory - reports which are not changed will not be included in the new directory (so you could repeatedly run this process as you migrate new reports and only change the new reports).

Summary
Not the easiest method I know but at least it works and if you have 2/300 files it's a lot quicker than manual updates. It's completely ludicrous that Microsoft haven't patched this problem - it does make "Report Builder 3" a completely useless product in some specific circumstances and "just use BIDS" is not really acceptable unless they're going to scrap Report Builder 3!

TS&R: Replacing Text in Multiple Files

This blog post (copied across from the original Knol) describes the "textfile-search-and-replace" windows application I've developed. It's far from complete but it is open-source so you download the source and change it yourselves if you want or just work with changes other people have made.

Please feel free to report any bugs or feature requests via the "code.google.com" link below.

NOTE: Check out other "textfile-search-and-replace" posts (clicking on the tag associated with this post) I've created (or will create) for worked examples.

Pre-requisites
There are only two requirements to run this application; a Windows OS and Microsoft .NET Framework Version 4. The .Net framework is a free download available from Microsoft which you can download from this URL;

http://www.microsoft.com/download/en/details.aspx?id=17851

Where do I get the program?
The project home page is below, it is hosted on Google Code;

http://code.google.com/p/textfile-search-and-replace/

The software is written using Visual Studio.Net (2010). It is a fairly simple windows application.

Click "Downloads" (second tab from the left, or just click here) and select the Download at the top of the list, this will always be the most recent version. This Knol was produced using "Version 0.01" of the software. Later versions may vary, but probably not by much.

A direct link to this download is available here.

You need to copy the file to somewhere on your local machine. It is not signed so the first time you run it you will see a dialog similar to;

Open File - Security Warning Dialog
Click "Run" (you might want to un-check the "Always ask before opening this file" check-box, otherwise it will keep asking you the same question every time you start the application).

NOTE: You should *always* be a little suspicious of applications downloaded from the Internet. The source is available so you can always check the code and build it yourself if in doubt.

Using The Application
When you first start the application you are presented with the following screen;

Text File Search and Replace V0.01 - Main Dialog
Wen you next start the application it will remember your saved settings so there are some settings you only need to enter once.

How It WorksIn order to use the application you need to specify four things;
  • Search Folder: This is the folder the application will look for files in. Search of sub-folders is not supported so you will need to make sure all the files you want to search are in a single folder OR you will need to do the search multiple times.
  • File Extensions: You need to enter the file extensions (.txt, .rtf, docx, etc) that you would like the application to read the contents of. You need to use the "|" character as a separator between multiple file extensions - for example if you want to search all .txt and .docx files you would need to enter .txt|.docx. File extensions are not case sensitive so .txt will give you .TXT, .txt, .Txt, etc.
  • Replace Strings: This large entry box needs to contain the strings you want to replace in the format Old|New (using the same separator as file extensions). The strings are processed from top to bottom so, for example if you had two lines the first with Old|New and the second with Oldish|Notsooldish then the second string would *never* be used as by the time the application checks for it any instances of "Oldish" would already have been replaced and become "Newish"
  • Output Folder: Rather than modifying your files in the search folder this application creates a copy of the file and works on that. These copies are stored in the "Output Folder" directory. Only files that have been modified by the search will be held there. Once the process has completed it's then up to you to make sure the changes are what you intended(!) and copy the new files back over the originals
Once you're ready click "Execute" the process will begin.

SSRS: Report Builder 3 Dataset Issues in SharePoint Integrated Mode

This blog post gives a brief overview of a dataset issue when attempting to work with a report which has been migrated from it's existing Reporting Server into a SharePoint Integrated Mode server.

The report works when you run it but when you open it in Report Builder 3 and attempt to edit the dataset you get an error.

1. Duplicating the Issue

Go to a report you have migrated from another document library;


Trigger the pop-up menu and select "Edit in Report Builder";


Expand and double-click a dataset in the menu on the left;


The error reads "The shared dataset cannot be loaded from the server". If you click on the Details button the text is;

The path of the item 'http:///Data Sets/FA Asset Budget Codes and Total Costs.rsd' is not valid. The full path must be less than 260 characters long; other restrictions apply. If the report server is in native mode, the path must start with slash. ---> Microsoft.ReportingServices.Diagnostics.Utilities.InvalidItemPathException: The path of the item 'http:///Data Sets/FA Asset Budget Codes and Total Costs.rsd' is not valid. The full path must be less than 260 characters long; other restrictions apply. If the report server is in native mode, the path must start with slash.

You'll also notice that the "Current report server" box at the bottom left of Report Builder has re-connected to the "old" server the Report used to live on prior to being migrated. If this server doesn't exist then you'll see a connection error along the lines of "can't find the server".


2. What's Causing It

Go to a report you have migrated from another document library;


Hover over it and on the pop-up menu select "Send To" and then "Download A Copy". Open the downloaded file in a text editor of your choice;


The problem is in two keys, both under the key at the top of the file;

  • SharedDataSetReference, and
  • rd:ReportServerUrl

Despite the migration and re-pointing the Datasets in SharePoint the XML for the Report has not been updated and these two keys (for each dataset) are still pointing at the wrong server.

Ironically if you scroll down to the bottom of the file you'll notice that the rd:ReportServerUrl key for the report is actually set correctly - it's just the ones for the datasets that are incorrect.

3. Fixing The Problem

We have raised this issue with Microsoft and hopefully a solution will be provided soon (and I'll update this). Until that time the only possible fix is to manually download the file and update the affected two keys with the correct values from the server and then upload the file back on top of the original.

Hardly ideal (especially if you have a large number of files). It's possible that you could do a database update and "fix" the XML where it's stored in the Reporting Services DB but it's unlikely Microsoft would support it, and equally likely if you have a quality team who approves/ rejects your changes to a production system you can get them to agree to the risk.

4. Update 06-OCT-2011 ** Fix now available **

I have now written a fix which doesn't involve doing anything unsupported by Microsoft - it's available in this Knol here;

SSRS: Using TS&R To Fix Report Builder 3 Issue with SharePoint Integrated Mode

Enjoy!

Tuesday, October 4, 2011

Noetix: Removing Invalid Views (In A Supported Way)

This blog post covers use of a fairly simple script to drop any invalid views in the NOETIX_SYS schema that should not have been already removed by the regenerate process (i.e. where a view shouldn't be there at all rather than having just failed to build correctly).

The script (callable from XU6) is;

@utlspon xu6_drop_unused_invalid_views_upd

begin
  dbms_output.put_line('See 110930-000002 Invalid Views under NOETIX_SYS Schema');
  dbms_output.put_line('-------------------------------------------------------');
  dbms_output.put_line('Remove Invalid Noetix Views (that are not set to be ommitted)');
  for v_SQL in (select 'DROP VIEW NOETIX_SYS.' || do.object_name text
                  from dba_objects do
                 where do.status = 'INVALID'
                   and do.OWNER = 'NOETIX_SYS'
                   and do.OBJECT_TYPE = 'VIEW'
                   and do.OBJECT_NAME not in
                       (select view_name
                          from n_views
                         where nvl(omit_flag, 'N') = 'N')) loop
    dbms_output.put_line('  ' || v_SQL.Text);
    execute immediate v_SQL.Text;
  end loop;
  dbms_output.put_line('END');
end;
/

commit;

@utlspoff

NOTE: If you have not called your Noetix schema owner NOETIX_SYS you will need to alter all occurrences of that in the above SQL!