Pages

Showing posts with label os x. Show all posts

Monday, February 25, 2013

OS X: Getting the MAC Address of Your Wireless Networking Adapter

The first step is to click on the "Wireless Network" icon that should be at the top right on your statusbar;
Wireless Networking Icon
Click on "Open Network Preferences ..." at the bottom;

Network Preferences
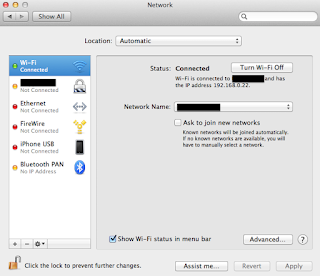
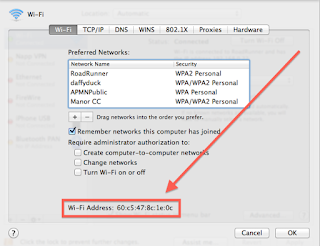
Make sure you have selected your Wi-Fi connection in the list on the left and then click on the "Advanced" button at the bottom right;

Advanced Network Settings
The MAC Address is highlighted in the image above.

Wednesday, December 19, 2012

OS X: Resolving UK Keyboard Issues with VMware Fusion

If you happen to be running OS X and using VMware Fusion to run Windows you'll be familiar with the issues regarding the default key-mapping used when you try and type text in windows. Of course if you're using a corporate Windows build (as I am) you get the additional fun of playing "hunt" the special key in password dialog boxes!

Now if you check the VMware Fusion forums you'll notice that they're practically full of advice on how to fix this problem (mostly using customised keyboard within the VM) but I'm going to recommend you do a couple of simple changes to the key-mappings to fix the issue. The example I'm going to use is the dreaded @ (shift-") mapping to " (shift-2) but after seeing this you should be able to quickly add other mappings.

The first thing is to start your VM (we can make this change while the VM is running without rebooting it) and then bring up your VM's settings;

VMware Fusion: VM Settings
3rd from the right on the top row is "Keyboard & Mouse". Click this;

VM Settings > Keyboard & Mouse
On the left side you have a number of profiles - there are usually 3 (Mac Profile, Profile, and Windows 8 Profile). One of them will have "- Default" on the end, this is the one you're currently using. Click on it and then click on the configuration cog at the bottom and choose "Duplicate" (this is just to enable you to get back to a working state if it all goes completely wrong!).

When you've got and named your duplicate (as you can see I've gone with "My Profile") select your new profile and select the configuration cog again and this time select "Make Default Profile".

Now click the cog for a third and final time and select "Edit Profile ...".

Keyboard & Mouse > Edit Profile
Now you can see on the list what key mappings you are currently using.

Click "+" at the bottom;

Edit Profile > Add Key Mappings

Click on "Shift" and enter ' (single-quote) in the top entry box, then click on "Shift" and enter 2 in the bottom box. Click "OK to save the change.

Now click on the "+" again and this time click on both shift buttons but put the single-quote at the bottom and the 2 at the top. Click "OK".

Scroll down to the bottom of your key mappings and you'll see something like;

Key Mappings > New Key Mappings

Open Notepad inside your VM and you should now find that the key mappings and back to the way they're printed on your keyboard.

You can repeat this process with as many key mappings as you want.


Saturday, June 30, 2012

Mac OS X: Unlocking Your Desktop

There are many reasons for unlocking your desktop, but a great many more for leaving it locked the first of which is that the Desktop is more than simply a folder on OS X. Having lots of files on your desktop will affect the performance of your Mac (see here, here, and here).

However there are a number of cases where you might want to, temporarily, unlocking the desktop so you can save files to it.


First of all bring up finder and right-click your Desktop and select "Get Info";


Desktop Folder Properties
There is a check-box at the top called "Locked", un-check it.

And you're done ... Easy wasn't it?

Friday, June 29, 2012

Mac OS X: Fixing "Your screen shot can't be saved" Error Message.

In order to save a screen shot when you're running Mac OS X (I'm on 10.7.4) you press;

Cmd + shift + 4 

The mouse will then turn into a cursor allowing you to select an area of the screen to take the screen shot of. Clearly an incredibly useful feature particularly if you're looking to produce documents (or blogs!) which include lots of helpful screen shots!

The problem is that if, like me, you have a locked desktop (and for the life of me I can't work out how it happened; but I like it and don't want to unlock it!) the first time you go to use this you get the following error;
Error Message
The text of the error message reads; "Your screen shot can't be saved" and "You don't have permission to save files in the location where screen shots are stored."

(Just a little note for Apple - telling me where it's trying to save the screen shot would have been helpful, as would offering me the change to save it somewhere else!)

The problem is that the screen capture utility is set to save the screen shot to your Desktop and to fix this you  have essentially two options; change the location it's trying to save to to somewhere it can access (my preferred one!) or to unlock your desktop (a lot easier!)

To change the location you need to use Terminal. Bring up a terminal session (Cmd + Space > Terminal or go to the top right and click on the search and enter Terminal);


Copy/ Paste the following two lines (you'll notice your bars will refresh);


defaults write com.apple.screencapture location ~/Downloads/
killall SystemUIServer


Close terminal and try again, the screen shot should now appear in your downloads folder (if you want it in Pictures just replace Downloads with Pictures in the first command above).

I'll blog unlocking your desktop separately.

Monday, March 26, 2012

Switching to Google Public DNS (on an Apple Mac OS X Lion)

If you are interested in learning why you should be using a DNS other than that provided by your Service Provider then you might like to see Google Article on the subject;

http://code.google.com/speed/public-dns/docs/intro.html

A couple of things it doesn't mention but are also definite benefits (for me anyway) are;

  • Automatically opting out of any Service Provider "search" services (such as those offered by Virgin Media) when you miss-type a URL
  • Avoiding any blocks your Service Provider might put on you reaching certain sites by substituting DNS entries. Of course the down side of using a service like Google is that suddenly by using a US-based service you are subject to US law and filtering
Here are the instructions in order to set-up your Mac to use Google DNS.

Go to the top-right of the screen and right-click the Network (Wireless?) network icon;
Apple Network Options
Select "Open Network Preferences";
Network Preferences
Click on the "Advanced" button at the bottom right;
Advanced Network Options
Click on the "DNS" tab (centre-middle at the top);
DNS  Servers
As you can see in the screen shot the Google IP addresses for DNS are 8.8.8.8 and 8.8.4.4 (which are certainly a lot easier to remember than IP addresses generally!).

You need to remove any entries that are already in this box and replace them with the two IP addresses above.