Pages

Showing posts with label report builder 3. Show all posts

Tuesday, February 7, 2012

SSRS: Poor Support For Troubleshooting Of Dataset Errors

With apologies this post is slightly more of a rant than an actual solution to a problem!

We have just completed our migration from Business objects (6.5 - ancient) to SSRS for reporting against our businesses most important system; Oracle e-Business Suite. As you can imagine this has been a major piece of work (300+ reports) and a major amount of time.

It's actually a tribute to SSRS that we have managed this in about 8 months with a team of FIVE people, one of which was junior, two consultants, and one full-time member of staff (me), plus another dropping in/out as needed.

What hasn't helped is Microsoft's attitude to error messages. Take this one for example;
Oracle (ORA-01427) Error Message in Report Builder 3
As you can see from the text it's a pretty simple error, a sub-query in DataSet1 is returning more than one row. Easy to fix (or at least debug) you'd think? No. Let's take a look at the datasets associated with the report;
Report Builder 3 Datasets
Now the first thing you'll notice is that there are a lot of Datasets associated with this report - it's a complex report bringing together data from multiple sources (a strength of SSRS).

The second thing you'll notice, when you look back at the error, is that *none* of the datasets are called "DataSet1".

Well that's easy, you'll be thinking, they're clearly numbered from the top down just look in the top one (or two, numbering might have started at zero!) and there you'll find your error.

Except no, neither of the top two datasets (PARAMETER_DEFAULTS or dsINVInventoryClasses) have sub-queries in the SQL and so it's impossible for them to be generating the ORA-01427 error that is being reported.

So now what? Well I need to go into each of the datasets, manually, and test them with the parameters the user is using until I find the error (and due to the poor nature of the reported error I have to open *all* of the datasets to make sure that the error isn't occurring in multiple datasets).

Now you'll also notice, if you look closely at the image above, that all of the datasets are shared datasets (i.e. are stored separately on the reporting server). Now in order to open each of these I first need to double-click the dataset to see where it is stored and what it's called;
Report Builder 3: Finding the Name/Location of a Shared Dataset
This gives me the location and name (NPL Parameter Default Values.rdl) of the first dataset.

Now to open it. Report Builder 3 doesn't allow you to have multiple items open in the same application so in order to look at a Shared Dataset I need to open a new instance of the application (which is annoying, but not really a big issue; think of it as a minor annoyance on the annoyance scale). So I open a new copy of Report Builder 3;
Report  Builder 3: Getting Started Wizard
That's handy isn't it? I've worked on this report fairly recently so surely Report Builder 3 will have the datasets I've been working on in my Recent files list? Surely? No. Of course not. The recent list contains only the reports I've been working on - Not the shared datasets (which if you think about it are actually the things that are substantially more likely to change that the reports). In fact if you look closely at the "Getting Started" dialog you'll see that while you can create New Datasets you have no way of opening existing ones as the "Open" option is for reports only as well.

So I click on the "Open" option and am presented with the root directly of the server I'm connected to;
Report Builder 3: Open Dialog

This is literally the one place on the server (if you're running in Sharepoint Integrated Mode - which we are) where there *can't* possibly be any reports or datasets (because it's impossible to save anything). It would be like when you open a document in Word it defaulting to the "My Computer" folder - sure it works, sure you can get to where you need, but it's "slightly harder than it needs to be" - a slogan I think should be adopted for Report Builder 3 in general!

Now I go into "Data Sets" folder and, after a few seconds wait, I'm presented with a blank dialog. Looking at the bottom you'll see that the "Items of type" field is set specifically to "Reports (*.rdl)" so datasets don't appear, if you want to see them you need to change it to "Datasets (*.rsd)"- and then all the reports disappear. Microsoft > Can we *please* have a "All Supported Files (*.rdl|*.rsd)" option?

So now we Open the dataset we are interested in and (NPL Parameter Default Values.rdl), run our test, and then move on to the next one. I'm going to skip a couple now, ones that work and I'm able to test in Report Builder and skip on to the next annoyance.

For those of you keeping track this is the dataset called "OE Item Type Demand Planning - Item Orders.rsd" (or dsOEItemTypeDemandPlanning_ItemOrders in the dataset list above).

I'm picking on this one because the report I'm testing allows you to enter multiple values into a parameter;
Report Builder 3: Editing SQL
This is configured as (looking at Parameters under Set Options);
Report Builder 3: Parameters
Now when you try and run the report you get the standard "Define Query Parameters" dialog;
Report Builder 3: Define Query Parameters dialog
Guess what? There is no ability to include multiple values for a single parameter so if (as in this specific case) your test conditions include a parameter having multiple values then you need to copy/paste the SQL from your dataset into a tool which does support it (I use PL/SQL Developer) and then run the SQL there.

Needless to say tracking down the specific cause of the error in this specific case took *hours* but it's not the amount of time taken that annoyed me enough to make me document it here; it's the sheer frustration of the process that needs to be followed and the need to use non-Microsoft tools (PL/SQL Developer) in order to do some testing.

So here are my recommendations (for Microsoft);
  • The obvious one; provide enough detail in the error messages for the user to know where the problem is. Did this really need to be said?!
  • I should be able to open Shared Datasets by right/double clicking them. I'm happy for it to spawn a new process if necessary but having me do it manually is just a time wasting step I don't need.
  • Datasets should receive the same treatment as reports in Report Builder 3 "Recent" listing.
  • The default open file-type should be both Reports and Datasets
  • If I'm using SharePoint Integrated mode it should remember the Document library I'm working in (maybe a Preference?) and the open dialog should take me right there.
  • If Reporting Services supports multiple-value parameters so should Report Builder 3.
Oh and just in case you're wondering I did go to the Connect website and did a search from SQL Server Reporting Services and had no results, then reporting services with also no results, and finally SQL Server with results - but no obvious way of reporting a Reporting Services issue.

Am I really alone in finding this just a frustrating?!

Footnote: *Please* refrain from telling me how much easier everything is in Visual Studio. We have around 50 non-IT users in the business who write reports who we are quite happy to give Report Builder to but would draw the line at Visual Studio and, in our experience, you either use Visual Studio or Report Builder - mixing them is just a recipe for Visual Studio users overwriting Report Builder users changes.

Thursday, February 2, 2012

SSRS: Far Future Date Issues For Date/Time Parameters

It's probably easiest just to show an example of problem (the quick solution is at the end).

Create a new report following the instructions here only use the following SQL;

SELECT TO_DATE(:Data_Value)
FROM DUAL

This assumes you are using an Oracle database to connect to. It's possible that this could be just an Oracle issue but it's pretty unlikely.

Once the report is completed run it with the parameter '01-JAN-2070';

2070 Parameter Passed Through
In the result you can see we have "1/1/2070 12:00:00 AM" which is exactly what you'd expect - the text value we passed through has been successfully converted to a date on the database server.

Now go into the properties of the Data_Value parameter and change the data type from Text to Date/Time;
Report Parameter Properties: Data type
Re-run the report and enter the same test date;
2070 Parameter Converted to 1970
You'll notice that rather than displaying 2070 the year has been altered in the output to 1970.

In fact if you choose any date after 01-JAN-2050 then it will automatically revert to it's 1900's equivalent (31-DEC-2049 is ok).

Now you might be thinking that this is something specific to do with the way the machine I'm running on is configured so in order to do a quick test I've opened Outlook and created an appointment for 2070 which seems to work fine;
Microsoft Outlook: 2070 Appointment
I've then done a search and confirmed the appointment has been saved for 2070 (and not 1970).

To further confirm it's an SSRS issue go back to the report and change the report title to display the parameter value;
Report Builder 3: Adding @Data_Value as the Report Title
Now run the report (with our 01-JAN-2070) parameter value;
Report Builder 3: Date Confusion
So from the look of it the Date/Time picker *isn't* the problem (otherwise the displayed parameter value would be wrong). That's actually good news as it means we can continue to use the (nice) Date/Time picker and resolve the issues with the values being passed in the code.

Go into the Query Parameters and change;

=Parameters!Data_Value.Value

To;

=Format(CDate(Parameters!Data_Value.Value), "dd-MMM-yyyy")

And now re-run the report;
Report Builder 3: Correct Date Values Displayed
This seems to indicate that the problem (for Microsoft) is due to the assigning of entered to parameter values. However we have our fix.


Friday, January 20, 2012

SSRS: Removing Blank Pages In Your Reports

If you find yourself writing reports for a truly international audience (i.e. US and EU) then you'll know about the nightmare of paper sizes when your users want to hit "Print" but a larger, and much more significant, issue is the blank pages that sometimes get printed either between or at the end of your reports.

This blog post lists a few things you might want to check to make sure your report is printing on as few pages as possible.

NOTE: If you are having problems printing matrix reports then there is a specific solution for you at the bottom (and an explanation of why you're seeing the blank pages).

Formatting For Printing
If you follow the steps to create a sample report here and then right-click the background of your created report and select "Report Properties";

Report Builder 3: Right-click in the Red Hatched Area for "Report Properties"
This will show you the properties for your report;

Report Builder 3: Report Properties > Page Setup
This is the "default" size created by the wizard. You'll notice that it has defaulted Centimetres, the UK-standard of A4 (as I'm in the UK) and that we have 2cm margins all round. These defaults (at least the Centimetres and A4) seem to be there as I've set them previously.

The major change I make on this screen is changing all the margins to 1.27cm which is just large enough for the printer to handle and gives over a centimetre of extra real-estate both vertically and horizontally. Of course another significant change is to switch the paper layout between Portrait and Landscape if that makes sense for your report!

Now assuming you are using A4, Portrait, and you have changed your margins to 1.27cm then the maximum size for a label you will be able to fit onto a single page is 184.6mm (210mm total width - 2 * 12.7 margins). To show this create a label on the main report, set it's location to 0,0 and make it 184.6mm wide. Put some right-aligned text (I'm using &ReportName) into the label;

Report Builder 3: 184.6mm Wide Label (A4, Portrait)
Now run the report;

Report Builder 3: &ReportName as GUID
It's displaying the &ReportName value as a GUID (I haven't yet saved the report) but the point is that it's some way over to the right. To find out what this looks like on paper click the "Print Layout" button in the ribbon above the GUID;

Report Builder 3: Print Layout
As you can see the GUID is now at the very right of the page and the page count is 1. Just as a quick test if you enlarge the label to 184.7mm (adding just .1mm) and then re-run the report;

Report Builder 3: Page Count Increased To TWO
You can see that the total page count for the whole report has increased to two (with the second page actually looking blank!).

Additional Formatting Problems With Matrix Reports
As soon as you start dynamically adding columns based on new data in the query the risk of getting blank pages, if you are using fixed width headers, dramatically increases.

Once again follow the steps given here to create a report only this time use the SQL;

SELECT 'Red' AS COLOUR, 'Pencil' AS ITEM, 3 AS QUANTITY FROM DUAL UNION
SELECT 'Red', 'Ruler', 11 FROM DUAL UNION
SELECT 'Red', 'Rubber', 4 FROM DUAL UNION
SELECT 'Red', 'A4 Folder', 9 FROM DUAL UNION
SELECT 'Green', 'Pen', 14 FROM DUAL UNION
SELECT 'Orange', 'Pencil', 23 FROM DUAL UNION
SELECT 'Cyan', 'Ruler', 21 FROM DUAL UNION
SELECT 'Orange', 'Rubber', 14 FROM DUAL UNION
SELECT 'Cyan', 'A4 Folder', 17 FROM DUAL UNION
SELECT 'Purple', 'Rubber', 14 FROM DUAL

And on the "Arrange fields" dialog instead of adding all three columns into the "Values" box add Colour to "Row Groups" and Item to "Column groups" as below;

Report Builder 3: Arrange Fields using Column and Row Groups
At the end of this process you will have something like this;
Report Builder 3: A Table With Column and Row Groups
When you run this report and look at the Print Layout (assuming you have selected A4, and 1.27mm margins in the Report Properties dialog - see above) you will get something like this;

Report Builder 3:

The point that might surprise you is if you look at the page count in the ribbon you will notice that it is TWO pages long and if you forward on to the second page it's blank.

If you look at the image below you can see the huge amount of white space to the right and below the table;

Report Builder 3: White Space
Now when the table expands the white space is ADDED so in order to not have blanks to the right and below the table we need to re-size the background and remove as much of it as possible. After re-sizing this becomes;

Report Builder 3: Resized Report Minimising White Space
Now when you run the report and look at the Print Layout you will see that we are back down to a single page.

Now a little "quirk" of how this tidying up takes place is that if you expand the width of the title to 184.6mm and then re-run the report you'll find you're back to two pages. It seems that because the amount of white space is now significant it's actually being added back in again. The easiest way round this is to add a new column to the right of "Total";

Report Builder 3: New Column
Now mark the column visibility as "Hide" and re-run the report;

Report Builder 3: All On One Page
And now you're back to having your report on a single page.


Thursday, January 19, 2012

SSRS: Creating a Simple Report With An Embedded Dataset

The purpose of this blog post is to put together a simple guide to producing a "test" report. I'm doing this as a separate post so that I can re-use it in Other Posts (rather than having to include basic setup information every time).

Other Report Builder 3 and select "New ..." to trigger the New Report of Dataset wizard;

Report Builder 3: New Report of Dataset Wizard

"New Report" report will be automatically selected on the left, on the right select "Table or Matrix Wizard" (the top item);
Report Builder 3: New Table or Matrix Report Wizard
At the bottom left check the "Create a dataset" radio group and then click "Next >" at the bottom right;

Report Builder 3: Choose a Data Source

From the list you need to select a Data Source connection to use and then click "Next" at the bottom right;

Report Builder 3: Design A Query
Now you can enter the SQL. As this is just a simple test I'm going to use the following (Oracle) SQL;

SELECT TO_CHAR(SYSDATE, 'DD-MON-YYYY') AS DATE_TODAY,
       TO_CHAR(TRUNC(SYSDATE, 'MM'), 'DD-MON-YYYY') AS DATE_FIRST_OF_MONTH,
       TO_CHAR(ADD_MONTHS(TRUNC(SYSDATE, 'MM'), 1) - 1, 'DD-MON-YYYY') AS DATE_LAST_OF_MONTH
  FROM DUAL

This simple piece of SQL just gives us a single row with today's date as well as the first and last days of the current month. Click the Run button (red exclamation mark above where you entered the SQL) to check the SQL works;
Design A Query: Testing the SQL
Once everything works click "Next";

Report Builder 3: Arrange Fields
The three fields in the SQL we've just added are in the "Available Fields" box on the left of the dialog. Drag/Drop them into the "Values" box at the bottom right;

Report Builder 3: Arrange Fields
Click "Next";

Report Builder 3: Choose the Layout
We don't want to make any changes here so just click "Next";

Report Builder 3: Choose a Style
Similarly here we don't want to make any changes so just click "Finish".

The report has now been completely generated and you will be presented with something similar to;

Report Builder 3: Fully Generated Report
Click on "Run" at the top left (to test the report);

Report Builder 3: Testing Generated Report

And you're done ....

Wednesday, January 18, 2012

SSRS: Adding Calculated Fields To Data Sets

This blog post covers an example of how to add a simple calculated field to a Dataset in SQL Server Reporting Services using Report Builder 3 (against SQL Server 2008R2). It isn't a massively complicated process except that Microsoft seem to be assuming absolutely no-one does this as all the "nice" features of expressions when working with Reports (i.e. being able to select fields by double-clicking a list) seem to be unavailable.

The easiest thing to do is to start Report Builder 3 and select "New Dataset" from the Getting Started wizard;
Report Builder 3: Getting Started Wizard
Select and active data source connection (for the purposes of this example I'll be connecting to an Oracle data source). Once you've selected a data source you'll be presented with the editor window;

Report Builder 3: SQL Editor Window
Now enter the following simple SQL;


SELECT 1 AS VALUE1,
 2 AS VALUE2
FROM DUAL

This is a very simple piece of SQL that will just return a single row with two columns called VALUE1 and VALUE2 which contain the values 1 and 2;

Report Builder 3: Sample SQL with Result
Now we are going to add two Calculated Columns;

  • VALUE3 = VALUE1 + VALUE2, and
  • VALUE4 = VALUE1/VALUE2

Click on "Set Options" (in the ribbon bar at the top of the window);

Report Builder 3: Shared Dataset Properties
Click "Add" and select "Calculated Field" from the drop down that appears;

Shared Dataset Properties: New Field
Enter the values;


  • VALUE3 (Field Name)
  • =Fields!VALUE1.Value + Fields!VALUE2.Value (Field Source)
  • VALUE4 (Field Name)
  • =Fields!VALUE1.Value / Fields!VALUE2.Value (Field Source)


And click "OK" to apply the change.

Re-run the query and you'll notice that your two new fields are NOT being displayed. This is slightly unexpected but if the expression you have entered is incorrect you will see an error message like;

Report Builder 3: Invalid Expression Error
The actual text of the error message is;

The Value expression for the field ‘=Fields!VALUE1.Value1 / Fields!VALUE2.Value’ contains an error: [BC30456] 'Value1' is not a member of 'Microsoft.ReportingServices.ReportProcessing.ReportObjectModel.Field'.

You'll notice that I just added a "1" after the Value property name.

Now you've saved the dataset close and re-open Report Builder and this time from the wizard select "New Report" and then "Table or Matrix Wizard", select the dataset you've just saved, click "Next" and you will see;

Report Builder 3: New Table or Matrix Wizard Screen
Which shows the four available fields. Select them all (i.e. move them into the Values box) and then click "Next" all the way through to the generated report and then run it;

Report Builder 3: Successfully Showing Four Fields

Now, as a final check, if you go through into the Dataset Properties of the Dataset you've just added and look at the fields;

Report Builder 3: Dataset Properties
You can see that the new fields have been added from the Dataset and that the calculation is being done in the dataset (otherwise Field Source would be an expression).


Thursday, October 6, 2011

SSRS: Using TS&R To Fix Report Builder 3 Issue with SharePoint Integrated Mode

This blog post describes a remedy for the issue which prevents Report Builder 3 from working with a Report in SharePoint integrated mode that has been migrated to SharePoint from a different server.

At the moment Microsoft has no solution for this issue (other that "don't use Report Builder 3).

NOTE: The exact problem that this blog post is showing you how to fix is detailed in another post here.

Background/ Setup
The first step in fixing this problem is gathering all the information. Each of your Reports will have embedded into it both the previous server URL and the location it was using on that server for it's Data Set. In this example we will assume the following;

The original server used the structure;
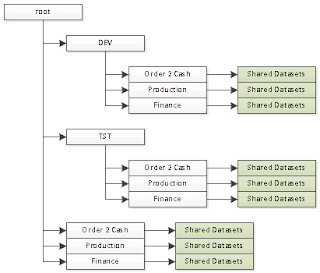
SSRS: Non-Sharepoint Integrated Mode Folder Structure
With the root folder being treated as "live" and the DEV and TST folders being hidden. The only location for data sets is in the "Shared Datasets" folders (highlighted in green).

This gives us the following list of "possible" sources for Data sets;
  • /DEV/Order 2 Cash/Shared Datasets
  • /DEV/Production/Shared Datasets
  • /DEV/Finance/Shared Datasets
  • /TST/Order 2 Cash/Shared Datasets
  • /TST/Production/Shared Datasets
  • /TST/Finance/Shared Datasets
  • /Order 2 Cash/Shared Datasets
  • /Production/Shared Datasets
  • /Finance/Shared Datasets
Each of these will need to be mapped to the "new" folder on the SharePoint integrated mode server. For the purposes of this example (and to assume maximum change) I'm going to assume the structure of the new server is;

SharePoint Integrated Mode Structure


Assuming you're following Microsoft "guidance" (using properties rather than folders) it's quite possible you could end up with something like this.

One other difference between non-integrated mode and integrated mode is that the Data Sets now have .rsd as a suffix (which makes sense - but is annoying).

An the final difference is in the server name itself (well assuming you did a migration rather than an upgrade to the server!). In our example I'm going to assume the SharePoint server is called "ssrsintegrated" and the other server is called "ssrs".

And that's it - a complete list of all the changes we need to make.

Configuring The Application
The first step is to download and open the application (it's open-source and you can find the details of how to get hold of it on another blog post TS&R: Replacing Text in Multiple Files).

The Search Folder needs to be set to point to the SharePoint servers' published folder for the "Reports "document library;

\\ssrsintegrated\DavWWWRoot\Reports\

The File Extensions we are interested in need to be restricted to SSRS Reports;

|*.rdl|

The vertical lines either side will be added when you enter "*.rdl" into the entry box;

Next is the Replace Strings entry box. Copy/Paste the following lines;

/DEV/Finance/Shared Datasets/|/Data Sets/
/DEV/Production/Shared Datasets/|/Data Sets/
/DEV/Order 2 Cash/Shared Datasets/|/Data Sets/
/TST/Finance/Shared Datasets/|/Data Sets/
/TST/Production/Shared Datasets/|/Data Sets/
/TST/Order 2 Cash/Shared Datasets/|/Data Sets/
/Finance/Shared Datasets/|/Data Sets/
/Production/Shared Datasets/|/Data Sets/
/Order 2 Cash/Shared Datasets/|/Data Sets/
http://ssrs/ReportServer|http://ssrsintegrated
http://ssrs/reportserver|http://ssrsintegrated
|.rsd
.rsd.rsd|.rsd

NOTE: The first 9 lines are just mapping old data set directories to the new one, the next two lines map the old URL's to the new one (you'll need to add additional lines if your developers capitalisation is not consistent - thankfully ours just settled on two versions!), the next line adds the .rsd to the Data Set reference and the final line removes duplicates if it was already there!

Finally an Output Folder needs to be selected (i.e. C:\TEMP\Report Output\).

Click "Execute" and the changes will be made and updated files will be placed in the C:\TEMP\Report Output\ directory - reports which are not changed will not be included in the new directory (so you could repeatedly run this process as you migrate new reports and only change the new reports).

Summary
Not the easiest method I know but at least it works and if you have 2/300 files it's a lot quicker than manual updates. It's completely ludicrous that Microsoft haven't patched this problem - it does make "Report Builder 3" a completely useless product in some specific circumstances and "just use BIDS" is not really acceptable unless they're going to scrap Report Builder 3!