Pages

Sunday, December 6, 2009

Migrating Workflow Changes Between HR.NET Instances

This blog post is a click-by-click guide to migrating changes from one HR.NET instance to another.


The obvious first step is to log onto the source server were you have been developing/ testing your new workflow and run the HR.NET Admin Console provided by Vizual as part of the standard install.

Prerequisites

  • Obviously you'll need two HR.NET instances, you'll need to be able to run the Admin Console for the two instances (i.e. you will need a HR.NET user account with permissions)
  • You need to have created a directory on both servers called "C:\Export" and some means of moving files between the two servers into the two directories (if this directory is missing you will get an error message);


  • You need to understand what you're doing! Vizual do a very good training course and offer a very high standard of support.

Source Server (The server to export from)
Log on to "Admin Console"
Using the Admin Console browse to the Workflow you wish to export and right-click it;


Select "Add to Export List" (second item from the bottom) - this will add the Workflow to a list of items to be exported
From the main menu at the top select "Tools > Export > View/ Export ..."


This will then display something like;


This is showing you that your Workflow is dependant on these other objects. In this case two tables and a directory. It's generally inadvisable to move these objects unless you really know what you're doing - you should unselect the checkboxes next to each of them so the screen looks like this;


Click "Export"


This is prompting you for the name of the file you are going to create which will contain your Workflow.
When you click "OK" the file is saved in the C:\Exports folder;


You should now look at moving these files between the folder on the source server, and the folder on the destination folder.

Destination Server
Log on to "Admin Console"
From the main menu select "Tools > Import ..."


This will display the following dialog;


The list of files displayed at the top is the list of XML files in the "C:\Exports" directory (so make sure you have copied the file there!), select the file you wish to import and click "OK".


The list of objects in the XML file is displayed - select the object you wish to import and then click "Import" at the bottom of the dialog.


Click "OK to complete the import process.

Saturday, November 28, 2009

How to Schedule A Meeting with Doodle

The Doodle scheduling tool allows you to put out a range of dates, or options, to a group of people and have each one express a preference. You can then view a summary of the results.


The first step, as you would expect, is to open your web browser and go to the website Doodle.


Click on the "Schedule event >>" button the the right of the page.


On this page you need to specify the title for your meeting (i.e. "To Agree A Time For A Local Meeting"). This needs to be meaningful so that when people see your email they actually want to respond - the tendency with emails is to "leave it till later" so it never gets done!

While "Description" is option (you don't need to specify one) you might get a higher response rate if you fill this in with as much detail about the meeting you're arranging as possible (i.e. draft agenda, decisions that you'd like to see made, etc).

If your meeting is going to be in a specific location you can click "Add address" and specify it;


The default location for the address is the US. Typing in "Cambridge" will give you "Cambridge, MA, USA". If you want to specify an address outside the US you need to specify the Country (i.e. UK).

You should then type in your name and email address (it's optional, but getting a message when each person responds usually helps with booking a meeting ... if the first 5 people to respond can't do any of your options then rather than waiting until everyone else has responded you might want to change them).

Once you've completed the form click "Next".


The next stage is to select dates for your meeting. You can select as many dates as you like by just clicking on the numbers. Clicking either of the blue arrows at the top will move the date along back/forward one month.

Once you've selected all the dates you're interested in (above I've selected from the 28th November to the 2nd December) click "Next" to move to the next phase.


The dates you entered on the previous screen are listed on the left of this page. You can then specify the times on each day for your meeting. You can on this screen have many options on each day, the initial display shows only 5 - if you need more than click "Add further time slots" to get another 5 (total 10), click it again to get another 5 (total 15) etc.

If the times you are interested in are the same for each day you just need to fill in the first line and then click on "Copy and paste first row" and all the other days will be filled in automatically based on the values you've specified for the first day.

Click "Next" once you're happy with the times.


It is generally best to select "you send the invitation" as it's a lot easier for various reasons not least of which is that people can be funny about sharing email addresses on websites - whatever the privacy policy of that website. Unless the people in your meeting have agreed to use Doodle (or used it previously) then I'd recommend sending the invitation yourself.

This final page shows you the URL's for your Doodle;


The participation link is the one you need to copy/paste into an email to send to everyone who you want to attend your meeting. You can use distribution lists, each person will be treated separately by Doodle. The Administration link is specific to you and will allow you to track peoples responses (you can also visit the Administration page for a reminder of the participation link).

Friday, August 21, 2009

Oracle EBS: Monitoring Oracle e-Business Suite Using SQL

This Knol covers adding a stored procedure and some tables to the Oracle database that will allow you to monitor settings within Oracle so that, for example, if you clone your live system to a development machine and then apply a patch you will be able to instantly see what has changed.


How It Works
This couldn't be simpler; the table SYSCHECKLIST contains many small SQL queries. Each of these returns "OK" (a single row) when it is successfully run against the Oracle database.

It's probably easiest to look at an example. If we take Profile Options. This is one area of Oracle that can be quite difficult to monitor. We can all see what they are now but what were they last week?! In the e-Business Suite profile options are stored in the two tables FND_PROFILE_OPTIONS and FND_PROFILE_OPTION_VALUES. Taking as an example the SITENAME profile option. If your site happened to be called "Production System" then you could write some SQL that would check this;

select 'OK'
  from applsys.fnd_profile_option_values fpov 
 where fpov.application_id = 0 
   and fpov.profile_option_id = 125 
   and fpov.level_id = 10001 
   and fpov.level_value = 0 
   and replace(nvl(fpov.profile_option_value, ''), '''', '') = 'Production System'

If your system had it's SITENAME set to "Production System" the query would return "OK". Otherwise it will either return nothing (if the site is called something else), multiple records if there are multiple entries (should be impossible, but you never know!), or an error if the SQL is invalid (such as Oracle dropping either of the tables in a patch - let's hope that never happens!).

By running this test on a daily basis if someone changes the profile option you will be notified.

By stringing together a group of these queries we can check multiple parts of the system. The table SYSTESTRESULT contains the results of previous runs (for those space-conscious DBA's the data in this table is cleared down after a month - you can adjust this in the SQL below).

Setting Up The Database
The database component of this monitoring suite comprises of two tables (SYSCHECKLIST, and SYSCHECKRESULT) and a package (SYSCHECK). The SQL to create each of the tables is;

create table SYSCHECKLIST
(
  TEST_REF  VARCHAR2(10) not null,
  TEST_DESC VARCHAR2(80) not null,
  TEST_SQL  CLOB not null
);


create table SYSCHECKRESULT
(
  TEST_REF    VARCHAR2(10) not null,
  TEST_DATE   DATE not null,
  TEST_RESULT VARCHAR2(255) not null
);

It should be noted that I'm not saying anything here about schemas and permissions here. I created the tables under our APPS schema but then I work for a small company and that's out policy. Your company will probably be different - I know some (most?) companies can be very strict about creating objects in the APPS schema and it's not exactly something Oracle recommends!

Of course using the APPS schema means you don't have permissions problems with your queries (i.e. your schema owner will need to be granted select for everything it's wants to check).

The SQL to create the package (and package body) is;

Package Specification 
Package Body

It's quite long so I've moved it to my Google Documents pages - any problems add a comment!

The functions in the package check either one test, all tests, or all tests (run as a concurrent request). Setting up a concurrent request is a lot more work so I'll cover that as a separate Knol when I get the chance but you do just need to create an executable pointing at the SYSCHECK.RUNALLTESTSCR procedure, and then a program pointing at the executable (not forgetting to create an incompatibility that will prevent the checks being run simultaneously) and you're there.

NOTE: I've updated the source code associated with this Knol as it was taking too long to churn through 500,000 checks. It now only logs a result if the result is something other than "OK". Which I guess is kind of what you want.

Running The Tests as a Report
A useful feature of the way the information is setup is that you can write a report that will actually run the tests. The SQL needed to do this is;

SYSCheck Report SQL 

This SQL checks to see if the first test has been run today. If it has then it simply presents the results from that test, if it hasn't then it runs the tests. The SQL is split into three parts separated by the "UNION" statements. The first part will run the report if the number of records found in SYSCHECKRESULT for today is zero (the +1 will make the WHERE clause "rownum = 1" which will return one row, which will then trigger calling the report. "rownum > 1" will never return anything - the joys of oracle!).

The second part looks for failed records (where TEST_RESULT <> 'OK'), it does this by getting a count of all records for today and if this count is greater than zero it displays the with the failure total.

The final part looks for successes (hopefully this will be the most common part). It has two conditions to the WHERE clause the first checks to make sure there are no failures, and second checks to make sure there are successes (otherwise parts 1 and 3 will display at the same time).

Sample Tests
Checking System and Application Profile Options
This is an example of when you want to check the same thing again and again. So it's easier, rather than just taking the options one at a time and creating a test for each one, to write a script that will go through the profile options tables (FND_PROFILE_OPTIONS and FND_PROFILE_OPTION_VALUES) and build the tests for you. Looking at our production system we have approximately 4,000 profile options so one-at-a-time was never going to work for us!

Here is the script;

SYSCheck Demo - Profile Options 

As you can see from the script a "Template" test is stored in the variable v_SQLTemplate, this is then updated and written into the SYSCHECKLIST table for each profile option returned by the query.

I have added some additional code to the comparison against PROFILE_OPTION_VALUE and the actual value so that quotes and null values are correctly compared. This will lead to a very slight performance hit. If you're worried about this (I'm not) then you can fix it by creating different types of rules based on the actual profile option value (null, not null, contains quotes, etc) - that's a lot of work for not much benefit if you ask me, but I'm a "getting it to work" person not a SQL purist!

I have restricted the profile options I'm checking to those are the SITE and APPLICATION level rather than just checking all options as, to be honest, these are the ones I'm worried about.

Checking the text of messages in FND_NEW_MESSAGES
This is another example of using a script to generate tests form existing database records.

This script looks at the text of messages in the table and checks to see if the message has changed.

Here is the script;

SYSCheck Demo - FND New Messages

The script is only checking US language messages but it should be fairly simple to change this to check messages for other languages.

Monitoring Table/Column Changes
This script allows you to monitor the datatypes and sizes of all the database tables Tables and columns. Needless to say on a large database this can be quite a substantual number: on our Oracle e-Business Suite implementation this is a little under 600,000 checks.

Here is the script;

SYSCheck Demo - Table/Column Changes

Needless to say if you're adding 600,000 checks to the routine then it will take substantually longer to complete - especially if you are logging successes as well as failures!

Friday, July 3, 2009

Oracle EBS: Linking Directly to SQL Server Reporting Services from Oracle e-Business Suite


This blog post covers (with a fairly simple example) a way of having a menu item in Oracle "punch out" to a SQL Server Reporting Services Report (or any other URL).

The reasoning behind doing this is that if you have a process driven by Oracle and need a report users don't want to then have to bring up Internet Explorer, browse to the Report website, and finally select their report. Using this process makes the join practically seemless to the end user.


This process requires three parts. The first is setting up and deploying a SQL Server 2008 report (I've included a small, and fairly pointless, example which just displays Invoices/Day from the AP_INVOICES_ALL table in e-Business Suite). Of course if you already have your own report just substitute your existing report for the example and proceed to the "Configuring e-Business Suite" stage.

The second stage is adding a simple HTML redirect script to the Apache webserver that comes with Oracle.

And the final step is to configure Oracle so that wen you click on a menu item it takes you to a SQL Server Reporting Services Report (SSRS).

Stage 1: Setting Up And Deploying a SQL Server 2008 Report
In order to speed things along I've created a report and a Shared Data Source (that you will need to re-point to your database). In order to use these files you need to open Visual Studio (I'm using 2008 but I don't see any reason why other versions wouldn't work), go to File > New > Project and select "Report Server Project".

At the right-hand side of the screen (in the treeview) you will see Shared Data Sources. Right-click this and select "Add > Existing Item" and then download the EBUSINESSSUITE.rds file (from Google) into your project directory and select it.

Double click the EBUSINESSUITE data source and change the connection string so that it points to your server. Click on "Credentials" and enter a username/password that has access to the AP_INVOICES_ALL table (the APPS account will, as will the AP account - if you are using something else then make sure that if you login using SQL * Plus and enter the SQL "select * from ap_invoices_all where rownum < 10" and make sure this works).

Next right-click the "Reports" node in the same tree view and select "Add > Existing Item" and then download the Invoice Totals By Day.rdl file (also from Google) into your project directory and select it.

Your Project should now look something like this;

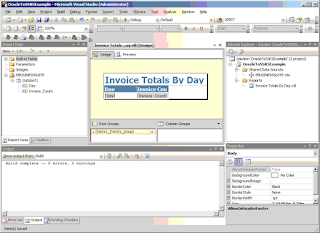
Figure 1: Visual Studio 2008 Project Setup
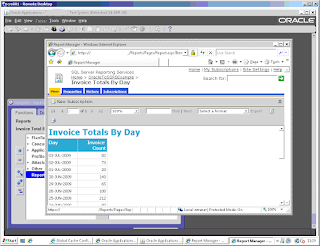
Open the "Invoice Totals By Day" report and select "Preview". After a few seconds the report should display some data. You will get something back similar to;

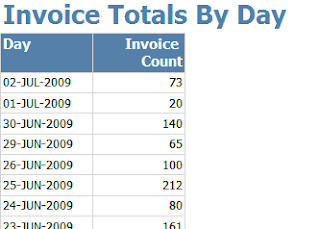
Figure 2: Invoice Totals By Day (Sample Output)
Next you need to deploy the report to your SQL Server. Choose "Project > Properties" from the menu and enter the URL for your server. You can type this URL straight into a bowser if you want to check it's correct.

Next deploy your solution by choosing "Build > Deploy Solution".

Finally when you visit the SQL Server and go into your deployment folder you will see something like;

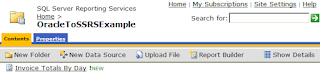
Figure 3: New Report Visible on SQL Server
Clicking on the report will show you the same result as you saw in Figure 2.

Deploying a SQL Server 2008 Example report is now complete.

Stage 2: Adding a Simple HTML Re-direct Script to Oracle
By far the most complicated part of this process is actually finding the correct directory into which to deploy the script. I'm not a UNIX person, I do my work in Windows and Oracle. I have a nice friendly UI and when that doesn't work I have the familiarity of PL/SQL ... Under UNIX I'm afraid I get a little lost.

The directory you're looking for contains lots of files. I created a simple text file called "test.txt" which contained the word "test" and then went to the URL;

http://XXXX:9999/OA_HTML/test.txt (XXX is the name of your server, and 9999 is the port number)

And confirmed that the word "test" appeared in my web browser.

I then created a small text file called verysimpleredirect.html containing this code (via Google Drive);

As you can see I took the "gup" function from from another website (I think I did a simple Google search for "javascript redirect" and picked out one of the top entries). To test the file is in position correct visit the URL;

http://XXXX:9999/OA_HTML/verysimpleredirect.html?redirect=www.google.co.uk (XXX is the name of your server, and 9999 is the port number)

You should end up at Google.

Once you have copied this file to the server (and tested it) this stage is complete.

Stage 3: Configuring Oracle to Punch-Out to the Report
Log into Oracle and select the "Application Developer" responsibility.
Scroll down the list and under "Application" select "Function" (everything will slow down while Java starts up and the screens load). Eventually the "Form Functions" dialog will appear;

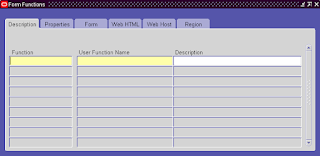
Figure 4: Oracle "Form Functions" Dialog
Despite the name this dialog can be used for any kind of function - like the web page links we need to create.

Complete the form as follows;

 Tab
 Field 
 Value 
 Description
 Function
 SSRS_INVTOTBYDAY
 User Function Name
 SSRS: Invoice Totals By Day Report 
 Description
 SSRS: Invoice Totals By Day Report
 Properties
 Function 
 SSRS_INVTOTBYDAY (Default)
 Type
 SSWA jsp function
 Maintenance Mode Support
 None (Default)
 Context Dependence
 Responsibility (Default)
 Form
 Function 
 SSRS_INVTOTBYDAY (Default)
 Form
 Blank (Default)
 Application
 Blank (Default)
 Parameters
 Blank (Default) 
 Web HTML
 Function 
 SSRS_INVTOTBYDAY (Default)
 HTML Call
 **
 MDS Reference Path
 Blank (Default) 
 Web Host
 Function 
 SSRS_INVTOTBYDAY (Default)
 Host Name
 Blank (Default) 
 Agent Name
 Blank (Default) 
 Icon
 Blank (Default) 
 Secured
 Blank (Default) 
 Encrypt Parameters
 Blank (Default) 
 Region
 Function 
 SSRS_INVTOTBYDAY (Default)
 Object
 Blank (Default) 
 Region Application
 Blank (Default) 
 Region Code
 Blank (Default) 


**- In this field you need to enter the URL of your report. This will look something like;
 verysimpleredirect.html?redirect=https://XXX/Reports/Pages/Report.aspx?ItemPath=%2fOracleToSSRSExample%2fInvoice+Totals+By+Day
 (where XXX is the name of your SQL Server)
I have listed all the fields for completeness but for the huge bulk you can just accept the default.

Now this is where things become a little fiddlie. For whatever reason the Type > SSWA jsp function doesn't appear to have saved correctly into the database (if anyone knows why, or what I'm doing wrong!) please let me know via the comments bit below!

Anyway running the following SQL will "fix" the problem;

update applsys.fnd_form_functions t
   set type = 'JSP'
 where function_name in ('SSRS_INVTOTBYDAY')

For some reason the type stored in the table is "UNKNOWN" . Until you have specified the type correctly you'll not be able to see your function anywhere.

Now switch responsibility to "System Administrator".

Under "Application" select "Menu" and the "Menus" form will be displayed. For the purposes of this example we'll be adding the report as a menu option to the "Application Developer" user (simply because this is likely to interfear less with other users using the system).

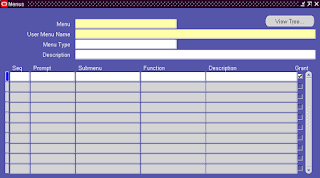
Figure 5: Oracle Menus Dialog
Using "Find" select the main menu for the Application Developer Responsibility (it's called "Navigator Menu - Application Developer GUI" - just search for %App%Dev% and you get a small enough list to pick it from).

For the purposes of this new menu I'll just add new item at the bottom;

The values are;

 Key
 Value
 Seq
 9
 Prompt
 Reports
 Submenu
 (blank)
 Function
 SSRS: Invoice Totals By Day Report
 Description
 Invoice Totals By Day Report
 Grant
 (Checked)

You should end up with something like this;

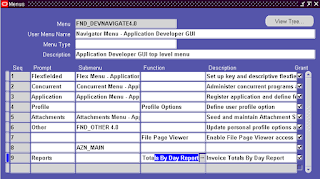
Figure 6: Completed Menus Dialog (for Application Developer GUI)
Save the changes, a job will be submitted to rebuild your menus. While that's happening you need to Clear the Cache on the Application Tiers (so that your change will be picked up).

Now if you switch back to the "Application Developer" responsibility you will see a new option on the menu called "Reports";
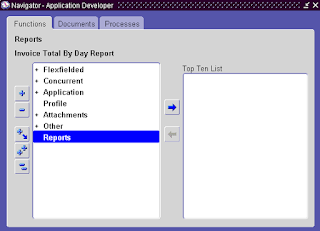
Figure 7: New "Reports" Item for "Application Developer" Responsibility
Clicking on "Reports" will bring up your default browser and point it at the Reporting Services Report;

Figure 8: Clicking on an Oracle Menu Items Triggers a SSRS Report

Monday, May 18, 2009

Oracle EBS: Currency Conversion in Oracle Internet Expenses (OIE.K)

This blog post aims to explain where the conversion rate in Oracle Internet Expenses is derrived from and how setting a policy can have quite a significant effect on the total value returned.


The exchange rate used to convert a non-GBP expense claim back into GBP to be paid is handled in two parts within Oracle.

In the General Ledger (GL) there is a table of "Daily Rates";


This shows the currency conversion rate entered into the system for a specific day. As you can see in the screen shot above rather than entering truly "daily" rates the Finance department where I work have entered these dates on a monthly basis - this isn't really a problem so long as you accept that these are the rates that will be used.

The rate stored in the GL is the "base rate" that Internet Expenses uses for the conversion.

The next part is dependent on the conversion policy as configured in internet expenses;


At the moment for the operating unit show above is configured with an allowance of 5% so when the total is converted back to sterling there is a 5% "bonus" paid to the end user.

The effect of this 5% bonus is that on the 31st January 2009 rather than getting a little less back in GBP that they had spend in Euros they got back a little more;

This is "as expected".

The problem with the 5% is that the more you spend the more you make. So if you spend 500 EUR you will get back 525 EUR at the prevailing exchange rate in the GL.

Wednesday, May 13, 2009

Oracle EBS: Viewing General Ledger (GL) Daily Currency Conversion Rates


NOTE: This SQL works in version 11.5.10.2, your version might be different!

Many companies like to have "one version of the truth" (I say "like to" as we all know how hard this is to actually achieve!). One of the ways this can be achieved is a standardised set of currency conversion rates across an organisation.

The SQL in this blog post gives you a quick and easy report showing the currency conversion rates currently being used in the GL.


If your company is using Oracle Finance software (i.e. General Ledger) and the currency conversion rates are being loaded into the system (either automatically or manually) then it makes sense to publish this information out so that other parts of the company can use it.

The SQL below will show currency conversion rates (or a specified type) between two currencies and between two dates with the latest date conversion rate entered at the top.

SELECT FROM_CURRENCY,
       TO_CURRENCY,
       TO_CHAR(CONVERSION_DATE, 'DD-MON-YYYY') COVERSION_DATE,
       SHOW_CONVERSION_RATE,
       SHOW_INVERSE_CON_RATE
  FROM GL_DAILY_RATES_V
 WHERE status_code != 'D'
   and (FROM_CURRENCY = :FROM_CURRENCY)
   and (TO_CURRENCY = :TO_CURRENCY)
   and (CONVERSION_DATE >=
       to_date(:START_DATE, 'DD-MON-YYYY') AND
       CONVERSION_DATE < to_date(:END_DATE, 'DD-MON-YYYY')+1)
   and (USER_CONVERSION_TYPE = :USER_CONVERSION_TYPE)
 order by from_currency,
          to_currency,
          conversion_date desc,
          user_conversion_type

In order to run this SQL you need to specify five parameters;

FROM_CURRENCY: The currency you wish to convert from (i.e. EUR)
TO_CURRENCY: The currency code you wish to convert to (i.e. GBP)
START_DATE: This is the first date you want to see in the report in the format DD-MON-YYYY
END_DATE: This is the last date you want to see in the report in the format DD-MON-YYYY
USER_CONVERSION_TYPE: This will be dependant on your system, I'd recommend you look in the GL_DAILY_RATES_V view and find out the values used at your site and then plug one of those in.

Hopefully this will prove useful to people!

Tuesday, May 12, 2009

Oracle EBS: Updating Vendor and Vendor Site (Supplier) Information in Oracle e-Business Suite (11i)

This blog post covers how you update Vendor and Vendor Site records in Apps 11i. The included example shows how you clear the Tax Code associated with both types of record (this is particularly useful in the UK where our Sales Tax has changed).


The Problem
Changes quite often need to be made to the records in the PO_VENDORS and PO_VENDOR_SITES tables that involve changes to a large number of records . For example when the Sales Tax (VAT) rate changed from 17.5 to 15% in the UK each Vendor and Vendor Site had the old rate stored against it (this is the default rate that populates the dialog when you create an invoice for a vendor).


The problem with making these changes directly into the tables themselves is that Oracle a) does not support this, and b) doesn't publish the necessary information for us to work out exactly what doing something as simple as this actually entails.

The Solution
Summary/ Description
Oracle has provided two packages which contain routines that enable developers to make these changes themselves;

AP_VENDORS_PKG

 AP_VENDOR_SITES_PKG

The first thing to note is that there is no "delete" routine; if you want to delete a record you need to update it and set the "INACTIVE_DATE" field to the current date.

The two routines we are interested in are called INSERT_ROW and UPDATE_ROW. There are lots of other routines but they are basically checking/validation or display routines and the Lock routine which we don't want to touch.

Inserting a New Record using INSERT_ROW
Basically you need to pass in ALL the parameters listed (for Vendor Sites there is around forty) these are the direct values you want to end up in the columns in the table. The only field you don't need to worry about is the VENDOR_SITE_ID which is populated from the PO_VENDOR_SITES_S sequence (NEXTVAL).

The two pieces of validation (as of 12th May 2009) that are carried out are a check for duplicate records (based on Vendor ID, and Site Code) and if you have specified the new site as a tax-reporting site (i.e. x_tax_reporting_site_flag = 'Y') a check is also made to make sure there aren't multiple tax sites for a single vendor (I guess you'll need to use UPDATE_ROW to turn off the tax reporting site flag on another record before inserting your new record).

Other than that the insert relies on Oracles validation (i.e. you won't be able to squeeze 12 characters into 10 character field, put a floating point number into an integer, etc) to stop things if you are inserting invalid data, but there really isn't anything to stop you doing something stupid like creating a new vendor who has only been active in the past or who has an inactive date before their active date.

If you pass in a Shipping Location then a new record will be created in the PO_LOCATION_ASSOCIATIONS table. This appears to be optional.

Updating a Record using UPDATE_ROW
This is the best example of how not to write an API you will ever come across. Basically you call it an pass in the ROWID and then new values for all the existing fields (fantastic potential to delete other peoples work here!).

The two pieces of validation (as of 12th May 2009) that are carried out are a check for duplicate records (based on Vendor ID, and Site Code) and if you have specified the new site as a tax-reporting site (i.e. x_tax_reporting_site_flag = 'Y') a check is also made to make sure there aren't multiple tax sites for a single vendor (I guess you'll need to use UPDATE_ROW to turn off the tax reporting site flag on another record before inserting your new record).

Obviously if the ROWID you specify doesn't exist you will get an error, equally if you try and insert invalid data you will get an error as well.

If you pass in a Shipping Location then a call will be made to the ap_po_locn_association_pkg.update_row package to update the location ID you've specified. This appears to be optional.

Example;
There is a "sample" script here which performs an update on the VAT Code attached to suppliers.

Friday, March 6, 2009

Installing Systems Centre Operation Manager (SCOM) 2007 with SP1

This guide is intended as a simple checklist of things you need to do in order to get a "working" SCOM test environment up and running under some form of "virtualising" technology (we use Microsoft's Hyper-V, but exactly the same instructions should work in VMware Workstation, VirtualBox etc).

In order to put this guide together I've made the following assumptions (well, OK, there weren't really any assumptions - this is how the environment I had to use was configured);
  • Your server operating system is Windows 2003R2 SP2 32-bit. The links below will install the required software onto this version of Windows. If you are running a 64-bit version , or a different version of the server operating system (i.e. Windows 2008) then follow the links and see if you can find a x64 version - once again Google is your friend.
  • Your server, users, etc are all part of an Active Directory domain. There is a group in Active Directory called "Domain Admins" that includes all the users who are Domain Administrators (i.e. your IT Department). The person running this installation has a "normal" (i.e. Standard User) domain account in addition to their Domain Admin account.
  • The software is being installed by a Domain Administrator.
  • You have either the installation CD's provided by your company or a MSDN account from which you can download the software.
The entire installation process (including the OS) will take around 3-4 hours - that's on a 2Gb Quad-Core Hyper-V host. You're mileage will almost certainly vary.

Installing the Prerequisites
When you try and install SCOM it will perform a series of checks against your system. If you're using a vanilla 2003 server than a great many of them will fail. Each piece of software listed below needs to be installed in order for SCOM to even begin to install.
  • Install the base operating systems (i.e. Windows Server 2003R2) and add it to the Active Directory domain.
  • Install the "Application Server" role (you need to go into "Manage your server" under the start menu). When asked make sure you include the FrontPage Server Extensions and ASP.NET.
  • Run the SCOM Installer and it will tell you that MSXML6.0 is missing and will offer to install it for you. This is the only useful thing the installer seems to offer, if you try it again it will just start telling you things are missing and you have to fix them all yourself!
  • Download and Install Microsoft .NET Framework 2.0 Service Pack 1 (x86).
  • Bring up a command prompt (you need this to turn on ASP.NET 2.0).The instructions for doing this are also available if you get the details for the pre-requisite check that fails.
  • Type "cd %WINDIR%\Microsoft.NET\Framework\v2.0.50727". As you can see the version of the framework is included in the directory path (so if you're using a different version you'll need to modify the path accordingly).
  • Type "aspnet_regiis.exe –i –enable" (this performs the switch-on).
  • Download and Install Microsoft .NET Framework 3.0 Service Pack 1 
  • Install SQL Server 2005 Standard Edition (use your Domain Admin account as the Service Account, choose "Windows Authentication", otherwise accept the defaults).
  • Download and install Microsoft SQL Server 2005 Service Pack 2 (you can do this before you reboot from the previous step if you want to). You should definitely reboot the machine before continuing.
  • Download and install Windows PowerShell 1.0 English-Language Installation Package for Windows Server 2003 (KB926139)
Shutdown the VM and take a snapshot.

Installing Systems Centre Operation Manager (SCOM)After installing the prerequisites this is actually quite easy. The steps below are "guidance" and aren't a screen-by-screen description of what the installer is doing. Just accept the defaults until you are asked one of the questions below;
  • Enter the group name as "DEVELOPERS" - technically you can pick anything but it's always good to make sure that your group is a good description of what you are using the system for and who set it up!
  • Give the AD Group "Domain Admins" permission to administer the box.
  • Select the locally installed copy of SQL Server (should be the only one available)
  • When prompted again for a User/Password enter your STANDARD user account, not your Domain Administrator (if you enter the Domain Administrator account you will get a "warning" that it's not good practice - it's unlikely your production box will be setup this way so you should avoid doing it for testing).
  • When prompted to enter account details for the SDK account enter your Domain Administrator details.
  • Choose to use "Windows Authentication" for the Console.
  • I would select "Don't use Windows Update" just because it's usually the simplest option, but I'd go with whatever your production system uses.
  • Click "Next"/ accept the defaults until you click "Install" to install the software.
Shutdown the VM and take a snapshot.

Optional Extras: The Oracle ClientIf you're going to be using SCOM to access an Oracle database you will also need to install the Oracle client. For the purposes of this example I'm going to suggest the 10g client but that won't work if you need to monitor 8i and earlier systems. I'm not sure what subset of companies are running older versions of Oracle AND want to use something as "new" as SCOM to monitor them!
  • Go to the URL Oracle 10.2 Client Download (this link is for Windows)
  • Download "Oracle Database 10g Client Release 2 (10.2.0.1.0)", this is around 470MB.
  • Uncompress the zip file into a local directory
  • Run the setup.exe and select the "Administrator Client"
  • Accept all the defaults and then click though to the "Install" button and then click that.
  • Setup the client to work with your network (i.e. if you have a TNS Names Server then configure the client to use that, if you have a "shared TNS" on a server somewhere then set it up to use that, if you have a copy of TNS under Source Control then get that and copy it into the NETWORK/ADMIN directory, whatever works for you).
  • Test the client.
Shutdown the VM and take a snapshot.