Pages

Showing posts with label windows 7. Show all posts

Thursday, April 11, 2013

Quick Guide: Creating a Document Thumbnail on Windows 7

This is intended to be really simple guide to creating 200x??? pixel thumbnails for an existing document. I'm currently using these small thumbnails as part of the EasyPush application as an alternative to "template" thumbnails (i.e. one for all Word documents). It looks much nicer if everything has it's own thumbnail.

The first step is to open the document you wish to create the thumbnail for. I've picked a PDF I just happened to have sitting around (Noetix Search Administrator guide). It's possible to use Word, Powerpoint, etc - just make sure you're viewing a "Print Preview" to ensure that you aren't getting any additional lines on the screen you're not interested;

Adobe PDF Reader
You'll notice that I've highlighted the enlarge/reduce buttons - click the reduce button until you can see the entire document on one screen. When you've managed to do that start the "Snipping Tool" (provided as part of Windows) and grab a capture of just the document image;

Full-size Document Image
You'll notice that as the document is predominately white I've included the border around the edge from Adobe Acrobat - this makes it stand out a bit better if you're using a white background.

If you look at the size of this image you'll notice that it's quite large; 539x666. This is way too big to be a thumbnail so you need to re-size it to make it smaller.

Save the image (from the "Snipping Tool") into a directory and then right-click it and choose "Edit". This *should* open it in Microsoft Paint;

Microsoft Paint: Screen Capture Image
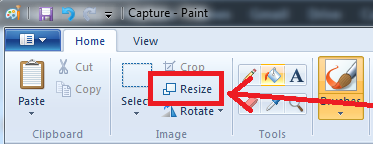
I've pretty much decided that the maximum size of my thumbnails will be 200 pixels in any direction - this is generally a good size and fits most places where you'd need to use a thumbnail. To alter the size of the image in Microsoft Paint click on the "Resize" button at the top left;

Microsoft Paint: Resize Button
This will display the "Resize and Skew" dialog;

Microsoft Paint: Resize and Skew Dialog
The first thing to do is click on "Pixels" at the top and then change whichever is the larger of the Horizonal or Veritcal numbers to 200 - so long as you have "Maintain aspect ratio" checked the smaller will be automatically adjusted.

Click "OK".

Then save the image and you have your new thumbnail - see below;

Document Thumbnail - Final Version
The final re-sized size is 161x200.

Thursday, June 7, 2012

Windows 7 Drivers for PC line Flatbed Scanner (Model PCL-3000 aka Mustek 1248UB)

Label on the Underside of Scanner
My parents have just brought a new Windows 7 machine and as you can imagine, as the techie in the family, when I came to visit I managed to pick up the task of getting all the old USB devices working with the new machine. The upgrade was from Windows XP so it was quite a big surprise that pretty much everything worked just fine, the drivers for the Lexmark Z615 were downloaded and installed without incident. Same with everything else actually (memory card readers, speakers, etc).

Of course not everything worked, the Labtec USB Webcam had become damaged in transit and no longer seemed to work at all - thankfully a quick trip to PC World netted a Sandstrom 720HD camera to replace it - and then there was the PC line Flatbed Scanner.

Now this isn't the first upgrade/ replacement machine I've dealt with (not even the first one this year) so it was quite a surprise when I plugged the make and model into Google and searched for drivers that I *didn't* get anything useful (and no, I'm not counting the "pay us £20 and we'll let you have them" sites which absolutely everyone should avoid as usually either a) they don't have the drivers or b) the actual driver download is just a couple links lower in Googles search results and is *free*). I'm happy to be proved wrong if someone has a site that's reliable; I just doubt that the business model for these sites can actually support the in-depth knowledge and testing of (frankly) obsolete hardware people think they are getting access to when they type in their credit card number.

A bit of digging turned up the fact that the PC line PCL-3000 is actually just a re-badged Mustek Scanner - looking further into it revealed that it's just a re-badged 1248UB scanner and if you go to the Mustek driver download site the Windows Vista drivers are available to download;
  • (** SEE UPDATE BELOW **) Go to  http://www.mustek.com.tw/Support/ (note that this is NOT the usual .com site, but the parent company in Taiwan - the drivers don't seem to be on the US site)
  • Click "Support"
  • Enter "1248ub" and click "Search"
  • A single result is returned, click on "1248ub"
  • Click "Drivers Download"
  • Click "Windows Vista 32-bit" (or 64-bit if that's the version of Windows you're using!)
If you want to go straight to the download (and you trust software downloaded from bloggers you don't know!) then the direct link is here (of course this might not work as they could move this anywhere on their site).

Hopefully this will save someone the amount of time this took me to work out!

UPDATE: October 2015: Mustek have updated their website and the link (and instructions) above no longer works. The software itself is still accessible on their FTP site though at this location;

ftp://ftp3.mustek.com.tw/pub/new/driver/0_Old%20Products/1248%20UB/

It looks like the software for the scanner is now available for Windows 8, 7, Vista, XP, and 2000. I've not tried it, I switched to a Mac a good few years ago, so can only guess it still works. If it does please leave a comment!


Saturday, January 14, 2012

Enabling Auto-Login Under Windows 7

First of all this is a MASSIVE security hole if you choose to enable it - anyone getting their hands on your machine will have full control over everything (logged into you bank? your Facebook account? your photos? the lot).

There are, however, very good reasons to actually do this; for example I have setup a Windows 7 machine which just runs iTunes because that's all I need - clearly it's pointless to password protect this as all my data is on (non-protected) NAS drive.

So here are the instructions;
1) Go to the start menu
2) type into the "search programs and files" text box the words; "control userpasswords2" and hit return
3) This dialog will appear;
User Accounts Dialog (Windows 7)
4) Make sure the checkbox at the very top (titled "Users must enter a user name and password to use this computer") is unchecked. You will then be prompted to enter your password.

And that's it, when you reboot your machine you will no longer be prompted for a password.

Thursday, July 28, 2011

Solving the "Cannot display this help file" error with Windows Help (.hlp) Files Under Vista/Windows 7/and later

This blog post provides simple step-by-step solutions to getting Windows Help files to display under Windows Vista/ Windows 7.


NOTE: Microsoft Help Viewer is not installed as standard in any of the newer operating systems (Microsoft is actively discouraging it's use). In order to add this feature to you system consult this Mircosoft Knowledgebase Article;

http://support.microsoft.com/kb/917607

This gives you the information you need to install the Help viewer on Vista/7/2008/etc. Without it you will not be able to view help files *at all*.

The message which this knol is attempting to solve when viewing a Help file is;

The error message reads;

 "Cannot display this help file. Try opening the help file again, and if you still get this message, copy the help file to a different drive, and try again".

First of all it's just "information" (not an error) and whilst copying it to a drive with different permissions could solve the problem the fact that you're seeing this error in the first place indicates that it might not.

The problem is caused by the file not being from a "known" source and being in a location (on your hard drive/ network share/ USB stick/ etc) where items with a unknown source cannot be run. Windows in effect treats Help Files in the same was as it does with executables. The message is quite correct in that moving it to a location where this restriction isn't enforced will solve the problem, it's just pretty unlikely there is one!

Anyway to solve the problem right-click the file and select "Properties" (usually at the bottom).

I've highlighted the "Security" section. Click "Unblock". Click "OK".

You should now be able to open the file.

Saturday, March 5, 2011

Why is "Run as different user" not available for some programs in Windows 7?

This blog post covers one of the reasons why holding down shift and right-clicking a shortcut might not give you the "Run as different user" option - only the "Run as administrator" option.


Duplicating the Problem
This is probably one of the most annoying "features" you'll ever encounter. It's probably also one of the least clear. Luckily there's a practically guaranteed way to duplicate the problem so you can see what I mean: install iTunes.

After you have installed the software if you hold down shift and right-click the installed icon you'll notice that you don't get the "Run as different user" option. Actually if you right click it and select "Pin to taskbar" and then run iTunes you'll also notice that it creates a "new" taskbar icon whereas you'd expect it to re-use the one you'd pinned there:

Duplicate iTunes Icons
If you right-click the icon and select "Properties" you'll also notice that the Shortcut itself seems to be setup in a "strange" way:


The "Target location" and "Start in" items appear to be blank.

Fixing the problem
Find the installation directory for the software you're trying to use. For iTunes this is either "C:\Program Files (x86)\iTunes" or "C:\Program Files\iTunes" depending on the OS you are running. If you look in this directory you will see a list of files:


The one we're intersted in I've highlighted - it's the main iTunes application (you can narrow it down for your application by looking for those files with a "Type" of Application and then doing each one in turn). Right-click this file and select "Create shortcut". You will then see the message that "Window's can't create a shortcut here" and "Do you want the shortcut to be placed on the desktop instead?". Click "Yes".

Hold down shift and right-click the new shortcut on your desktop and you'll see the "Run as different user" option is now available.

Tuesday, January 11, 2011

Installing Active Directory Tools Under Windows 7

This blog post is a step-by-step guide to installing the Active Directory Tools (i.e. Active Directory Users and Computers) on a Windows 7 machine. It has been tested on Windows 7 Enterprise but will probably work with Professional or Ultimate as well - Home users it will not work (but then why are you wanting to administer AD from a home machine??!!)

First of all you need to download the software from Microsoft. In the Microsoft Download Centre these are called "Remote Server Administration Tools for Windows 7" a direct link to the download page is given below;

http://www.microsoft.com/downloads/details.aspx?displaylang=en&FamilyID=7d2f6ad7-656b-4313-a005-4e344e43997d

If you scroll down to the "Files in This Download" section of the page you'll see two files. Depending on whether or not you're running 32-bit or 64-bit Windows 7 you need to pick the correct file. If you're unsure of which version you're running then go to the start button, right-click "Computer" and then select "Properties". You'll see something like this;
System Information (64-bit/32-bit)
Look at the "System type:" value and you'll see what version of Windows you're running.

If you're running 32-bit then you need to download the file which starts "x86..." (currently this is "x86fre_GRMRSAT_MSU.msu" but it might change). For 64-bit users you need to download the file which begins "amd64..." (currently this is "amd64fre_GRMRSATX_MSU.msu") - this is true even if you're running a non-AMD 64-bit processor. The reason for this I'll leave Microsoft to explain ...

Once you've got the file install it (it's a standard KB update file).

After it's been successfully installed go to the Start Menu > Control Panel and select "Programs";
"Turn Windows Features on or off" under "Programs and Features"
The "Windows Features" dialog box will be displayed, scroll down to "Role Administration Tools" (under "Remote Server Administration Tools") and select the the following items;
"Windows Features" dialog
Click "OK" to make the changes.

In order to make finding these under the Start Menu a little easier right-click the Start Button and select "Properties";
Taskbar and Start Menu Properties
Select "Customize ..." and then scroll down the list until you see "System administrative tools" and choose where you want the tools to display;
Customize Start Menu
Under the Start Menu you will now see an "Administrative Tools" option, under this you'll see the new AD Tools;
Active Directory Start Menu Items
NOTE: Sometimes a reboot is required to pick up these changes!