A simple function for embedding in SSRS Reports that allows you to check and see if an item exists in a array of items (in either a case sensitive or insensitive way).
Here is the function;
Function ExistsInArray(ByVal SearchTerm As String, ByVal MultiValueParam As Parameter, optional ByVal CaseInsensitive as Boolean = False) As Boolean
For i As Integer = 0 To MultiValueParam.Count - 1
If CaseInsensitive = True Then
If CStr(LCase(MultiValueParam.Value(i))) = LCase(SearchTerm) Then Return True
Else
If CStr(MultiValueParam.Value(i)) = SearchTerm Then Return True
End If
Next
Return False
End Function
You pass in the SearchTerm as a string and then the multi-value parameter you wish to search through. Optionally you can make the search case insensitive by specifying True for the third parameter. The function loops through the items and when it finds one that matches it returns True, otherwise if it finds nothing it returns False.
Monday, May 9, 2011

Oracle PL/SQL: Creating A Database Link
This Knol is a quick developers guide to creating a link between two Oracle databases using TNS Information but not editing the TNSNames.ora file on the server.
It is quite often the case that it is better to link two databases together and report from one of them rather than draw together information from multiple data sources - usually because the link can be re-used more easily and as you have a requirement to re-use it then it stands to reason other people might.
The problem is that DBA's don't generally like developers making changes to the TNS file on the server - and usually this TNS file will only include information for the current database - not all the databases in your company.
Fortunately the CREATE DATABASE LINK command lets you either name a specific TNS entry OR specify the details. To create a database link called DBLINK_TEST to another oracle database which *does not* exist in the TNS file you can use;
CREATE DATABASE LINK DBLINK_TEST
CONNECT TO
IDENTIFIED BY
USING '
(DESCRIPTION =
(ADDRESS_LIST =
(ADDRESS =
(PROTOCOL = TCP)
(HOST = )
(PORT = ))
)
(CONNECT_DATA = (sid =)))'
There is something to be said for not using the TNS file (especially in an Oracle EBS environment) as if you keep creating multiple clones of multiple systems the complexities of keeping the file up to date (and yes I know there are ways of automating it) might not be worth the time.
It is quite often the case that it is better to link two databases together and report from one of them rather than draw together information from multiple data sources - usually because the link can be re-used more easily and as you have a requirement to re-use it then it stands to reason other people might.
The problem is that DBA's don't generally like developers making changes to the TNS file on the server - and usually this TNS file will only include information for the current database - not all the databases in your company.
Fortunately the CREATE DATABASE LINK command lets you either name a specific TNS entry OR specify the details. To create a database link called DBLINK_TEST to another oracle database which *does not* exist in the TNS file you can use;
CREATE DATABASE LINK DBLINK_TEST
CONNECT TO
IDENTIFIED BY
USING '
(DESCRIPTION =
(ADDRESS_LIST =
(ADDRESS =
(PROTOCOL = TCP)
(HOST =
(PORT =
)
(CONNECT_DATA = (sid =
There is something to be said for not using the TNS file (especially in an Oracle EBS environment) as if you keep creating multiple clones of multiple systems the complexities of keeping the file up to date (and yes I know there are ways of automating it) might not be worth the time.
Saturday, March 5, 2011
Why is "Run as different user" not available for some programs in Windows 7?
This blog post covers one of the reasons why holding down shift and right-clicking a shortcut might not give you the "Run as different user" option - only the "Run as administrator" option.
Duplicating the Problem
This is probably one of the most annoying "features" you'll ever encounter. It's probably also one of the least clear. Luckily there's a practically guaranteed way to duplicate the problem so you can see what I mean: install iTunes.
After you have installed the software if you hold down shift and right-click the installed icon you'll notice that you don't get the "Run as different user" option. Actually if you right click it and select "Pin to taskbar" and then run iTunes you'll also notice that it creates a "new" taskbar icon whereas you'd expect it to re-use the one you'd pinned there:
If you right-click the icon and select "Properties" you'll also notice that the Shortcut itself seems to be setup in a "strange" way:

The "Target location" and "Start in" items appear to be blank.
Fixing the problem
Find the installation directory for the software you're trying to use. For iTunes this is either "C:\Program Files (x86)\iTunes" or "C:\Program Files\iTunes" depending on the OS you are running. If you look in this directory you will see a list of files:

The one we're intersted in I've highlighted - it's the main iTunes application (you can narrow it down for your application by looking for those files with a "Type" of Application and then doing each one in turn). Right-click this file and select "Create shortcut". You will then see the message that "Window's can't create a shortcut here" and "Do you want the shortcut to be placed on the desktop instead?". Click "Yes".
Hold down shift and right-click the new shortcut on your desktop and you'll see the "Run as different user" option is now available.
Duplicating the Problem
This is probably one of the most annoying "features" you'll ever encounter. It's probably also one of the least clear. Luckily there's a practically guaranteed way to duplicate the problem so you can see what I mean: install iTunes.
After you have installed the software if you hold down shift and right-click the installed icon you'll notice that you don't get the "Run as different user" option. Actually if you right click it and select "Pin to taskbar" and then run iTunes you'll also notice that it creates a "new" taskbar icon whereas you'd expect it to re-use the one you'd pinned there:
 |
| Duplicate iTunes Icons |

The "Target location" and "Start in" items appear to be blank.
Fixing the problem
Find the installation directory for the software you're trying to use. For iTunes this is either "C:\Program Files (x86)\iTunes" or "C:\Program Files\iTunes" depending on the OS you are running. If you look in this directory you will see a list of files:

The one we're intersted in I've highlighted - it's the main iTunes application (you can narrow it down for your application by looking for those files with a "Type" of Application and then doing each one in turn). Right-click this file and select "Create shortcut". You will then see the message that "Window's can't create a shortcut here" and "Do you want the shortcut to be placed on the desktop instead?". Click "Yes".
Hold down shift and right-click the new shortcut on your desktop and you'll see the "Run as different user" option is now available.
Monday, February 28, 2011
SSRS: Column Duplication (Fixed Columns) on Printouts
This blog post covers implementing something like the "fixed columns" in excel which allow you to have a column (or columns) repeat on multiple pages. This only happens whey you view the report in a non-interactive way (i.e. not when viewing online).
This blog post was put together using SQL Server 2008R2 and Report Builder 3 but it might be applicable to other versions.
Open your report in Report Builder (I'm using 3.0) and add in your duplicate column (you will need to do some sizing - for example setting up your printer format to A4 or US Letter and expanding your page 1 columns to cover the entire width of the page);

After you have added in your duplicate column select the column, right-click the heading and select "Column Visibility";

Enter the expression;
[&RenderFormat.IsInteractive]
Into the "Show or hide based on an expression" entry box.
The column will now only appear when the report is not being viewed interactively (to test you can click "Run" and then choose "Print Layout").
Saturday, February 26, 2011
SSRS: Scheduling Reports Using SQL Server Reporting Services 2008
This blog post gives detailed step-by-step instructions on how to schedule reports to run using SQL Server Reporting Services 2008 Standard Edition. Additional features are available in the Enterprise Edition and these will be covered separately.
Prerequisites
The example Reporting Services project used throughout this guide (put together using Bussiness Intelliegnece Development Studio) is available for download here. You might want to download and unzip this file, load it into the Business Intelignence Development Studio and deploy the reports to your server before attempting to continue with this step-by-step guide.
Accessing Reporting Services
In order to access the Self Service interface for reporting services you need to point your web browser to the page:
https:///reports
You will then see a list of folders for the reports available on that server and the "Data Sources" folder which contains shared data sources (that we won't be using during this demo).

Click on "GoogleKnolSSRSProject".

You can now see three reports; ComplexParameters, SimpleParameter, and NoParameter.
Scheduling A Report With No Parameters
To start things out simply we'll begin by scheduling the "NoParameter" report. Click on it.

This is the report itself (it simply displays a label showing information about this report). Click on the "New Subscription" button at the top left.

This screen allows you to create a new Subscription for this report. As you can see you have to specify two things; the report delivery options (how you want to receive it), and the schedule for delivering the report to you.
The delivery options avaialble to you will depend on how the SQL Server you are using has been setup. The default (if available) is via email but I'll take you through both email and delivery to a fileshare (which is sometimes more convienient if you're looking at something that is accessed by multiple people for example).
Deploying the Report via E-Mail
Select "E-Mail" in the drop down:

The screen will change to show you options available for an email. These are all pretty self-explanatory so I don't intend to go through them one at a time. For the purposes of this example I'm going to be outputting to report into Excel so change the "Render Format" from MHTML (web archive) to "Excel".
It's worth noting that the version of this screen you see is dependant on the permissions you have on the server. If you are a "normal user" then you get the screen shown above. If you have extra permisisons you will see extra fields (i.e. CC, BCC, Reply-To, Comment, and the "To" field becomes editable so you can send the subscription to multiple users).
Now that what we want to do is defined click "Select Schedule":
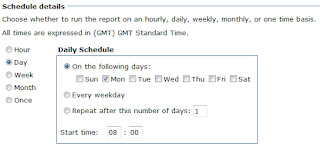
This new screen presents the options you have in the scheduler. For the purposes of this test I'm going to select this report to run on weekdays a few minutes in the future (just so it runs while I'm writing this!).
At the bottom of this screen is an option to have a start/end schedule for the report:

I won't be using this but feel free to experiement.
Once you've selected the schedule you want click "OK".

You are now presented with the Delivery Options and Schedule you've created. Click "OK" to start the subscription.
After the subscription time has passed an email will arrive with the report:

Deploying the Report via a File Share
Select "Windows File Share" in the "Delivered by:" drop down:

Pick a schedule and click "OK".
NOTE: SQL Server needs to be able to "see" the share to which you're trying to write the file. If it can't (for whatever reason) you will see a message like:

You will need to contact the person reponsible for Administering your server in order to get these permissions problems resolved (especially if you are trying to write this to a "private" share).
Other Deployment Options
Other options are available depending on how your SQL Server is configured (for example if your SQL Server is running in SharePoint integrated mode).
Scheduling a Report with a Simple Parameter
Return to the report selection screen:

Select the "SimpleParameter" report:

Unlike the pervious report you're now being prompted for a parameter before the report is executed. Enter the value "5" and then click "View Report". As you can see this report is pretty similar to the previous one except that it displays the value of the parameter passed to it. Click on "New Subscription" at the top:

This screen is exactly the same as the previous screen so I don't intend going over the Report Delivery Options (top) and the Subscription Processing Options (middle) again. The new section at the bottom is "Report Parameter Values". This section allows you to specify parameters than should be used to run the report.
Enter the value "7" and setup an appropirate schedule and then click "OK".
At the scheduled time the report will be processed and you will receive an email:

You'll notice that leaving the Render format set to "MHTML (web archive)" gives you a nice email in outlook that you can see without having to open an attachment (which can be a problem on certain mobile devices).
Scheduling Reports with Complex Parameters
Return to the report selection screen:

Select the "ComplexParameters" report:

As you can see this report takes four parameters; Day and Time and both pciked from a list (day has a default value, time does not), and Attendees and Guests are simple paremeters (attendees has a default, guests does not).
Pick the time "08:00-11:59" and enter "2" for guests and click "View Report":

Again this report simply re-displays the values of the parameters passed into it. Click on "New Subscription":

The "Report Parameter Values" section at the bottom of the Subscription screen allows you to use the drop downs to pick values for Day and Time OR, in the case of Day, to check the "Use Default" checkbox.
Check the two "Use Default" checkboxes (for Day and Attendees) pick the time 08:00-11:59 and enter "1" for Guests set the Report Delivery Options and pick a schedule and click "OK".
After a few minutes an email will arrive:

The advantages of using Default parameters for scheduling is that, for example, if you are running monthly reports for a full month then if the Default value for the parameter is "last month" then by selecting to use the default when the value of "last month" (i.e. Jan > Feb > Mar > etc) changes the report will automatically pick up the change. If, in February, you ran the report and specified January when the report ran again in March it would just run again for January.
Prerequisites
The example Reporting Services project used throughout this guide (put together using Bussiness Intelliegnece Development Studio) is available for download here. You might want to download and unzip this file, load it into the Business Intelignence Development Studio and deploy the reports to your server before attempting to continue with this step-by-step guide.
Accessing Reporting Services
In order to access the Self Service interface for reporting services you need to point your web browser to the page:
https://
You will then see a list of folders for the reports available on that server and the "Data Sources" folder which contains shared data sources (that we won't be using during this demo).

Click on "GoogleKnolSSRSProject".

You can now see three reports; ComplexParameters, SimpleParameter, and NoParameter.
Scheduling A Report With No Parameters
To start things out simply we'll begin by scheduling the "NoParameter" report. Click on it.

This is the report itself (it simply displays a label showing information about this report). Click on the "New Subscription" button at the top left.

This screen allows you to create a new Subscription for this report. As you can see you have to specify two things; the report delivery options (how you want to receive it), and the schedule for delivering the report to you.
The delivery options avaialble to you will depend on how the SQL Server you are using has been setup. The default (if available) is via email but I'll take you through both email and delivery to a fileshare (which is sometimes more convienient if you're looking at something that is accessed by multiple people for example).
Deploying the Report via E-Mail
Select "E-Mail" in the drop down:

The screen will change to show you options available for an email. These are all pretty self-explanatory so I don't intend to go through them one at a time. For the purposes of this example I'm going to be outputting to report into Excel so change the "Render Format" from MHTML (web archive) to "Excel".
It's worth noting that the version of this screen you see is dependant on the permissions you have on the server. If you are a "normal user" then you get the screen shown above. If you have extra permisisons you will see extra fields (i.e. CC, BCC, Reply-To, Comment, and the "To" field becomes editable so you can send the subscription to multiple users).
Now that what we want to do is defined click "Select Schedule":

This new screen presents the options you have in the scheduler. For the purposes of this test I'm going to select this report to run on weekdays a few minutes in the future (just so it runs while I'm writing this!).
At the bottom of this screen is an option to have a start/end schedule for the report:

I won't be using this but feel free to experiement.
Once you've selected the schedule you want click "OK".

You are now presented with the Delivery Options and Schedule you've created. Click "OK" to start the subscription.
After the subscription time has passed an email will arrive with the report:

Deploying the Report via a File Share
Select "Windows File Share" in the "Delivered by:" drop down:

Pick a schedule and click "OK".
NOTE: SQL Server needs to be able to "see" the share to which you're trying to write the file. If it can't (for whatever reason) you will see a message like:

You will need to contact the person reponsible for Administering your server in order to get these permissions problems resolved (especially if you are trying to write this to a "private" share).
Other Deployment Options
Other options are available depending on how your SQL Server is configured (for example if your SQL Server is running in SharePoint integrated mode).
Scheduling a Report with a Simple Parameter
Return to the report selection screen:

Select the "SimpleParameter" report:

Unlike the pervious report you're now being prompted for a parameter before the report is executed. Enter the value "5" and then click "View Report". As you can see this report is pretty similar to the previous one except that it displays the value of the parameter passed to it. Click on "New Subscription" at the top:

This screen is exactly the same as the previous screen so I don't intend going over the Report Delivery Options (top) and the Subscription Processing Options (middle) again. The new section at the bottom is "Report Parameter Values". This section allows you to specify parameters than should be used to run the report.
Enter the value "7" and setup an appropirate schedule and then click "OK".
At the scheduled time the report will be processed and you will receive an email:

You'll notice that leaving the Render format set to "MHTML (web archive)" gives you a nice email in outlook that you can see without having to open an attachment (which can be a problem on certain mobile devices).
Scheduling Reports with Complex Parameters
Return to the report selection screen:

Select the "ComplexParameters" report:

As you can see this report takes four parameters; Day and Time and both pciked from a list (day has a default value, time does not), and Attendees and Guests are simple paremeters (attendees has a default, guests does not).
Pick the time "08:00-11:59" and enter "2" for guests and click "View Report":

Again this report simply re-displays the values of the parameters passed into it. Click on "New Subscription":

The "Report Parameter Values" section at the bottom of the Subscription screen allows you to use the drop downs to pick values for Day and Time OR, in the case of Day, to check the "Use Default" checkbox.
Check the two "Use Default" checkboxes (for Day and Attendees) pick the time 08:00-11:59 and enter "1" for Guests set the Report Delivery Options and pick a schedule and click "OK".
After a few minutes an email will arrive:

The advantages of using Default parameters for scheduling is that, for example, if you are running monthly reports for a full month then if the Default value for the parameter is "last month" then by selecting to use the default when the value of "last month" (i.e. Jan > Feb > Mar > etc) changes the report will automatically pick up the change. If, in February, you ran the report and specified January when the report ran again in March it would just run again for January.
Tuesday, February 15, 2011
SSRS: Working With Multiple Value Parameters
It is generally a good idea when writing reports to provide some space on the report to display the parameter values the user is using to run the report. It makes it a lot easier to deal with helpdesk requests along the lines of "Why's it doing this?" accompanied by a screen shot or a saved report - if you include the parameter values in the report then it should be fairly easy to duplicate it.
The problem comes when you're dealing with Multiple Value Parameters. For example if I look at the General Ledger Accounts we have setup in our ERP System we have around 804. Most users will select a couple, all, or one to report on. How do we make sure that enough meaningful information is displayed to help us debug any issues with the report?
The following function follows some simple rules;
- If the number of selected records is the same as the number of records available in the dataset then display "All",
- If a single record is selected then display it,
- If more than 10 records are selected display "Multiple", and otherwise
- Build a comma-separated list of the selected labels making sure that the last item is separated by ", or " rather than a just a "," (it does this by joining together all the selected items separated by "@@@@@", removing the last item and then adding it back in with the separator)
The code to process these rules is;
=IIF(
Count(Fields!KEY.Value, "LIST_GLACCOUNTS") =
Parameters!ACCOUNTLIST.Count, "All",
IIF(
Parameters!ACCOUNTLIST.Count = 1,
Join(Parameters!ACCOUNTLIST.Label, ""),
IIF(
Parameters!ACCOUNTLIST.Count > 10,
"Multiple",
Replace(
Left(
Join(
Parameters!ACCOUNTLIST.Label, "@@@@@"),
InStrRev(
Join(
Parameters!ACCOUNTLIST.Label,
"@@@@@"),
"@@@@@") - IIF( Parameters!ACCOUNTLIST.Count < 2, 0, 1)),
"@@@@@",
", ") + ", or " +
Parameters!ACCOUNTLIST.Label(
Parameters!ACCOUNTLIST.Count-1))))
SSRS: Commonly Used Date/Time Functions

Hopefully they'll prove useful and as new ones come up I'll update this post;
Last day of the current year,
=DateSerial(Year(Now()), 12, 31)
Last day of previous month
=DateAdd(""d"", -1, DateSerial(Year(Now()), Month(Now()), 1))
First date of previous month
=DateAdd(""m"", -1, DateSerial(Year(Now()), Month(Now()), 1))
First day of last year
=DateSerial(Year(Now())-1, 1, 1)
Last day of last year
=DateSerial(Year(Now())-1, 12, 31)
Last day of this year
=DateSerial(Year(Now()), 12, 31)
First day of this year
=DateSerial(Year(Now()), 1, 1)
Subscribe to:
Posts (Atom)