Pages

Monday, February 25, 2013

OS X: Getting the MAC Address of Your Wireless Networking Adapter

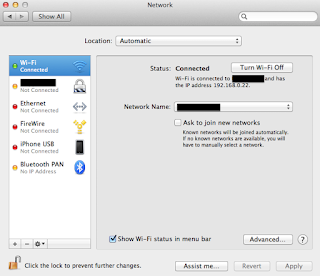
The first step is to click on the "Wireless Network" icon that should be at the top right on your statusbar;
Wireless Networking Icon
Click on "Open Network Preferences ..." at the bottom;

Network Preferences
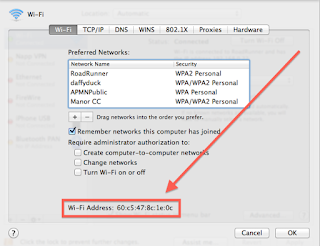
Make sure you have selected your Wi-Fi connection in the list on the left and then click on the "Advanced" button at the bottom right;

Advanced Network Settings
The MAC Address is highlighted in the image above.

Monday, February 18, 2013

Oracle PL/SQL: How Big Are My Tables?

As part of a change request I just happened to need to get a "ball-park" figure on the sizes of some of the key tables in a schema. For that reason I put together the following PL/SQL;

SELECT NVL(di.table_name, DS.segment_name) "Table Name",
       ROUND((sum(ds.bytes) / 1048576 /* 1 MB in bytes */), 3) "MB"
  FROM dba_segments DS
  LEFT JOIN dba_indexes DI
    ON DI.owner = DS.owner
   AND DI.index_name = DS.segment_name
 WHERE 1 = 1
   AND DS.segment_type IN ('INDEX', 'TABLE')
   AND DS.owner = USER -- Currently logged in user
 GROUP BY NVL(di.table_name, DS.segment_name)
 ORDER BY sum(ds.bytes) DESC


It works by looking at the sizes of both the table itself and any assocaited indexes. It's worth noting that there are other components (notably LOB's) which can have a drastic effect on table size which I'm not checking for here (primarily because I'm not interested in them - we typically put those into another table space that is monitored separately).

In some cases you might want the break down based on the segment_type (so you can tell the difference between lots of table data and lots of indexes) but I think by studying the above you get the gist of what would need to be tweaked to do that.

Hopefully this will prove useful to those of you wanting quick estimates to provide to support.

Sunday, February 17, 2013

Accessing Free Audiobooks via Cambridgeshire Libraries Online

The first step is not at all really surprising; you need a library card (if nothing else this acts as proof that you are resident in the Cambridgeshire County as they have to post it out to you). If you don't have one already you can apply for one via this link;

https://cambridgeshire.spydus.co.uk/cgi-bin/spydus.exe/MSGTRN/OPAC/BRWREG

Alternatively a short link is available - http://goo.gl/jOVG3

It takes about 7-10 days for you to get your card (and welcome letter) and you really can't do anything to speed this up.

Once you've got your card you'll need to go to the "Create An Account" page on the OneClickdigital website (which is partnering with Cambridgeshire County Council to deliver this service);

http://cambridgeshire.oneclickdigital.eu/Create%20User.aspx

The screen you're presented with looks something like this;

OneClickdigital: Create An Account page
Enter your library number on the left (it begins DD...) and your personal information on the right. When you'd done click the button at the bottom;

Oneclickdigital: Welcome Page

And that's it. You can now click on the "home" tab at the top-left and download away;

Cambridge Audiobook Online Library
It's a little disappointing that all I can see are 48Kbs MP3 files - but then as we're only talking about spoken-word audio you're unlikely to be missing out on the highs and the lows that you would expect to be present in, for instance, a music track.

As far as I can see it works in a similar way to a library service in that you select a book and say how long you'd want to "check it out" for. For example here is "A Ship of War" by Sean Thomas Russell showing a checkout time of 21 days;

"A Ship of War" by Sean Thomas Russell (book page)
You can pick anything from 1 day to 21 days. Whatever period you pick the "copy" you download of the book is unavailable for anyone else to borrow during that period. For example here is the "Luther: The Calling" by Neil Cross;

"Luther: The Calling" by Neil Cross (book page)
Under availability this shows "Not Available". It's likely this is due to all the "copies" of the book being already out on loan.

Yes. I know. "Not Available" for a digital copy?! Doesn't quite make sense in the digital world. However the one thing you need to bear in mind is that there is no legal requirement on book publishers to make audiobooks available to libraries in the same way there is for paper copies. Whilst what we have is far from ideal it is better than the alternative - try searching for Terry Pratchett or J K Rowling to see what publishers have chosen to not allow access to.

In fact doing a search for "everything" (and if you work in IT you'll know that if you get any results for that search it's not a good sign as generally if you go to Amazon, Apple, Tesco, etc websites and search for everything there are too many results so it won't show them to you) you'll see that there are only 1,001 titles available (this is as of February 2013);

Searching for "Everything" ... With results!
You'll notice that Art, Business & Economics, Historical Fiction, language, Music, Poetry, religion, Sagas, Technology & Industry, and Westerns are categories without a single book in them!

Similarly of the 1,001 audio books only 26 are targeted at Children.

But on the plus side only 48 are encumbered by DRM (which means you have to worry a lot more about whether or not they'll play on your device - but then you could just "borrow" it for a day to find out!). The other downloads must be just MP3's which is pretty good.

This is still a fairly new service being offered by the County Council so it will be interesting to see how (and indeed if!) it grows over the next few years.

Tuesday, February 12, 2013

SQL Server: Installing BIDS 2008R2 (Developer Edition)

After inserting the CD and running the Setup.exe the following User Account Control (UAC) dialog will appear;
SQL Server 2008 R2 UAC Dialog
Click "Yes".

The SQL Server Installation Center dialog will now appear;

SQL Server Installation Center
Click on "Installation" on the left (highlighted above);

SQL Server Installation Center (Installation Page)
Click "New installation or add features to an existing installation" (the top option on the right);

SQL Server 2008 R2 Setup
The installation program will run some tests to make sure your system can run the software. I'm installing onto Windows 7 Enterprise (32-bit). If there any any issues you'll need to resolve them before it will allow you to continue. Click "OK";

SQL Server 2008 R2: Product Key Dialog
After entering your product key click "Next";

SQL Server 2008 R2: License Terms
Click on the "I accept the license terms" checkbox (after reading it of course!) and then click "Next";

SQL Server 2008 R2: Setup Support Files
Click "Install" (if the installation of Setup Support Files fails with 1605 or 1608 error message then you may be interested in this post here - thank you Sage!);

SQL Server 2008 R2: Setup Support Rules
Click "Next";

SQL Server 2008 R2: Setup Role
Click "Next";

SQL Server 2008 R2: Feature Selection
Select "Business Intelligence Development Studio" (I've also chosen the Client/ Management Tools as they're often quite useful as well). Click "Next";

SQL Server 2008 R2: Installation Rules
Click "Next";

SQL Server 2008 R2: Disk Space Requirements
Click "Next";

SQL Server 2008 R2: Error Reporting
Click "Next";

SQL Server 2008 R2: Installation Configuration Rules
Click "Next";

SQL Server 2008 R2: Ready to Install
Click "Install";

SQL Server 2008 R2: Installation Progress
Wait for the installation to complete (takes about 10 minutes);

SQL Server 2008 R2:Complete
Click "Close".

You can now find SQL Server Business Intelligence Development Studio on your start menu;

SQL Server Business Intelligence Development Studio
NOTE: One of the fantastic anomalies with BIDS is that unless you have Integration Services installed locally you don't seem to actually do deploy to a remote server from within BIDS - you need to deploy to the file system and then use management studio to deploy to the server.

Also unless you install Integration Services *locally* you won't be able to test the deployed package on your system.


Monday, February 11, 2013

SSIS: Creating a Job To Run An SSIS Package On A SQL Server

For this blog post I'm going to use the test SSIS package I created as part of the "Exporting Query Results To A Flat File"-blog post, and had previously deployed to SQL Server (see "Deploying A Package To A Remote SQL Server") because it's all setup and I know it works.

Start SQL Server Management Studio;
Management Studio: Connect to Server
Make sure you select "Database Engine" in the "Server type" drop down. Click "Connect";

SQL Server: Object Explorer
Expand the "SQL Server Agent" node in the "Object Explorer" (left-hand side) and then right-click the "Jobs" node;

SQL Server: Creating A New Job
Click on "New Job ...";

SQL Server: New Job Dialog
Enter a Name (I've chosen "SSISDataExportDemo") and then select "Steps" from the list on the left;

SQL Server: New Job Dialog (Steps)
Click on "New..." (highlighted above);

SQL Server: New Job Step Dialog
Enter a "Step Name" (we're only going to have one so it's not really important) and then change the Type from "Transaction SQL script (T-SQL)" to "SQL Server Integration Services Package" and a lot of new options will appear;

SQL Server: New Job Step (SQL Server Integration Services Package)
You need to select the SQL Server you wish to run the package on (doesn't have to be the one you're currently connected to) and then select the name of the package. Once you've done that click "OK";

SQL Server: New Job (Steps)
As you can see the new step we've just created is now listed.

It is now ready to run but if the job is only going to be run as a one-off you might want to click "Notification" on the left and select "Automatically Delete Job" (when the Job Succeeds);

SQL Server: New Job (Notifications)
This way you'll keep your SQL Server tidy but you should bear in mind that if you do this the job will run immediately and then be gone so you won't be able to see anything in the following steps!

Click "OK" when you're done (a few seconds will pass while the script to create the job is executed on the SQL Server).

Now you can expand the "Jobs" node on the SQL Server and find the new Job you've just created (usually it's inserted at the bottom of the list) and right-click it;

SQL Server: Job Options
Choose "Start Job at Step...";

SQL Server: Start Jobs
The job will run and will take as long as it takes and then you'll see the result (as above). Now that we know the Job is there and works we can schedule it by right-clicking it and bringing up "Properties" and select the "Schedules" page;

SQL Server: Job Properties (Schedules)
Click on "New ..." to create a New Schedule;

SQL Server: New Job Schedule
I've changed the "Schedule type" to "One time" and set it to run in a few minutes but there is a lot of flexibility to schedule the task as and when you see fit.

When you're done click "OK", and then "OK" again to save your changes.

SSIS: Deploying A Package To A Remote SQL Server (And Testing It)

The blog post covers deploying a package onto a server (and then running it). I'm going to use the test package I created in the blog post "Exporting Query Results To A Flat File" as it's as good as any and doesn't rely on anything tricky. I also know that the domain user who is running the Server has permissions to see the G drive I'm trying to write to so I can eliminate that as a potential error!

Open the project in BIDS and right-click the project in "Solution Explorer" (on the right);

SSIS: Solution Properties
Select "Properties" at the bottom;

SSIS: Solution Property Pages
Select "Deploy (BIDS Helper)" in the panel on the right and then change the "DeploymentType" to "SqlServerDestination";

SSIS: Changed Deployment Settings
While it defaults to "localhost" I always tend to pick a different machine to deploy to if possible or specify the name of the machine in full - I just worry that "localhost" could change at any time (you could open and run it on a different machine) whereas if I specify a machine it will remain constant.

When you've entered the server you with to use click "OK".

Right-click the project in the "Solution Explorer" view again;
SSIS: Deploying A Project
And this time select "Deploy";

SSIS: Output Showing A Successful Deploy
Now the package has been successfully deployed to the SSIS Server.

To check it's successfully worked open up SQL Server Management Studio;

SQL Server Management Studio: Connect to Server
Make sure you select "Integration Services" in the "Server type" drop down and click "Connect".

Go to the "Object Explorer" (on the left) and expand the nodes under "Stored Packages" until you find the package you've just deployed;

Management Studio: Deployed Package
Now right-click the deployed package;

Management Studio: Package Options
Select "Run Package";

Management Studio: Execute Package Utility
Click "Execute";
Management Studio: Package Execution Progress
As you'll see I've expanded the window so you can see the complete set of messages for executing this package. This will appear over time as the package executes so could take anything from a few seconds to a few hours to shows you everything (depending on the complexity and volume of the SQL you're running) but it will complete (either with an error or success).

Click "Close".