Pages

Wednesday, December 8, 2010

How To Get To The Arbury Carnival


This blog pos covers a variety of transport options for getting to/from the Arbury Carnival. This event is held in King's Hedges in North Cambridge (UK) on the second Saturday in June each year.


So where is it?
The following Google Map shows the location of the Carnival.
If you want to search for the nearest postcode then the best one to pick is probably CB4 2LD. Campkin Road, the postal address for the Carnival, is actually quite long and if you type in that postcode coming from the North or West will actually cause you to "arrive at your destination" without your destination actually being visible. Hardly ideal!

Travelling By Car
Clearly with the congestion caused by the Carnival you don't really want to be travelling to/from the area by car but I accept that for some people it is not just the easiest but the only option. There are two off-street car parks within very easy walking distance (one right next to the Carnival green itself).

Arbury Community Centre Car Park
Situated right next to the Arbury Community Centre (which in turn is right next to the Carnival green) this is the most convienient and consequently it's the one that's going to fill up first. It's actually quite small at around 50 cars total and it's likely that stall holders (who will be arriving at 8am) are likely to have taken up a lot of the spaces so I guess the key is to arrive early!

There are several disabled parking bays.

NOTE: Please take note of the Height Restriction entering the car park! This is fairly common in Cambridge and driving into it will really ruin your day ...

Arbury Community Centre Car Park (from Google Street View 
One final note on car travel; please try and avoid parking on Northfield Avenue - the procession passes down this route and it makes it "difficult" if for the last hundred yards the people involved have the run the gauntlet of parked cars.

Arbury Court Car Park
Slightly further way and with about the same capacity this Car Park serves the near by shopping precinct of Arbury Court. It is similarly sized and so consequently will fill up similarly quickly.

Arbury Court Cark Park (from Google Street View)
You can walk straight from the back of the Car Park across the road (at traffic lights), past the Arbury Community Centre and onto the Green where the Carnival takes places (2-3 minutes walk).

Again there are several disabled parking bays.

Travelling By Bus
Arbury/ King's Hedges are well served by Stagecoach Bus services. By far the most convienient bus service is the Citi 1 which runs from Fulbourn to Arbury/King's Hedges via Addenbrookes, Cambridge Station, the City Centre, and Cambridge Regional College every 10 minutes during the day.

The timetable for the Citi 1 is available from Stagecoach via their website here.

Travelling By Guided Bus
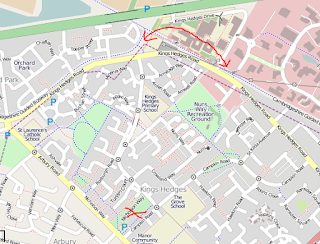
The Guided Bus passes very close by (5-10 minute walk) from the site of the Arbury Carnival. The closest stop on the Busway is either the Cambridge Regional College or Orchard Park East


The arrows at the top mark the Orchard Park East and Cambridge Regional College stops, the X at the bottom/ middle of the map is where the carnival is located. You can either walk down King's Hedges Road/ Northfield Avenue or (as you've already paid for the ticket) catch the Citi 1 service from opposite the Regional College/ at the Top of Northfield Avenue and it will take you straight to the Carnival site.

Travelling By Train
The nearest station to the Carnival is Cambridge Station. The Citi 1 bus service runs (every 10 minutes) direct from the station to the Carnival site (the jouney will take around 30 minutes). See above for instructions on travelling by bus.
Friday, November 26, 2010

Oracle PL/SQL: Dropping All Objects In An Oracle Schema

This blog post provides a simple piece of PL/SQL which will delete every object owned by the currently logged in user.

Here is the PL/SQL block;


declare
  v_ItemCount integer;
begin
  SELECT count(*)
    INTO v_ItemCount
    FROM ALL_OBJECTS AO
   WHERE AO.OWNER = USER
     AND AO.OBJECT_TYPE NOT IN ('INDEX')
     AND AO.OBJECT_NAME NOT LIKE 'BIN$%';
  while (v_ItemCount > 0) loop
    for v_Cmd in (SELECT 'drop ' || AO.OBJECT_TYPE || ' ' || AO.OBJECT_NAME ||
                         DECODE(AO.OBJECT_TYPE,
                                'TABLE',
                                ' CASCADE CONSTRAINTS',
                                '') as DROPCMD
                    FROM ALL_OBJECTS AO
                   WHERE AO.OWNER = USER
                     AND AO.OBJECT_TYPE NOT IN ('INDEX')
                     AND AO.OBJECT_NAME NOT LIKE 'BIN$%') loop
      begin
        execute immediate v_Cmd.dropcmd;
      exception
        when others then
          null; -- ignore errors
      end;
    end loop;
    SELECT count(*)
      INTO v_ItemCount
      FROM ALL_OBJECTS AO
     WHERE AO.OWNER = USER
       AND AO.OBJECT_TYPE NOT IN ('INDEX')
       AND AO.OBJECT_NAME NOT LIKE 'BIN$%';
  end loop;


  execute immediate 'purge recyclebin';
end;

The SQL was written against Oracle 10g (hence the "purge recyclebin" at the bottom and the exclusion of objects already in the recycle bin from the "drop" loop). You can monitor progress (and check to see if the code has stalled) by running the count SQL in another editor attached to the same schema.

Clearly a piece of SQL you should be very careful with!

Thursday, November 25, 2010

Deploying an ASP.NET Website to a Remote Server Running IIS 6


Probably the most important thing I can do first is to describe the environment I'm using; we have a global Active Directory forest with local domain controllers in each country. We have Windows 2003 servers running IIS 6 in both test and production - Developers (like myself) have a normal user account and a "Domain Administrator" account for working with remote servers. We use Kerberos for authentication (which requires a slight change to the process, see later).

The website itself has been generated using Visual Studio 2008. It has a single label (lblOutput) on the "Default.aspx" page and in the pages "on_load" event handler the following code;

        lblOutput.Text = "
" +
    "
" +
    "
Page.User.Identity.Name:" + Page.User.Identity.Name + "
System.Security.Principal.WindowsIdentity.GetCurrent().Name:" + System.Security.Principal.WindowsIdentity.GetCurrent().Name + "
Request.ServerVariables[LOGON_USER]:" + Request.ServerVariables["LOGON_USER"] + "
";

Put simply this just reads the currently logged in user, the user running the IIS server, and the server variable for the logged in user and displays them on the web page (very simple). It's a good test of what we're doin because the user running the web server will be changed by this process.

This document is a fairly specific guide for the company I work for so we can do the process repeatedly, feel free to make suggestions to improve it and to skip any "unnecessary" steps that don't fit into your organisation.

Step by Step Guide

  1. Logon (Remote Desktop) to the machine acting as your webserver and make sure you are connecting as as an Administrator
  2. Open Windows Explorer and go to "C:\Websites"
  3. Create a directory with your website name, it's best not to use spaces or any special characters as we're going to use this for the names of the Website in IIS and the Applicaiton Pool.
  4. Open IIS Manager
  5. Right-click "Application Pools" and choose "New > Application Pool"
  6. Call the Pool AP + the directory name you used under "C:\Websites" (henceforth just "directory name")
  7. Choose "User default settings ..."
  8. Click "OK"
  9. Right-click the newly created Application Pool and select "Properties"
  10. Select the "Identity" tab, choose "Configurable" and enter the windows account the website should be running under
  11. Click "OK"
  12. Right-click the "Websites" and select "New > Website"
  13. Enter the same name as you used for a directory
  14. Set the TCP Port to a random value not currently in use for any of the other sites
  15. Select the directory you just created under "C:\Websites" as the location for the new site
  16. Choose "Run Scripts" and "Read" for permissions
  17. Click "Finish"
  18. Right-click the newly created Web Site and select "Properties"
  19. Go to "ASP.NET" tab and select the correct version (if needed)
  20. Go to "Home Directory" tab and change the "Application Pool" to the application pool you just created
  21. Go to "Directory Security" tab and click on "Edit" under "Authentication and acccess control"
  22. Disable "Enable anonymous access"
  23. Click "OK" twice
  24. Open up Computer Management, expand "Local Users and Group", then "Groups"
  25. Open the IIS_WPG group and add in the Windows account you are using to run the application pool

You are now ready to begin testing, open your web browser on a different machine and see if you can connect.

Troubleshooting
"Service Unavailable" error message in the browser
Check to make sure that the windows account you are using for the application pool is actually able to login (i.e. the account isn't locked, you've entered the correct username and password).

If you refresh the application pools in IIS Manager if the application pool has "crashed" you will see the icon change.

Multiple "username/password" dialogs followed by "you are not authorized to view this page" errors
The chances are if you're seeing this you are using Kerbaros for authentication (like us). An easy way to tell is to download Firefox and try and access the site using that - it should accept your authentication and take you to the site. This is one of the very rare cases where Firefox will actually work and IE won't.

In order to fix this problem you need to create a Service Principle Name (SPN) for the username/ server combination. Remember to create a fully qualified SPN as well as a shortcode (i.e. server and server.domain.forest.org) - you are likely to need both and it makes it a lot easier to have both.

Opening Additional Mailboxes in Outlook 2007

A simple step-by-step guide for end users on how to open additional mailboxes (assuming you have been granted the appropirate permissions) using Outlook 2007 and Microsft Exchange Mailboxes in a Corporate Environment.

Open Outlook 2007 as you would normally

Access the “Tools” menu and select “Account Settings ...”

Ensure that “Microsoft Exchange” is selected and click the button marked “Change...” just above and to the right of it.

Click on “More Settings ...” at the bottom right.

Select the “Advanced” tab (second from the left).

Click on the “Add...” button in the “Mailboxes” group at the top.

Enter the email address for the mailbox you wish to add and click “OK” on this dialog.

Providing you have entered the details correctly the new mailbox will be displayed under “Open these additional mailboxes” in the dialog. If you have additional mailboxes to add you can click on “Add ...” again and repeat the previous step.


When you’ve added all the mailboxes you require click “OK”.

The “Next” button at the bottom right will now be available on this dialog. Click “Next”.

Click “Finish”.

Click “Close”.

The shared mailbox will now be available.

Monday, September 6, 2010

Oracle PL/SQL: Copying Column Comments From One View To Another

This blog post gives a piece of simple SQL that will allow you to automatically copy the comments from one database view to another. In the case of this example we are copying the column comments from a standard oracle view to a materialised view which has the same name except with "_MV" suffix.


The PL/SQL block is;

declare
  v_ViewName varchar2(30) := 'XXX';
begin
  for v_Comment in (select acc.COLUMN_NAME, REPLACE(REPLACE(acc.COMMENTS, chr(13), ''), chr(10), '') comments
                      from all_col_comments acc
                     where acc.OWNER = USER
                       and acc.TABLE_NAME = v_NoetixViewName) loop
    execute immediate
      'comment on column ' || v_ViewName || '_MV.' || v_Comment.Column_Name || ' is ''' || v_Comment.Comments || '''';
  end loop;
end;

To use this code in your system replace XXX with the name of the view you want to copy from and where is says "...  v_ViewName || '_MV ..." you should replace this with the naming convention you are using for the view you want to copy to.

For example if you source view is called SOURCE and your target view is called TARGET then the SQL would become;

declare
  v_ViewName varchar2(30) := 'SOURCE';
begin
  for v_Comment in (select acc.COLUMN_NAME, REPLACE(REPLACE(acc.COMMENTS, chr(13), ''), chr(10), '') comments
                      from all_col_comments acc
                     where acc.OWNER = USER
                       and acc.TABLE_NAME = v_NoetixViewName) loop
    execute immediate
      'comment on column TARGET.' || v_Comment.Column_Name || ' is ''' || v_Comment.Comments || '''';
  end loop;
end;

I've found this useful when creating new materialised views based on existing NoetixViews to copy across all the comments from the NoetixView to the Materialised view (rather than having to write the comments in myself).

Hope this helps!

Tuesday, July 27, 2010

SSRS: Repeating Column Headings Not Appearing

This blog post covers how to make changes to your existing SQL Server Reporting Services Report to ensure that the Column Headings appear at the top of every page. The steps (and screen shots) below come from Report Builder 3 running against SQL Server 2008R2.

Looking at a standard report the first thing you will have tried is to set the "Repeat Column Header" and "Repeat Row Header" on the table. For whatever reason this doesn't work and you'll then have found yourself here (probably via Google!);
In order to make repeating headers actually work the first thing you need to do is to turn on "advanced" mode for Row/Column Groups. You do this by clicking on the down arrow at the far-right of the section;
And selecting "Advanced Mode".

This will then add in some of the "Hidden" levels in the Row Groups entry box;
If you select the top item "Static" and view the properties you can see the "RepeatOnNewPage" property (at the bottom of the "Other" section);
Changing this to "True" will make the column headings repeat on each page.

Wednesday, June 9, 2010

SSRS: Looking Up Values in Another Dataset

This blog post covers using Report Builder 3 (with Microsoft SQL Server 2008R2) to lookup a value in another dataset.

Scroll straight to the bottom for the key function, the rest of the article is setup.

NOTE: The back end of this example is an Oracle database but the solution will work for any database, you just will need to modify the SQL.


Start Report Builder 3

Select "Blank Report" from the New Report or Dataset wizard.


Right click "Dataset" in the treeview on the left and select "Add Dataset ..." from the popup:

Change the radio group on the right from "Use a shared dataset" to "User a dataset embedded in my report":

Click the "New ..." button next to the Data source drop down:


Change the selected radio group item from "Use a shared connection or report model" to "User a connection embedded in my report":

Change the drop down to "Oracle", click "Build" to enter your server, username, and password details. Click "Test Connection" to make sure everything is ok and then click "OK". This returns you to the "Dataset Properties" dialog:
Change the name to "KEY" and enter the Query:

SELECT 1 AS KEY FROM DUAL UNION
SELECT 2 FROM DUAL UNION
SELECT 8 FROM DUAL UNION
SELECT 3 FROM DUAL UNION
SELECT 4 FROM DUAL UNION
SELECT 5 FROM DUAL UNION
SELECT 7 FROM DUAL

Click "OK".

Add a second Dataset following the same steps above (you can re-use the data source) except name this Dataset "VALUE" and enter the Query:

SELECT  1 AS KEY, '01 DESC' AS KEYLABEL FROM DUAL UNION
SELECT  2, '02 DESC' FROM DUAL UNION
SELECT  3, '03 DESC' FROM DUAL UNION
SELECT  4, '04 DESC' FROM DUAL UNION
SELECT  5, '05 DESC' FROM DUAL UNION
SELECT  6, '06 DESC' FROM DUAL UNION
SELECT  7, '07 DESC' FROM DUAL UNION
SELECT  8, '08 DESC' FROM DUAL UNION
SELECT  9, '09 DESC' FROM DUAL UNION
SELECT 10, '10 DESC' FROM DUAL

You will end up with something like this:

Create an empty table on the report and drag/drop the KEY field from the KEY dataset onto the table:

Click on the cell next to "[KEY]" (with "Data" showing in the image above) and enter an expression:

=Lookup(Fields!KEY.Value, Fields!KEY.Value, Fields!KEYLABEL.Value, "VALUE")

This will give you something like:


Click "OK", click "Run" (at the top left on the ribbon):
And the lookup is complete ...

Friday, February 19, 2010

Apple TV (V1) unable to play Purchased Video (White Screen)


This blog post attempts to give a way of fixing the problem described above (which is related to account authorisation when using Multiple Apple ID's from iTunes not being correctly passed through to the Apple TV when you do a Sync).

This fix will only be of use to you if you have just factory-resert your Apple TV, performed a new Sync of your videos, you actually use multiple Apple ID's (i.e. you and your partner have separate accounts), and you are seeing the white screen instead of your video.

NOTE: This problem relates to an issue with the FIRST VERSION of the Apple TV. It does not occur on Apple TV 2.


Symptoms
When you select a video (film or TV program) that you have purchased from the Apple Store (i.e. it includes Apple DRM) the screen fills with white and at the bottom you see the "progress" bar which continues to count up but the picture remains just solid white.

There is no audio.

Cause
Your Apple TV has not been authorised to play video's for the specific user account that purchased the video.

Replicating The Problem
I've always though this this should be the most important section when describing any IT-related problem. How do you know you've fixed a problem you can't replicate? Needless to say working out exactly what caused this required quite a lot of time!

First of all you need two Appe ID's both of which have to have purchased a video (of some description) from the iTunes Store. Of course this is fairly easy to setup given the number of "free" videos and email services like GMail out there.

Let's call the accounts [1] and [2]. [1] has the free pilot episode of Stargate: Universe while [2] has the free recap of Lost.

Perform a factory reset of your Apple TV and then perform the initial setup from iTunes when it appears. Use account [1] to register your Apple TV and then sync both videos.

Attempt to play the video from [2] (Lost) on the newly refreshed Apple TV. You will see the white screen as despite iTunes allowing you to Sync the video it does not have the keys to actually play it.

Fixing the Problem
Ah yes, the important bit! Apple provide a potential solution to the problem here - IT veterans will recognize it as our perenial favourite the "turning it off and on again" answer to everything.

Assuming Apple's recommendation hasn't worked try the following:

  • Go to the "Settings" and then the "General" menus
  • Select "iTunes Store"
  • Log in with the Apple ID that purchased the video (following the example above this would be account [2])
  • Go back to the main menu and select "Downloads" and then "Check for Downloads"

Now when you try and play the video it will work (as the Apple TV has now been authorised to play videos from this account). You should be able to repeat this with as many additional accounts as necessary.

Wednesday, February 3, 2010

Oracle EBS: Repairing the "XXX is not a valid responsibility for the current user" error in Oracle

This Knol covers how to "fix" a problem that can occur in Oracle when you have granted a user access to a new web-based responsibility but the middle-tier application servers have not picked up this change.

Below are detailed instructions on how to clear the cache on the middle-tier application server(s). As it says in the warning when you try and do it there will be a performance hit while it re-reads all the data from the database - use on Production Systems at you own risk!!

At the moment I'm currently configuring Oracle Internet Expenses (11, not 12) and several times we've granted a user the "Internet Expenses" responsibility, they've logged into Oracle, selected Internet Expenses and then received an error along the lines of "Internet Expenses is not a valid responsibility for the current user. Please contact your System Administrator". For example when trying to access "Function Administrator" privilege you get the message:

Figure 1: Sample error for "Functional Administrator" Responsibility
You only get this issue with Web-based responsibilities. If I'd assigned "Payables Manager" then it works without any issues, the reason for this error is that in order to improve performance Oracle caches some information on the web server. In order to "fix" this problem we need to clear the cache by following these steps;

Step 1: Log in and select the "Functional Administrator" responsibility
Now this is where we get a delicious taste of irony; this responsibility is web-based so if you are trying to fix a problem that's occurring now and you don't already have this responsibility then I'm afraid you're too late. You'll have to bounce the Apache server (something that will require a DBA). In short; you need to have granted yourself this responsibility BEFORE you run into problems!

Figure 2: "Functional Administrator" Welcome Screen

Step 2: Select "Core Services" (the tab at the top right)
Figure 3: "Function Administrator" > "Core Services"
Step 3: Select "Caching Framework" (second option from the right on blue bar)

Figure 4: "Core Services" > "Caching Framework"
Step 4: Select "Global Configuration" (bottom option on the left)
Figure 5: "Caching Framework" > "Global Configuration"
This page shows you the currently configured Caching Statistics and Policy. The bit we're interested in though is the "Clear All Cache" button the right-hand side.

Step 5: Click "Clear All Cache"

Figure 6: Clear Cache Warning Message
Read the message, it's there for a reason!

Step 6: Click "Yes"
Figure 7: Confirmation Message
And we're done, the user should now be able to log in with the new responsibility.