Pages

Wednesday, January 23, 2013

Installing Remote Server Administration (Active Directory) Tools in Windows 8

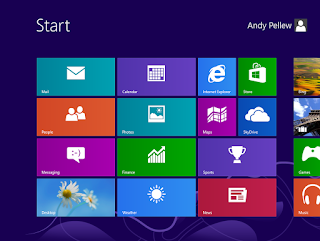
Windows 8: Start Screen
Following this process will install the "Active Directory Users and Computers" utility on your start menu (amongst other things).

The download link to the Microsoft page for the software you require is;

http://www.microsoft.com/en-us/download/details.aspx?id=28972 (the download is about 100MB)

Once you've opened the page you need to determine whether you're running 32-bit or 64-bit windows - I've written a separate post on this here.

Once you've downloaded the software install it;

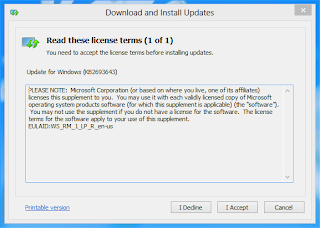
Windows 8: Windows Update Dialog
You'll then be presented with the standard EULA;

Windows 8: EULA Details
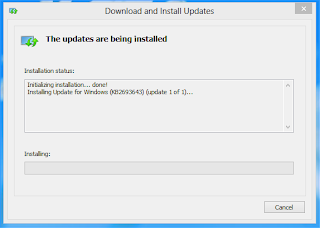
Click "I Accept" and the software will install;

Windows 8: Installation Progress
It's a 100MB installation so will take a bit of time, when it's done you'll see;

Windows 8: RSAT Installation Complete
Now one thing that is a definite improvement over the previous version is that now that you've installed the software it's immediately available - under Vista and Windows 7 you used to have to "turn it on" after you've installed it.

To find the installed applications return to the Start Page and scroll to the right;

Windows 8: RSAT Installation Blocks
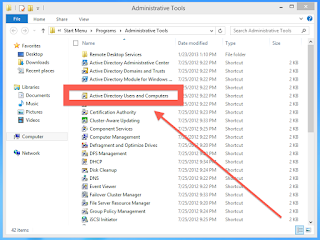
You'll see two new blocks, "Administrative Tools" and "Server Manager". The new Active Directory tools are under the "Administrative Tools" icon. Click on it, you'll be taken to the desktop;

Windows 8: Active Directory Users and Computers
And you're done.

Windows 8: How Can I Tell If I'm Running 32-Bit or 64-Bit?


The easiest way is to click "Desktop" (at the bottom left on the image above);

Windows 8: Start Page

Then when desktop appears bring up Windows Explorer;

Windows 8: Desktop

Right-click "Computer" (on the left) and select Properties;

Windows 8: Getting Machine Properties

This then brings up a dialog with information about your installation;

Windows 8: System Properties Dialog

I've highlighted the bit which tells you whether you're running 32 or 64-bit version of Windows.

EasyPush: Managing Versions in A Production Environment

Like quite a lot of applications that companies pay for and deploy internally EasyPush is not available in the Apple App Store but is instead deployed via another method (in our case using MobileIron). One of the issues this causes is that it is not immediately obvious to the user that an updated version is available - and even if they are aware of it then there isn't really any way they can be forced to actually install it!

(At this stage it's probably important to point out that we have an *internal* installation of EasyPush - we are not running off Futurecoms' servers in Switzerland. There are many reasons for this, but one of the advantages is that we have access to the back-end database for reporting)

EasyPush is actually a very special case as well as it's not only keeping the application up-to-date that's an issue but keeping the content up to date as well. When you install the application it includes only the barest bones of content - you need to click the "Update" button for it to connect to the server and download specific content for that iPad;
EasyPush: Update button
Every time an update is performed it is logged by EasyPush. Because of this it's possible, if you know when an update was published, to run a report which tells you which of the iPads that are out there have not downloaded the latest content (MobileIron will allow you to send Notifications to those iPads).

In addition as part of the log the current version of the software is recorded. This is useful in that MobileIron (at least in our configuration!) does not force the users to update their applications so having this information allows you to also identify those people who, while they are using the most up-to-date data within EasyPush, are not running the latest application.

The log information is held in three tables within the database; fucoLogEntry, fucoLogSession, and fucoDevice. Linking these together is fairly easy (in fact TOAD auto-completes the joins!) the SQL is;

SELECT LS.fkFucoAppVersion "EasyPush Version",
       D.udid              "UDID",
       LS.startDate        "Last Update Date"
  FROM fucoLogEntry le
  JOIN dbo.fucoLogSession LS
    ON LS.id = le.fkFucoLogSession
  JOIN dbo.fucoDevice D
    ON D.id = LS.fkDevice
 WHERE 1 = 1
   AND le.logType = N'System'
   AND le.message = N'Update'
   AND LS.startDate = (SELECT MAX(LS1.startDate)
                         FROM fucoLogEntry LE1
                         JOIN dbo.fucoLogSession LS1
                           ON LS1.id = le1.fkFucoLogSession
                        WHERE LS1.fkDevice = LS.fkDevice
                          AND le1.logType = N'System'
                          AND le1.message = N'Update')
                         ORDER BY LS.startDate DESC


This gives you some fairly simple data to work with, I've included the UDID as it's the easiest thing to search for in MobileIron. As the two systems are separate (and not necessarily in sync) it's possible that the recorded Member in EasyPush isn't actually the user of the device according to MobileIron!

Using this SQL I put together a fairly simple SSRS report;
EasyPush: SSRS Report on Versions and Update Dates
As you can see this uses the same data and breaks it down in two ways. The top table just gives you a simple count of the EasyPush application versions in your environment while the second gives you a detailed breakdown of who is running what and when they last updated.

I've added a couple of parameters to allow me to exclude versions (the current version for example) and people who have updated after a specific date.

Hope this is helpful to someone!


Wednesday, January 16, 2013

iOS: Application Signing using iResign (for MobileIron Deployment)

This is a fairly simple blog that just takes you through the process of signing an application with a corporate distribution certificate so that it can be distributed internally to an organisation (using, for example, MobileIron).

In order to get started you need to have installed Xcode (via the Apple App Store for the Mac) and then  download iResign from it's github repository;
iResign on github
Once you've downloaded the zip file if you double-click it it will extract into a new folder, you can then open that;
iResign Xcode Project Download Directory
Double-click on the top file (iResign.xcodeproj), this will then open in Xcode.

You don't need to worry about the contents of the project, just run it and the application will appear;

iReSign Application
The top browse button allows you to select the downloaded application you with to re-sign.

The second box is to identify the location of your .mobileprovision file (see below for instructions on how to get this and the certificates).

The third box allows you to override the specified company name, we've never needed to use this! Finally is the name of the the Certificate from your Keychain.

Once you've got all these click "ReSign!" and as if by magic you should have a new file in the same directory as the original file except with -resigned appended to it's name.

"Signing failed" Error Message
If you see this error message;

iResign: Signing failed error message

Then the problem is that you are missing the Command Line Tools in Xcode. If you start Xcode, go to Preferences, then Downloads and check you have "Command Line Tools" installed;

Xcode: Preferences > Downloads > Command Line Tools
If you install the tools (usually takes a few minutes) then you should just be able to switch back to iResign and click "ReSign!" again and this time it will work.

Downloading Provisioning Profiles and Certificates

You can download this by logging into your developer account (https://developer.apple.com);

Apple Developer Website
Click on the "iOS Dev Center". If you aren't logged in log in on the next page. At the top-right of the next page there are three options under the heading "iOS Developer Program";

iOS Developer Program
Select the top option, "iOS Provisioning Portal", on the left side of the next page are a number of options;

Welcome to the IOS Provisioning Portal
To get your certificate (to install in your keychain) click on the "Certificates" option and then click on the "Distribution" tab;

Current Distribution Certificate
To download the certificate click on the "Download" link on the right side. And a .cer file will download, when it's finished (should take a few seconds) click on it and you'll be prompted by KeyChain to add your certificate;

Keychain Access: Add Certificates Dialog
If you click on "View Certificates" you get more detail on the certificate you're installed;

New Certificate Details
The bit I've covered up at the top is the name of the certificate, this is the bit you need to copy exactly into iReSign (Certificate Name from keychain).

Return to the previous dialog and click "Add".

Now you've got your distribution certificate you need to get your provisioning profile. Click on "Provisioning" on the left-hand side;

Provisioning Profiles
Make sure you've clicked on "Distribution" (top tab) and then download the provisioning profile you wish to use. This is the ".mobileprovision" file you need to enter into iReSign.

And you're done, you now have everything you need to resign an application for deployment within an enterprise!
EasyPush: Working With Media

We have just deployed and started using Easy-Push (see here - company website) for getting publications (PowerPoint, Word Documents, etc) out to company iPads in several European countries.

EasyPush uses Umbraco CMS (open-source - see here) as it's back-end for storing the media and configuring the displayed screens. This blog post is a simple guide to using the two main type of screens (Standard and Asset Overview) to deploy already-uploaded media.

In the case of EasyPush "Media" can mean anything from videos, standard office documents, PDF's through to HTML5 websites.

Overview


You can access the media section, if your user has been granted permission, by clicking on the “Media” icon at the bottom left of the webpage after you’ve signed in;

EasyPush: Available Sections (Media Highlighted)
When you click on the icon the Navigator on the left changes to display the Media items that have been uploaded. You can pretty much organise these in any way you like but unlike the "Content" for the site you cannot grant users permissions to administer just their area of Media - anyone who can administer the Media section can makes changes to everyone's - something to bear in mind when you're setting up your site!

When you first enter media you should see the top-level "Media" item automatically expanded;

EasyPush: Media Section


Locate your folder. It might be under “AppData” but I’d recommend moving it to the root to make working with the media easier (in effect it’s one click less to do anything).

Everyone’s structure is different but I’d recommend, unless you’re going to have millions of files (you’re not), that you go with as flat a structure as possible mirroring as closely as possible your content structure (to make it intuitive for people to pick up).


It’s a good idea to have a “_shared” folder for items that are shared across several areas.


Creating New Folders


Right-click the “parent” folder where you’d like the new folder located and select “Create”;

EasyPush: Standard Create Dialog
 Enter the Name (which is mandatory) and change the Media Type drop down to "Folder" and click "Create".

Uploading Files


Right-click the “parent” folder where you’d like the new folder located and select “Create”;

EasyPush: Standard Create Dialog
Give the file a name and then click “Create”.

The new file will appear in the Navigation View on the left and the properties for it, including an upload button, will appear on the right;

EasyPush: File/ Media Item Properties


Click on the “Browse” button to locate the file you want to upload and once you’ve selected it click “Save”.


The file will now upload the properties page (on the right) will update with the actual files’ properties;

EasyPush: File/ Media Item Properties (Updated)


File Types and Formats

The following are supported file types and formats for version 1.5.022 of the EasyPush iPad application;

  • Microsoft Office; Excel, PowerPoint, and Word only
  • HTML5 (needs to conform to Apple Safari Web Kit and have an index.html in the root of the zip)
  • Movies (m4v, mp4, mov - up to 8MBit/s 1280x720pixel, 30 frames per sec)
  • URL's
  • PDF
  • Images (preferably .png, but does support .jpg)