Pages

Thursday, September 29, 2011

SSRS: Creating a "Shared Reports" folder in Reporting Services

This blog post covers step-by step instructions on how to create a folder that can be shared between multiple users without being publicly findable (i.e. users will have to share a URL with people who they want to be able to access it).

The location of this folder is under the "My Reports" folder for the individual user.

Start "Internet Explorer" with an account which has administrative permissions for the particular SQL Server Reporting Services (SSRS) instance you are wanting to work with and navigate to your report server URL (for this know let's assume I'm using a server called "reportserver" which is setup on the standard ports);

http://reportserver/Reports/Pages/Folder.aspx

SSRS Home Page - Highlighting "Users Folder"
Click on the “Users Folders” folder;

SSRS Contents of the Users Folder
Find the users folder (look for their username) and click on it. The format of the folders is DOMAINUSERNAME;

Highlighting the "My Reports" Folder Under An Individual User
(under the users folder) Click on “My Reports”;

Highlighting "Folder Settings" In A Users "My Reports" Folder
Click on “Folder Settings” in the title bar;

Highlighting "Security" Under Folder Settings
Click on “Security”;
Highlighting "New Role Assignment"
Click on “New Role Assignment”;
Highlighting the "Select all" click-box
Enter the administrator or administrator domain group and use the checkbox to select all the roles. This will allow the administrator to directly administer the folder going forward. Scroll to the bottom and click “OK”.
Highlighting the Users' User name
Click on the username at the top left of the web page;
Highlighting The Users "My reports" Folder
Click on “My Reports” ;
Highlighting the "New Folder" Menu Button
Click on “New Folder”;
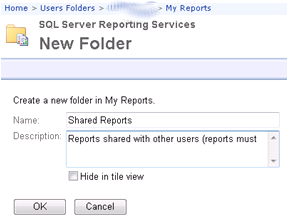
"New Folder" Detail Page
Enter the name “Shared Reports “ and copy/ paste the following text (in italics) into the description;

To share a report modify the following URL http://reportserver/Reports/Pages/Report.aspx?ItemPath=%2fUsers+Folders%2f%YOURDOMAIN%+%USERNAME%%2fMy+Reports%2fShared+Reports%

Replacing %YOURDOMAIN% with your domain name, %USERNAME% with your username, and with the name of the report you wish to share.

For example to share the report “Supplier Spend Summary” for user DDX7 from domain GB1 you would need to use the URL;

http://reportserver/Reports/Pages/Report.aspx?ItemPath=%2fUsers+Folders%2fGB1+ddx7%2fMy+Reports%2fShared+Reports%Supplier Spend Summary

NOTE: Replace %USERNAME% with the lowercase version of the users windows username and make sure you don’t get carried away removing %’s!!


Click "OK";
Highlighting the "Shared Reports" Folder
Click on the newly created “Shared Reports” folder;
Highlighting "Folder Settings"

Click on the “Folder Settings” button the titlebar;
Highlighting "Security" Under Folder Settings
Click on “Security” on the left;
"Edit Item Security" Highlighted
Click on “Edit Item Security”;
Breaking Item Inheritance Warning Message
Click “OK”;
"New Role Assignment" Highlighted
Click on “New Role Assignment”;
"New Role Assignment" Role Selection Dialog
You will either to enter individual users (one at a time, repeating the steps above) or enter a group (for example “Domain Users” to include everyone on your domain) and click on the Browser role. Click “OK”;
Final Settings
The setup is now complete. All the users to whom you have assigned the browse role will now be able to access reports in the users "Shared Folder" (once they have the URL).

Oracle EBS: Linking GL Lines to AP Invoice Distributions in R12

This blog post gives some guidance as to how to link a GL Journal line in Oracle R12 back to its associated AP Invoice Distribution.

NOTE: That this applies ONLY to R12 data - you will not be able to link old (pre-migration) data using this method you will need to have one linking rule for old records and one for new. Just another reason to do a reimplementation!

As always the easiest way to look at this is with a picture;

The image is click-able for a larger view.

The linking goes as follows;

GL_JE_Lines > XLA_AE_Lines > XLA_Distribution_Links > AP_Invoice_Distributions_All

In our Oracle implementation this didn't end up with a 1:1 relationship (which we had in R11) mainly due to the changes in the way AP invoices are stored (R11: Invoice + Distributions, R12: Invoice + Invoice Lines + Distributions).

Looking at a specific example from our R12 test system for journal “4673291 Purchase Invoices GBP”. This journal contains 5 GL records;


Looking at records in XLA_AE_Lines we also have 5 records;


But when we move on to the next table (XLA_DISTRIBTUION_LINKS);


We now have 6 lines (line 2 having been split into two).

We solved this problem but automatically populating a field in the GL with direct 1:1 linking information (hopefully I can add this as another Knoll).

Tuesday, September 27, 2011

SSRS: Sharing Report Builder 3 Reports Between Users


This blog post provides a fairly quick-and-easy guide to simply sharing a single report between two users.

NOTE: If you're sharing a report in your "My Reports" directory you will need to do some fiddly changes with the URL in order to get someone else to actually access the report (they won't simply be able to browse to it).


Sharing a Folder
By far the easiest way to share reports is actually to set the permissions on folders so that multiple users can see the same folder. Access your reporting server and then browse to the folder you want to share;


When you're in the folder (in this case a folder called "Procurement" select "Folder Settings" (the fourth button from the left on the toolbar). Don't see the button? Then you don't have permission to share folders and you either need to contact someone who does or share the individual reports;

This screen is showing you the basic properties for the folder. Click on the "Security" tab (beneath Properties) on the very left of the page;

Security in SSRS is based on roles. You have five basic roles;

  • Browser - Someone with this role can run reports
  • Content Manger - This role can create folders, move reports around, etc.
  • My Reports - This role grants access to a "My Reports" folder for that individual user
  • Publisher - This role can create reports
  • Report Builder - This role grants access to the "Report Builder" plugin to create new reports

Clicking on "Edit Item Security" will probably bring up the popup below;

This is simply letting you know that if you make any changes the permissions on this item will then be different to the permissions on the parent item - as this is exactly what we're trying to achieve click "OK" to continue.

To add a new user to the folder (or group of users) click on "New Role Assignment" (the middle button above the section on the right);

Enter the Active Directory user (or group) that you wish to give permissions to access the folder and select the role wyou want that group to have. Click "OK" and you're done.

Sharing A Single Report
Navigate to the directory which contains the report you wish to share;

For the purposes of this example I'm going to share the "Lookup Example - For Everyone"-report. Hover over it and select "Security" from the drop down when it appears;

The current permissions for the item are displayed;

Click "Edit Item Security" (in the menu bar);

Click "OK" to break the inherritance and give this report specific permisisons.

Click on "New Role Assignment";

Enter the username (or AD groupname) that you wish to define permisisons for on this report (Browser if you just want them to be able to run it) and click "OK". The user will now have the permissions you defined for the report.

NOTE: If you as sharing a report in the "My Reports" folder you MUST provide a URL to those you have shared the report with that does not reference "My Reports". For example;

https://xxx/Reports/Pages/Folder.aspx?ItemPath=%2fUsers+Folders%2f%2fMy+Reports&ViewMode=List

Would work as it goes through "Users Folders > > My Reports" whereas;

https://xxx/Reports/Pages/Folder.aspx?ItemPath=%2fMy+Reports&ViewMode=List

Could not be shared as each user will have a different "My Reports" folder. Looking at the two URL's above you should be able to quickly see how to convert one to another when sharing.

Wednesday, September 7, 2011

Noetix: Adding a Flexfield to a View

This blog post covers a step-by-step guide to adding a Flexfield into a NoetixView. As is the case with all Noetix changes if you do now have NCM (Noetix Customisation Mantenance) these changes will not be supported by Noetix.

In order to add a flexfield you need to identify the table and columns used to store the data. Flexfield data will typically be stored in the ATTRIBUTE1..x columns of the table you specify, but this isn't always the case! You only need the "general" information, not down the the segment level.

Once you have the table/column combinations you need to create a script called from xu2 that contains the following insert statement;

INSERT INTO n_view_column_templates
  (view_label, query_position, column_label, table_alias, column_expression, column_position, column_type, description, group_by_flag, product_version, ref_lookup_column_name, created_by, creation_date, last_updated_by, last_update_date)
VALUES
  ('**1**' -- view_label
  ,**4** -- query_position
  ,'**2**' -- column_label
  ,'**2**' -- table_alias
  ,'**2**' -- column_expression
  ,(&max_col_position + 1) -- column_position
  ,'ATTR' -- column_type
  ,'Descriptive flexfield' -- description
  ,'N' -- group_by_flag
  ,'%' -- product_version
  ,'**5**' -- ref_lookup_column_name
  ,'**3**' -- created_by
  ,to_date('07-SEP-2011') -- creation_date
  ,'**3**' -- last_updated_by
  ,to_date('07-SEP-2011')) -- last_update_date
;

**1** = The view label, from n_view_templates, i.e. GME_Batch_Headers
**2** = The table alias, from n_view_table_templates, that you identified as being used to store the flexfield
**3** = Your details!
**4** = The query position in use in the target view. Look in n_view_column_templates to get the active values. This will usually only be one value, if not you will need to replicate the insert statement for each query position.
**5** = The columns where the flex field is stored followed by a percentage (usually ATTRIBUTE%)

NOTE: Product version might also have to change if you have two environments you regenerate into (i.e. 11.5.1.0 and 12.1) when the table aliases between the versions are different.

If you follow the standard script template for xu2 then the @max_col_position variable will already be populated.

Tuesday, September 6, 2011

Oracle PL/SQL: Working with Materialized Views in a 24/7 Reporting Environment


This blog post gives an outline for a process that will provide users with the Last Update, Next Update, and a "nice message" during a materialized view refresh.

The purpose of this blog post is to provide your report writers with a way of identifying whether or not the view is currently being refreshed so they can "try again later". Of course for business-critical up-to-the-second reporting you might not want to be using materialized views at all.


Setting Up The Demonstration System
In order to show this in action we need to setup the following items in a database;

create table MAT_VIEW_TEST
(
  ID          number not null,
  SHORTCODE   varchar2(30) not null,
  DESCRIPTION varchar2(255),
  STARTDATE   date not null,
  ENDDATE     date
)
;

alter table MAT_VIEW_TEST
  add constraint MAT_VIEW_TEST_PK primary key (ID);

insert into MAT_VIEW_TEST (ID, SHORTCODE, DESCRIPTION, STARTDATE, ENDDATE)
values (1, 'IT', 'IT Department', to_date('01-05-2010', 'dd-mm-yyyy'), null);
insert into MAT_VIEW_TEST (ID, SHORTCODE, DESCRIPTION, STARTDATE, ENDDATE)
values (2, 'IT', 'Business Systems Department', to_date('01-01-1980', 'dd-mm-yyyy'), to_date('30-04-2010', 'dd-mm-yyyy'));
insert into MAT_VIEW_TEST (ID, SHORTCODE, DESCRIPTION, STARTDATE, ENDDATE)
values (3, 'FIN', 'Finance', to_date('01-01-1980', 'dd-mm-yyyy'), null);
insert into MAT_VIEW_TEST (ID, SHORTCODE, DESCRIPTION, STARTDATE, ENDDATE)
values (4, 'PRC', 'Procurement', to_date('01-01-1980', 'dd-mm-yyyy'), null);
insert into MAT_VIEW_TEST (ID, SHORTCODE, DESCRIPTION, STARTDATE, ENDDATE)
values (5, 'LEG', 'Legal', to_date('01-01-1980', 'dd-mm-yyyy'), null);
commit;

 create materialized view mat_view_test_mv
  refresh complete 
   start with sysdate 
   next trunc(sysdate)+1 + 5/24 as
  select *
    from mat_view_test
 ;

The materialized view we're creating will refresh immediately and will then schedule itself to refresh at 5am each day going forward.

Aims and Expected Results
The whole point of this Knol is to manage the users expectations. If you provide them a report which is refreshed at 5am and they make a change to the data and then run the report you want them to know why they're not going to see their new record so they don't call your helpdesk and start saying the report is "broken".

The result we're expecting to see (from a simple SELECT * ...) would be;


(1) - This is the date the view was last refreshed and the date the view will next be refreshed.
(2) - As all the records are being returned from the main table the message always reads "OK".

We would expect to get this result at any time other than when the view was being refreshed. When the view is actively being refreshed then the result would normally be blank but what we'd like to see would be a single row returned with the message "REFRESHING".


Building Our View of the Materialized View
Now the values we need (the last and next refresh dates) are stored in SYS.ALL_MVIEWS and SYS.DBA_JOBS respectively. It's a fairly simple process to join these objects together and get the result;

select am.LAST_REFRESH_DATE,
       dj.next_date next_refresh_date,
       'OK' as message,
       mvtv.*
  from MAT_VIEW_TEST_MV mvtv
  left outer join sys.dba_jobs dj
    on dj.what =
       'dbms_refresh.refresh(''"' || USER || '"."MAT_VIEW_TEST_MV"'');'
  join sys.all_mviews am
    on am.owner = user
   and am.mview_name = 'MAT_VIEW_TEST_MV'

We can use a default for the message so that we can change it to something more meaningful in the reporting tool.

Now that we've got our main result we now need to handle the special case when MAT_VIEW_TEST_MV contains no records. The easiest way to do this is to use the DUAL system object to return a single row and do a check in MAT_VIEW_TEST_MV for records. For example;

select null, null, 'REFRESHING', mvtv.*
  from sys.dual
  left join MAT_VIEW_TEST_MV mvtv
    on 3 = 1
 where not exists (select 'x' from MAT_VIEW_TEST_MV)

Now you're probably already spotted that the columns returned by both queries are identical which makes unioning them a lot easier giving you the final piece of SQL;

create view mat_view_test_v as
select am.LAST_REFRESH_DATE,
       dj.next_date next_refresh_date,
       'OK' as message,
       mvtv.*
  from MAT_VIEW_TEST_MV mvtv
  left outer join sys.dba_jobs dj
    on dj.what =
       'dbms_refresh.refresh(''"' || USER || '"."MAT_VIEW_TEST_MV"'');'
  join sys.all_mviews am
    on am.owner = user
   and am.mview_name = 'MAT_VIEW_TEST_MV'
union
select null, null, 'REFRESHING', mvtv.*
  from sys.dual
  left join MAT_VIEW_TEST_MV mvtv
    on 3 = 1
 where not exists (select 'x' from MAT_VIEW_TEST_MV)

You now have a view which will return the contents of the materialized view if it has any or a single record you can check for if it doesn't.

Oracle PL/SQL: When are Materialized Views refreshing?

This blog post provides a pieces of SQL which will look for Jobs in the SYS.DBA_JOBS view that appear to be Materialized View refreshes and display the timing information as well as the interval.


Execute the following SQL;

 SELECT dj.job,
       SUBSTR(SUBSTR(dj.what, 24, 255),
              1,
              INSTR(SUBSTR(dj.what, 25, 255), '"')) VIEW_OWNER,
       REPLACE(SUBSTR(SUBSTR(dj.what, 24, 255),
                      INSTR(SUBSTR(dj.what, 25, 255), '.') + 3,
                      255),
               '"'');',
               '') VIEW_NAME,
       dj.last_date,
       dj.last_sec,
       dj.NEXT_DATE,
       dj.broken,
       dj.interval
  FROM sys.dba_jobs dj
 WHERE dj.what like 'dbms_refresh.refresh(''"%"."%"'');'

This will return something similar to;


This gives enough information to allow new views to be scheduled in the gaps around the refreshes of old views and I have always found very useful.

Oracle PL/SQL: Removing an Existing Materialized View

This blog post provides a piece of SQL that you can easily customize to check-for and remove a materialized view if it is present.


The SQL is;

declare
  v_MVName varchar2(30) := 'XXX';
begin
  for v_Row in (select 'x' from all_mviews am where am.owner = user and am.mview_name = v_MVName) loop
  execute immediate
    'drop materialized view ' || v_MVName;
  end loop;
end;

In order to target a specific view just replace XXX in the second line with the name of your view.