This blog post covers how to make changes to your existing SQL Server Reporting Services Report to ensure that the Column Headings appear at the top of every page. The steps (and screen shots) below come from Report Builder 3 running against SQL Server 2008R2.
Looking at a standard report the first thing you will have tried is to set the "Repeat Column Header" and "Repeat Row Header" on the table. For whatever reason this doesn't work and you'll then have found yourself here (probably via Google!);
In order to make repeating headers actually work the first thing you need to do is to turn on "advanced" mode for Row/Column Groups. You do this by clicking on the down arrow at the far-right of the section;
And selecting "Advanced Mode".
This will then add in some of the "Hidden" levels in the Row Groups entry box;
If you select the top item "Static" and view the properties you can see the "RepeatOnNewPage" property (at the bottom of the "Other" section);
Changing this to "True" will make the column headings repeat on each page.
This blog is recording things I think will be useful. Generally these are IT-solutions but I also touch on other issues as well as-and-when they occur to me.
Tuesday, July 27, 2010
Wednesday, June 9, 2010
SSRS: Looking Up Values in Another Dataset
This blog post covers using Report Builder 3 (with Microsoft SQL Server 2008R2) to lookup a value in another dataset.
Scroll straight to the bottom for the key function, the rest of the article is setup.
NOTE: The back end of this example is an Oracle database but the solution will work for any database, you just will need to modify the SQL.
Start Report Builder 3
Select "Blank Report" from the New Report or Dataset wizard.
Right click "Dataset" in the treeview on the left and select "Add Dataset ..." from the popup:
Change the radio group on the right from "Use a shared dataset" to "User a dataset embedded in my report":
Click the "New ..." button next to the Data source drop down:
Change the selected radio group item from "Use a shared connection or report model" to "User a connection embedded in my report":
Change the drop down to "Oracle", click "Build" to enter your server, username, and password details. Click "Test Connection" to make sure everything is ok and then click "OK". This returns you to the "Dataset Properties" dialog:
Change the name to "KEY" and enter the Query:
SELECT 1 AS KEY FROM DUAL UNION
SELECT 2 FROM DUAL UNION
SELECT 8 FROM DUAL UNION
SELECT 3 FROM DUAL UNION
SELECT 4 FROM DUAL UNION
SELECT 5 FROM DUAL UNION
SELECT 7 FROM DUAL
Click "OK".
Add a second Dataset following the same steps above (you can re-use the data source) except name this Dataset "VALUE" and enter the Query:
SELECT 1 AS KEY, '01 DESC' AS KEYLABEL FROM DUAL UNION
SELECT 2, '02 DESC' FROM DUAL UNION
SELECT 3, '03 DESC' FROM DUAL UNION
SELECT 4, '04 DESC' FROM DUAL UNION
SELECT 5, '05 DESC' FROM DUAL UNION
SELECT 6, '06 DESC' FROM DUAL UNION
SELECT 7, '07 DESC' FROM DUAL UNION
SELECT 8, '08 DESC' FROM DUAL UNION
SELECT 9, '09 DESC' FROM DUAL UNION
SELECT 10, '10 DESC' FROM DUAL
You will end up with something like this:
Create an empty table on the report and drag/drop the KEY field from the KEY dataset onto the table:
Click on the cell next to "[KEY]" (with "Data" showing in the image above) and enter an expression:
=Lookup(Fields!KEY.Value, Fields!KEY.Value, Fields!KEYLABEL.Value, "VALUE")
This will give you something like:
Click "OK", click "Run" (at the top left on the ribbon):
And the lookup is complete ...
Scroll straight to the bottom for the key function, the rest of the article is setup.
NOTE: The back end of this example is an Oracle database but the solution will work for any database, you just will need to modify the SQL.
Select "Blank Report" from the New Report or Dataset wizard.
Right click "Dataset" in the treeview on the left and select "Add Dataset ..." from the popup:
Change the radio group on the right from "Use a shared dataset" to "User a dataset embedded in my report":
Click the "New ..." button next to the Data source drop down:
Change the selected radio group item from "Use a shared connection or report model" to "User a connection embedded in my report":
Change the drop down to "Oracle", click "Build" to enter your server, username, and password details. Click "Test Connection" to make sure everything is ok and then click "OK". This returns you to the "Dataset Properties" dialog:
Change the name to "KEY" and enter the Query:
SELECT 1 AS KEY FROM DUAL UNION
SELECT 2 FROM DUAL UNION
SELECT 8 FROM DUAL UNION
SELECT 3 FROM DUAL UNION
SELECT 4 FROM DUAL UNION
SELECT 5 FROM DUAL UNION
SELECT 7 FROM DUAL
Click "OK".
Add a second Dataset following the same steps above (you can re-use the data source) except name this Dataset "VALUE" and enter the Query:
SELECT 1 AS KEY, '01 DESC' AS KEYLABEL FROM DUAL UNION
SELECT 2, '02 DESC' FROM DUAL UNION
SELECT 3, '03 DESC' FROM DUAL UNION
SELECT 4, '04 DESC' FROM DUAL UNION
SELECT 5, '05 DESC' FROM DUAL UNION
SELECT 6, '06 DESC' FROM DUAL UNION
SELECT 7, '07 DESC' FROM DUAL UNION
SELECT 8, '08 DESC' FROM DUAL UNION
SELECT 9, '09 DESC' FROM DUAL UNION
SELECT 10, '10 DESC' FROM DUAL
You will end up with something like this:
Create an empty table on the report and drag/drop the KEY field from the KEY dataset onto the table:
Click on the cell next to "[KEY]" (with "Data" showing in the image above) and enter an expression:
=Lookup(Fields!KEY.Value, Fields!KEY.Value, Fields!KEYLABEL.Value, "VALUE")
This will give you something like:
Click "OK", click "Run" (at the top left on the ribbon):
And the lookup is complete ...
Friday, February 19, 2010
Apple TV (V1) unable to play Purchased Video (White Screen)
This blog post attempts to give a way of fixing the problem described above (which is related to account authorisation when using Multiple Apple ID's from iTunes not being correctly passed through to the Apple TV when you do a Sync).
This fix will only be of use to you if you have just factory-resert your Apple TV, performed a new Sync of your videos, you actually use multiple Apple ID's (i.e. you and your partner have separate accounts), and you are seeing the white screen instead of your video.
NOTE: This problem relates to an issue with the FIRST VERSION of the Apple TV. It does not occur on Apple TV 2.
Symptoms
When you select a video (film or TV program) that you have purchased from the Apple Store (i.e. it includes Apple DRM) the screen fills with white and at the bottom you see the "progress" bar which continues to count up but the picture remains just solid white.
There is no audio.
Cause
Your Apple TV has not been authorised to play video's for the specific user account that purchased the video.
Replicating The Problem
I've always though this this should be the most important section when describing any IT-related problem. How do you know you've fixed a problem you can't replicate? Needless to say working out exactly what caused this required quite a lot of time!
First of all you need two Appe ID's both of which have to have purchased a video (of some description) from the iTunes Store. Of course this is fairly easy to setup given the number of "free" videos and email services like GMail out there.
Let's call the accounts [1] and [2]. [1] has the free pilot episode of Stargate: Universe while [2] has the free recap of Lost.
Perform a factory reset of your Apple TV and then perform the initial setup from iTunes when it appears. Use account [1] to register your Apple TV and then sync both videos.
Attempt to play the video from [2] (Lost) on the newly refreshed Apple TV. You will see the white screen as despite iTunes allowing you to Sync the video it does not have the keys to actually play it.
Fixing the Problem
Ah yes, the important bit! Apple provide a potential solution to the problem here - IT veterans will recognize it as our perenial favourite the "turning it off and on again" answer to everything.
Assuming Apple's recommendation hasn't worked try the following:
- Go to the "Settings" and then the "General" menus
- Select "iTunes Store"
- Log in with the Apple ID that purchased the video (following the example above this would be account [2])
- Go back to the main menu and select "Downloads" and then "Check for Downloads"
Now when you try and play the video it will work (as the Apple TV has now been authorised to play videos from this account). You should be able to repeat this with as many additional accounts as necessary.
Wednesday, February 3, 2010
Oracle EBS: Repairing the "XXX is not a valid responsibility for the current user" error in Oracle
This Knol covers how to "fix" a problem that can occur in Oracle when you have granted a user access to a new web-based responsibility but the middle-tier application servers have not picked up this change.
Below are detailed instructions on how to clear the cache on the middle-tier application server(s). As it says in the warning when you try and do it there will be a performance hit while it re-reads all the data from the database - use on Production Systems at you own risk!!
At the moment I'm currently configuring Oracle Internet Expenses (11, not 12) and several times we've granted a user the "Internet Expenses" responsibility, they've logged into Oracle, selected Internet Expenses and then received an error along the lines of "Internet Expenses is not a valid responsibility for the current user. Please contact your System Administrator". For example when trying to access "Function Administrator" privilege you get the message:
You only get this issue with Web-based responsibilities. If I'd assigned "Payables Manager" then it works without any issues, the reason for this error is that in order to improve performance Oracle caches some information on the web server. In order to "fix" this problem we need to clear the cache by following these steps;
Step 1: Log in and select the "Functional Administrator" responsibility
Now this is where we get a delicious taste of irony; this responsibility is web-based so if you are trying to fix a problem that's occurring now and you don't already have this responsibility then I'm afraid you're too late. You'll have to bounce the Apache server (something that will require a DBA). In short; you need to have granted yourself this responsibility BEFORE you run into problems!
Step 2: Select "Core Services" (the tab at the top right)
Step 3: Select "Caching Framework" (second option from the right on blue bar)
Step 4: Select "Global Configuration" (bottom option on the left)
This page shows you the currently configured Caching Statistics and Policy. The bit we're interested in though is the "Clear All Cache" button the right-hand side.
Step 5: Click "Clear All Cache"
Read the message, it's there for a reason!
Step 6: Click "Yes"
And we're done, the user should now be able to log in with the new responsibility.
Below are detailed instructions on how to clear the cache on the middle-tier application server(s). As it says in the warning when you try and do it there will be a performance hit while it re-reads all the data from the database - use on Production Systems at you own risk!!
At the moment I'm currently configuring Oracle Internet Expenses (11, not 12) and several times we've granted a user the "Internet Expenses" responsibility, they've logged into Oracle, selected Internet Expenses and then received an error along the lines of "Internet Expenses is not a valid responsibility for the current user. Please contact your System Administrator". For example when trying to access "Function Administrator" privilege you get the message:
![]() |
| Figure 1: Sample error for "Functional Administrator" Responsibility |
Step 1: Log in and select the "Functional Administrator" responsibility
Now this is where we get a delicious taste of irony; this responsibility is web-based so if you are trying to fix a problem that's occurring now and you don't already have this responsibility then I'm afraid you're too late. You'll have to bounce the Apache server (something that will require a DBA). In short; you need to have granted yourself this responsibility BEFORE you run into problems!
![]() |
| Figure 2: "Functional Administrator" Welcome Screen |
![]() |
| Figure 3: "Function Administrator" > "Core Services" |
![]() |
| Figure 4: "Core Services" > "Caching Framework" |
![]() |
| Figure 5: "Caching Framework" > "Global Configuration" |
Step 5: Click "Clear All Cache"
![]() |
| Figure 6: Clear Cache Warning Message |
Step 6: Click "Yes"
| Figure 7: Confirmation Message |
Sunday, December 6, 2009
Migrating Workflow Changes Between HR.NET Instances
This blog post is a click-by-click guide to migrating changes from one HR.NET instance to another.
The obvious first step is to log onto the source server were you have been developing/ testing your new workflow and run the HR.NET Admin Console provided by Vizual as part of the standard install.
Prerequisites
Source Server (The server to export from)
Log on to "Admin Console"
Using the Admin Console browse to the Workflow you wish to export and right-click it;
Select "Add to Export List" (second item from the bottom) - this will add the Workflow to a list of items to be exported
From the main menu at the top select "Tools > Export > View/ Export ..."
This will then display something like;
This is showing you that your Workflow is dependant on these other objects. In this case two tables and a directory. It's generally inadvisable to move these objects unless you really know what you're doing - you should unselect the checkboxes next to each of them so the screen looks like this;
Click "Export"
This is prompting you for the name of the file you are going to create which will contain your Workflow.
When you click "OK" the file is saved in the C:\Exports folder;
You should now look at moving these files between the folder on the source server, and the folder on the destination folder.
Destination Server
Log on to "Admin Console"
From the main menu select "Tools > Import ..."
This will display the following dialog;
The list of files displayed at the top is the list of XML files in the "C:\Exports" directory (so make sure you have copied the file there!), select the file you wish to import and click "OK".
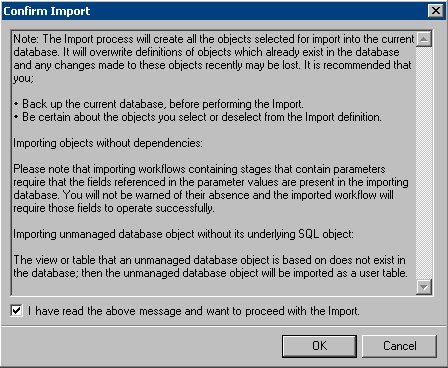
The list of objects in the XML file is displayed - select the object you wish to import and then click "Import" at the bottom of the dialog.
Click "OK to complete the import process.
The obvious first step is to log onto the source server were you have been developing/ testing your new workflow and run the HR.NET Admin Console provided by Vizual as part of the standard install.
Prerequisites
- Obviously you'll need two HR.NET instances, you'll need to be able to run the Admin Console for the two instances (i.e. you will need a HR.NET user account with permissions)
- You need to have created a directory on both servers called "C:\Export" and some means of moving files between the two servers into the two directories (if this directory is missing you will get an error message);
- You need to understand what you're doing! Vizual do a very good training course and offer a very high standard of support.
Source Server (The server to export from)
Log on to "Admin Console"
Using the Admin Console browse to the Workflow you wish to export and right-click it;
Select "Add to Export List" (second item from the bottom) - this will add the Workflow to a list of items to be exported
From the main menu at the top select "Tools > Export > View/ Export ..."
This will then display something like;
This is showing you that your Workflow is dependant on these other objects. In this case two tables and a directory. It's generally inadvisable to move these objects unless you really know what you're doing - you should unselect the checkboxes next to each of them so the screen looks like this;
Click "Export"
This is prompting you for the name of the file you are going to create which will contain your Workflow.
When you click "OK" the file is saved in the C:\Exports folder;
You should now look at moving these files between the folder on the source server, and the folder on the destination folder.
Destination Server
Log on to "Admin Console"
From the main menu select "Tools > Import ..."
This will display the following dialog;
The list of files displayed at the top is the list of XML files in the "C:\Exports" directory (so make sure you have copied the file there!), select the file you wish to import and click "OK".
The list of objects in the XML file is displayed - select the object you wish to import and then click "Import" at the bottom of the dialog.
Click "OK to complete the import process.
Saturday, November 28, 2009
How to Schedule A Meeting with Doodle
The Doodle scheduling tool allows you to put out a range of dates, or options, to a group of people and have each one express a preference. You can then view a summary of the results.
The first step, as you would expect, is to open your web browser and go to the website Doodle.
Click on the "Schedule event >>" button the the right of the page.
On this page you need to specify the title for your meeting (i.e. "To Agree A Time For A Local Meeting"). This needs to be meaningful so that when people see your email they actually want to respond - the tendency with emails is to "leave it till later" so it never gets done!
While "Description" is option (you don't need to specify one) you might get a higher response rate if you fill this in with as much detail about the meeting you're arranging as possible (i.e. draft agenda, decisions that you'd like to see made, etc).
If your meeting is going to be in a specific location you can click "Add address" and specify it;
The default location for the address is the US. Typing in "Cambridge" will give you "Cambridge, MA, USA". If you want to specify an address outside the US you need to specify the Country (i.e. UK).
You should then type in your name and email address (it's optional, but getting a message when each person responds usually helps with booking a meeting ... if the first 5 people to respond can't do any of your options then rather than waiting until everyone else has responded you might want to change them).
Once you've completed the form click "Next".
The next stage is to select dates for your meeting. You can select as many dates as you like by just clicking on the numbers. Clicking either of the blue arrows at the top will move the date along back/forward one month.
Once you've selected all the dates you're interested in (above I've selected from the 28th November to the 2nd December) click "Next" to move to the next phase.
The dates you entered on the previous screen are listed on the left of this page. You can then specify the times on each day for your meeting. You can on this screen have many options on each day, the initial display shows only 5 - if you need more than click "Add further time slots" to get another 5 (total 10), click it again to get another 5 (total 15) etc.
If the times you are interested in are the same for each day you just need to fill in the first line and then click on "Copy and paste first row" and all the other days will be filled in automatically based on the values you've specified for the first day.
Click "Next" once you're happy with the times.
It is generally best to select "you send the invitation" as it's a lot easier for various reasons not least of which is that people can be funny about sharing email addresses on websites - whatever the privacy policy of that website. Unless the people in your meeting have agreed to use Doodle (or used it previously) then I'd recommend sending the invitation yourself.
This final page shows you the URL's for your Doodle;
The participation link is the one you need to copy/paste into an email to send to everyone who you want to attend your meeting. You can use distribution lists, each person will be treated separately by Doodle. The Administration link is specific to you and will allow you to track peoples responses (you can also visit the Administration page for a reminder of the participation link).
The first step, as you would expect, is to open your web browser and go to the website Doodle.
Click on the "Schedule event >>" button the the right of the page.
On this page you need to specify the title for your meeting (i.e. "To Agree A Time For A Local Meeting"). This needs to be meaningful so that when people see your email they actually want to respond - the tendency with emails is to "leave it till later" so it never gets done!
While "Description" is option (you don't need to specify one) you might get a higher response rate if you fill this in with as much detail about the meeting you're arranging as possible (i.e. draft agenda, decisions that you'd like to see made, etc).
If your meeting is going to be in a specific location you can click "Add address" and specify it;
The default location for the address is the US. Typing in "Cambridge" will give you "Cambridge, MA, USA". If you want to specify an address outside the US you need to specify the Country (i.e. UK).
You should then type in your name and email address (it's optional, but getting a message when each person responds usually helps with booking a meeting ... if the first 5 people to respond can't do any of your options then rather than waiting until everyone else has responded you might want to change them).
Once you've completed the form click "Next".
The next stage is to select dates for your meeting. You can select as many dates as you like by just clicking on the numbers. Clicking either of the blue arrows at the top will move the date along back/forward one month.
Once you've selected all the dates you're interested in (above I've selected from the 28th November to the 2nd December) click "Next" to move to the next phase.
The dates you entered on the previous screen are listed on the left of this page. You can then specify the times on each day for your meeting. You can on this screen have many options on each day, the initial display shows only 5 - if you need more than click "Add further time slots" to get another 5 (total 10), click it again to get another 5 (total 15) etc.
If the times you are interested in are the same for each day you just need to fill in the first line and then click on "Copy and paste first row" and all the other days will be filled in automatically based on the values you've specified for the first day.
Click "Next" once you're happy with the times.
It is generally best to select "you send the invitation" as it's a lot easier for various reasons not least of which is that people can be funny about sharing email addresses on websites - whatever the privacy policy of that website. Unless the people in your meeting have agreed to use Doodle (or used it previously) then I'd recommend sending the invitation yourself.
This final page shows you the URL's for your Doodle;
The participation link is the one you need to copy/paste into an email to send to everyone who you want to attend your meeting. You can use distribution lists, each person will be treated separately by Doodle. The Administration link is specific to you and will allow you to track peoples responses (you can also visit the Administration page for a reminder of the participation link).
Friday, August 21, 2009
Oracle EBS: Monitoring Oracle e-Business Suite Using SQL
This Knol covers adding a stored procedure and some tables to the Oracle database that will allow you to monitor settings within Oracle so that, for example, if you clone your live system to a development machine and then apply a patch you will be able to instantly see what has changed.
How It Works
This couldn't be simpler; the table SYSCHECKLIST contains many small SQL queries. Each of these returns "OK" (a single row) when it is successfully run against the Oracle database.
It's probably easiest to look at an example. If we take Profile Options. This is one area of Oracle that can be quite difficult to monitor. We can all see what they are now but what were they last week?! In the e-Business Suite profile options are stored in the two tables FND_PROFILE_OPTIONS and FND_PROFILE_OPTION_VALUES. Taking as an example the SITENAME profile option. If your site happened to be called "Production System" then you could write some SQL that would check this;
select 'OK'
from applsys.fnd_profile_option_values fpov
where fpov.application_id = 0
and fpov.profile_option_id = 125
and fpov.level_id = 10001
and fpov.level_value = 0
and replace(nvl(fpov.profile_option_value, ''), '''', '
If your system had it's SITENAME set to "Production System" the query would return "OK". Otherwise it will either return nothing (if the site is called something else), multiple records if there are multiple entries (should be impossible, but you never know!), or an error if the SQL is invalid (such as Oracle dropping either of the tables in a patch - let's hope that never happens!).
By running this test on a daily basis if someone changes the profile option you will be notified.
By stringing together a group of these queries we can check multiple parts of the system. The table SYSTESTRESULT contains the results of previous runs (for those space-conscious DBA's the data in this table is cleared down after a month - you can adjust this in the SQL below).
Setting Up The Database
The database component of this monitoring suite comprises of two tables (SYSCHECKLIST, and SYSCHECKRESULT) and a package (SYSCHECK). The SQL to create each of the tables is;
create table SYSCHECKLIST
(
TEST_REF VARCHAR2(10) not null,
TEST_DESC VARCHAR2(80) not null,
TEST_SQL CLOB not null
);
create table SYSCHECKRESULT
(
TEST_REF VARCHAR2(10) not null,
TEST_DATE DATE not null,
TEST_RESULT VARCHAR2(255) not null
);
It should be noted that I'm not saying anything here about schemas and permissions here. I created the tables under our APPS schema but then I work for a small company and that's out policy. Your company will probably be different - I know some (most?) companies can be very strict about creating objects in the APPS schema and it's not exactly something Oracle recommends!
Of course using the APPS schema means you don't have permissions problems with your queries (i.e. your schema owner will need to be granted select for everything it's wants to check).
The SQL to create the package (and package body) is;
Package Specification
Package Body
It's quite long so I've moved it to my Google Documents pages - any problems add a comment!
The functions in the package check either one test, all tests, or all tests (run as a concurrent request). Setting up a concurrent request is a lot more work so I'll cover that as a separate Knol when I get the chance but you do just need to create an executable pointing at the SYSCHECK.RUNALLTESTSCR procedure, and then a program pointing at the executable (not forgetting to create an incompatibility that will prevent the checks being run simultaneously) and you're there.
NOTE: I've updated the source code associated with this Knol as it was taking too long to churn through 500,000 checks. It now only logs a result if the result is something other than "OK". Which I guess is kind of what you want.
Running The Tests as a Report
A useful feature of the way the information is setup is that you can write a report that will actually run the tests. The SQL needed to do this is;
SYSCheck Report SQL
This SQL checks to see if the first test has been run today. If it has then it simply presents the results from that test, if it hasn't then it runs the tests. The SQL is split into three parts separated by the "UNION" statements. The first part will run the report if the number of records found in SYSCHECKRESULT for today is zero (the +1 will make the WHERE clause "rownum = 1" which will return one row, which will then trigger calling the report. "rownum > 1" will never return anything - the joys of oracle!).
The second part looks for failed records (where TEST_RESULT <> 'OK'), it does this by getting a count of all records for today and if this count is greater than zero it displays the with the failure total.
The final part looks for successes (hopefully this will be the most common part). It has two conditions to the WHERE clause the first checks to make sure there are no failures, and second checks to make sure there are successes (otherwise parts 1 and 3 will display at the same time).
Sample Tests
Checking System and Application Profile Options
This is an example of when you want to check the same thing again and again. So it's easier, rather than just taking the options one at a time and creating a test for each one, to write a script that will go through the profile options tables (FND_PROFILE_OPTIONS and FND_PROFILE_OPTION_VALUES) and build the tests for you. Looking at our production system we have approximately 4,000 profile options so one-at-a-time was never going to work for us!
Here is the script;
SYSCheck Demo - Profile Options
As you can see from the script a "Template" test is stored in the variable v_SQLTemplate, this is then updated and written into the SYSCHECKLIST table for each profile option returned by the query.
I have added some additional code to the comparison against PROFILE_OPTION_VALUE and the actual value so that quotes and null values are correctly compared. This will lead to a very slight performance hit. If you're worried about this (I'm not) then you can fix it by creating different types of rules based on the actual profile option value (null, not null, contains quotes, etc) - that's a lot of work for not much benefit if you ask me, but I'm a "getting it to work" person not a SQL purist!
I have restricted the profile options I'm checking to those are the SITE and APPLICATION level rather than just checking all options as, to be honest, these are the ones I'm worried about.
Checking the text of messages in FND_NEW_MESSAGES
This is another example of using a script to generate tests form existing database records.
This script looks at the text of messages in the table and checks to see if the message has changed.
Here is the script;
SYSCheck Demo - FND New Messages
The script is only checking US language messages but it should be fairly simple to change this to check messages for other languages.
Monitoring Table/Column Changes
This script allows you to monitor the datatypes and sizes of all the database tables Tables and columns. Needless to say on a large database this can be quite a substantual number: on our Oracle e-Business Suite implementation this is a little under 600,000 checks.
Here is the script;
SYSCheck Demo - Table/Column Changes
Needless to say if you're adding 600,000 checks to the routine then it will take substantually longer to complete - especially if you are logging successes as well as failures!
How It Works
This couldn't be simpler; the table SYSCHECKLIST contains many small SQL queries. Each of these returns "OK" (a single row) when it is successfully run against the Oracle database.
It's probably easiest to look at an example. If we take Profile Options. This is one area of Oracle that can be quite difficult to monitor. We can all see what they are now but what were they last week?! In the e-Business Suite profile options are stored in the two tables FND_PROFILE_OPTIONS and FND_PROFILE_OPTION_VALUES. Taking as an example the SITENAME profile option. If your site happened to be called "Production System" then you could write some SQL that would check this;
select 'OK'
from applsys.fnd_profile_option_values fpov
where fpov.application_id = 0
and fpov.profile_option_id = 125
and fpov.level_id = 10001
and fpov.level_value = 0
and replace(nvl(fpov.profile_option_value, '
') = 'Production System'
If your system had it's SITENAME set to "Production System" the query would return "OK". Otherwise it will either return nothing (if the site is called something else), multiple records if there are multiple entries (should be impossible, but you never know!), or an error if the SQL is invalid (such as Oracle dropping either of the tables in a patch - let's hope that never happens!).
By running this test on a daily basis if someone changes the profile option you will be notified.
By stringing together a group of these queries we can check multiple parts of the system. The table SYSTESTRESULT contains the results of previous runs (for those space-conscious DBA's the data in this table is cleared down after a month - you can adjust this in the SQL below).
Setting Up The Database
The database component of this monitoring suite comprises of two tables (SYSCHECKLIST, and SYSCHECKRESULT) and a package (SYSCHECK). The SQL to create each of the tables is;
create table SYSCHECKLIST
(
TEST_REF VARCHAR2(10) not null,
TEST_DESC VARCHAR2(80) not null,
TEST_SQL CLOB not null
);
create table SYSCHECKRESULT
(
TEST_REF VARCHAR2(10) not null,
TEST_DATE DATE not null,
TEST_RESULT VARCHAR2(255) not null
);
It should be noted that I'm not saying anything here about schemas and permissions here. I created the tables under our APPS schema but then I work for a small company and that's out policy. Your company will probably be different - I know some (most?) companies can be very strict about creating objects in the APPS schema and it's not exactly something Oracle recommends!
Of course using the APPS schema means you don't have permissions problems with your queries (i.e. your schema owner will need to be granted select for everything it's wants to check).
The SQL to create the package (and package body) is;
Package Specification
Package Body
It's quite long so I've moved it to my Google Documents pages - any problems add a comment!
The functions in the package check either one test, all tests, or all tests (run as a concurrent request). Setting up a concurrent request is a lot more work so I'll cover that as a separate Knol when I get the chance but you do just need to create an executable pointing at the SYSCHECK.RUNALLTESTSCR procedure, and then a program pointing at the executable (not forgetting to create an incompatibility that will prevent the checks being run simultaneously) and you're there.
NOTE: I've updated the source code associated with this Knol as it was taking too long to churn through 500,000 checks. It now only logs a result if the result is something other than "OK". Which I guess is kind of what you want.
Running The Tests as a Report
A useful feature of the way the information is setup is that you can write a report that will actually run the tests. The SQL needed to do this is;
SYSCheck Report SQL
This SQL checks to see if the first test has been run today. If it has then it simply presents the results from that test, if it hasn't then it runs the tests. The SQL is split into three parts separated by the "UNION" statements. The first part will run the report if the number of records found in SYSCHECKRESULT for today is zero (the +1 will make the WHERE clause "rownum = 1" which will return one row, which will then trigger calling the report. "rownum > 1" will never return anything - the joys of oracle!).
The second part looks for failed records (where TEST_RESULT <> 'OK'), it does this by getting a count of all records for today and if this count is greater than zero it displays the with the failure total.
The final part looks for successes (hopefully this will be the most common part). It has two conditions to the WHERE clause the first checks to make sure there are no failures, and second checks to make sure there are successes (otherwise parts 1 and 3 will display at the same time).
Sample Tests
Checking System and Application Profile Options
This is an example of when you want to check the same thing again and again. So it's easier, rather than just taking the options one at a time and creating a test for each one, to write a script that will go through the profile options tables (FND_PROFILE_OPTIONS and FND_PROFILE_OPTION_VALUES) and build the tests for you. Looking at our production system we have approximately 4,000 profile options so one-at-a-time was never going to work for us!
Here is the script;
SYSCheck Demo - Profile Options
As you can see from the script a "Template" test is stored in the variable v_SQLTemplate, this is then updated and written into the SYSCHECKLIST table for each profile option returned by the query.
I have added some additional code to the comparison against PROFILE_OPTION_VALUE and the actual value so that quotes and null values are correctly compared. This will lead to a very slight performance hit. If you're worried about this (I'm not) then you can fix it by creating different types of rules based on the actual profile option value (null, not null, contains quotes, etc) - that's a lot of work for not much benefit if you ask me, but I'm a "getting it to work" person not a SQL purist!
I have restricted the profile options I'm checking to those are the SITE and APPLICATION level rather than just checking all options as, to be honest, these are the ones I'm worried about.
Checking the text of messages in FND_NEW_MESSAGES
This is another example of using a script to generate tests form existing database records.
This script looks at the text of messages in the table and checks to see if the message has changed.
Here is the script;
SYSCheck Demo - FND New Messages
The script is only checking US language messages but it should be fairly simple to change this to check messages for other languages.
Monitoring Table/Column Changes
This script allows you to monitor the datatypes and sizes of all the database tables Tables and columns. Needless to say on a large database this can be quite a substantual number: on our Oracle e-Business Suite implementation this is a little under 600,000 checks.
Here is the script;
SYSCheck Demo - Table/Column Changes
Needless to say if you're adding 600,000 checks to the routine then it will take substantually longer to complete - especially if you are logging successes as well as failures!
Subscribe to:
Posts (Atom)